
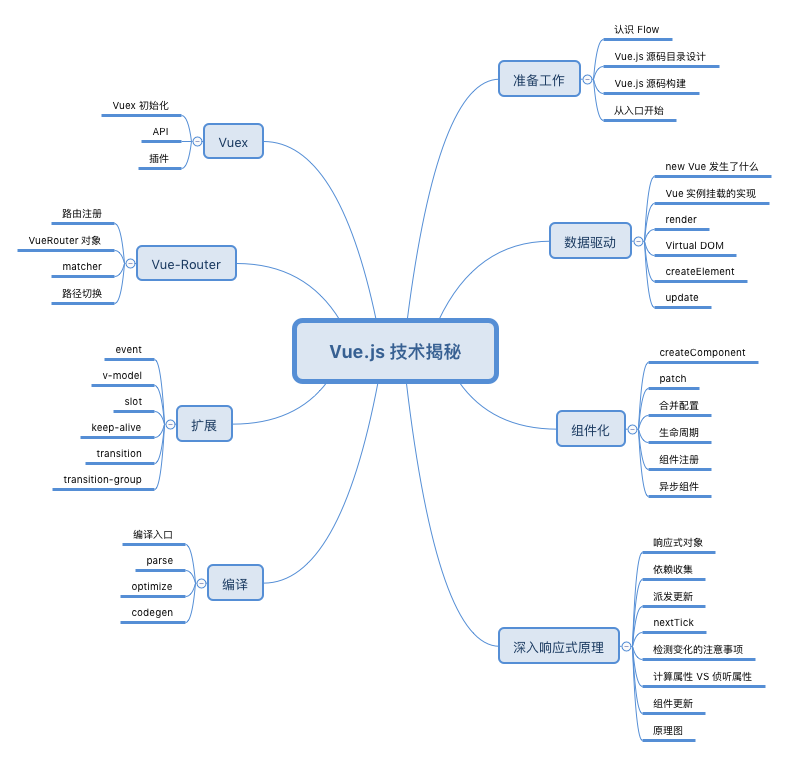
17.Vue基础
17.Vue基础
Fantastic-admin —— 一款开箱即用的 Vue 中后台管理系统框架(支持Vue2/Vue3)
https://cn.vuejs.org/guide/introduction.html
尚硅谷教程:https://www.bilibili.com/video/BV1Zy4y1K7SH/
是一款用于构建用户界面的 JavaScript 框架
- 组件化开发模式,提高代码的复用率
- 声明式编码,可以无需操作DOM,提高开发效率
需要掌握的JavaScript 知识
ES6语法规范
ES6模块化
包管理器
原型,原型链
数组常用方法
axios
promise
1. vue安装/搭建项目
搭建项目步骤
① 安装 Vue 脚手架
② 通过 Vue 脚手架创建项目
③ 配置 Vue 路由
④ 配置 Element-UI 组件库
⑤ 配置 axios 库
⑥ 初始化 git 远程仓库
⑦ 将本地项目托管到 Github 或 码云 中
1.1 基本介绍
参考网址:
轻量级,双向数据绑定的UI层渐进式框 架;
同时兼具了React和Angular的优点,并剔除它们的缺点;
官网文档清晰、易于理解;
学习成本低。
2.vue 基础知识
2.1 vue 简介
官方给 vue 的定位是前端框架,因为它提供了构建用户界面的一整套解决方案(俗称 vue 全家桶):
- vue(核心库)
- vue-router(路由方案)
- vuex(状态管理方案)
- vue 组件库(快速搭建页面 UI 效果的方案) 以及辅助 vue 项目开发的一系列工具:
- vue-cli(npm 全局包:一键生成工程化的 vue 项目 - 基于 webpack、大而全)
- vite(npm 全局包:一键生成工程化的 vue 项目 - 小而巧)
- vue-devtools(浏览器插件:辅助调试的工具)
- vetur(vscode 插件:提供语法高亮和智能提示)
vue 框架的特性,主要体现在如下两方面:
① 数据驱动视图
② 双向数据绑定
2.2 模板语法
- 差值表达式
- 指令
- 事件绑定
- 属性绑定
- 样式绑定
- 分支循环结构
2.3指令
- v-text
- v-html
- v-show
v-ifv-elsev-else-if- v-for
- v-on
- v-bind
- v-model
- v-slot
- v-pre
- v-once
- v-memo
- v-cloak
2.3.1 v-bind 说明
<!-- 绑定 attribute -->
<img v-bind:src="imageSrc" />

<!-- 动态 attribute 名 -->
<button v-bind:[key]="value"></button>

<!-- 缩写 -->
<img :src="imageSrc" />

<!-- 缩写形式的动态 attribute 名 -->
<button :[key]="value"></button>

<!-- 内联字符串拼接 -->
<img :src="'/path/to/images/' + fileName" />

<!-- class 绑定 -->
<div :class="{ red: isRed }"></div>
<div :class="[classA, classB]"></div>
<div :class="[classA, { classB: isB, classC: isC }]"></div>

<!-- style 绑定 -->
<div :style="{ fontSize: size + 'px' }"></div>
<div :style="[styleObjectA, styleObjectB]"></div>

<!-- 绑定对象形式的 attribute -->
<div v-bind="{ id: someProp, 'other-attr': otherProp }"></div>

<!-- prop 绑定。“prop” 必须在子组件中已声明。 -->
<MyComponent :prop="someThing" />

<!-- 传递子父组件共有的 prop -->
<MyComponent v-bind="$props" />

<!-- XLink -->
<svg><a :xlink:special="foo"></a></svg>
2.3.2 v-slot 插槽
<div class="from-content">
    <slot name="headContentSlot">
        <!--自定义插槽-->
    </slot>
</div>
<form-head-layout title="人员待办" :checkIndex="listType" :tabs="tabs" @checkTab="checkTab" >
    <template slot="headContentSlot">
		<!--自定义插槽 内容-->
    </template>
</form-head-layout>
<template #headContentSlot="headContentSlot">
	<!--自定义插槽 内容-->
</template>
2.3.3 v-on 事件绑定
默认传递 event 如果需要自定义 传参 $event 列如:
@click="doThat('hello', $event)event.target
给元素绑定事件监听器。
缩写:
@参数:
event(使用对象语法则为可选项)修饰符:
1.事件修饰符
.stop——调用event.stopPropagation()。.prevent——调用event.preventDefault()。.capture——在捕获模式添加事件监听器。.self——只有事件从元素本身发出才触发处理函数。.{keyAlias}——只在某些按键下触发处理函数。.once——最多触发一次处理函数。.left——只在鼠标左键事件触发处理函数。.right——只在鼠标右键事件触发处理函数。.middle——只在鼠标中键事件触发处理函数。.passive——通过{ passive: true }附加一个 DOM 事件。
2.按键修饰符 事件修饰符可以对所有事件进行修饰,按键修饰符用于对键盘事件进行修饰,键盘事件:比如keyup,keydown等等 vue中的键盘修饰符
.enter:对回车键修饰
.tab:对tab键修饰
.delete(捕获删除和退格键)
.esc:对esc修饰
.space:对空格修饰
.up:对 上
.down:对 下
.left:对 左
.right:对 右
<!-- 方法处理函数 -->
<button v-on:click="doThis"></button>

<!-- 动态事件 -->
<button v-on:[event]="doThis"></button>

<!-- 内联声明 -->
<button v-on:click="doThat('hello', $event)"></button>

<!-- 缩写 -->
<button @click="doThis"></button>

<!-- 使用缩写的动态事件 -->
<button @[event]="doThis"></button>

<!-- 停止传播 -->
<button @click.stop="doThis"></button>

<!-- 阻止默认事件 -->
<button @click.prevent="doThis"></button>

<!-- 不带表达式地阻止默认事件 -->
<form @submit.prevent></form>

<!-- 链式调用修饰符 -->
<button @click.stop.prevent="doThis"></button>

<!-- 按键用于 keyAlias 修饰符-->
<input @keyup.enter="onEnter" />

<!-- 点击事件将最多触发一次 -->
<button v-on:click.once="doThis"></button>

<!-- 对象语法 -->
<button v-on="{ mousedown: doThis, mouseup: doThat }"></button>
2.3.4 v-model 原理
<input v-model="searchText" />

<!--上面的代码其实等价于下面这段 (编译器会对 v-model 进行展开):-->

<input  :value="searchText"  @input="searchText = $event.target.value"/>
2.3.5 v-for
循环数组,也可以遍历对象
<div v-for="(item, index) in list"></div>
<div v-for="item in list"></div>

<div v-for="(value, name, index) in object"></div>
2.4 Class 与 Style 绑定
2.4.1 class
1 绑定对象
- 第一种
<div :class="{ active: isActive }"></div>
- 第二种
isActive=true hasError=true 则
<div class="active text-danger"> </div
<div :class="{ active: isActive ,'text-danger': hasError }"></div>
- 第三种
<div :class="classObject"></div>
data() {
  return {
    classObject: {
      active: true,
      'text-danger': false
    }
  }
}
2 绑定数组
data() {
  return {
    activeClass: 'active',
    errorClass: 'text-danger'
  }
}
<div :style="[baseStyles, overridingStyles]"></div>
或者
<div :class="[isActive ? activeClass : '', errorClass]"></div>
数组中嵌对象
<div :class="[{ active: isActive }, errorClass]"></div>
2.4.2 Style
写法同 class
:style 支持绑定 JavaScript 对象值,对应的是 HTML 元素的 style 属性:
<div :style="{ color: activeColor, fontSize: fontSize + 'px' }"></div>
尽管推荐使用 camelCase,但 :style 也支持 kebab-cased 形式的 CSS 属性 key (对应其 CSS 中的实际名称),例如:
<div :style="{ 'font-size': fontSize + 'px' }"></div>
3.自定义指令
https://cn.vuejs.org/guide/reusability/custom-directives.html
Vue.directive 注册全局指令
<!--
  使用自定义的指令,只需在对用的元素中,加上'v-'的前缀形成类似于内部指令'v-if','v-text'的形式。
-->
<input type="text" v-focus>
<script>
// 注意点:
//   1、 在自定义指令中  如果以驼峰命名的方式定义 如  Vue.directive('focusA',function(){})
//   2、 在HTML中使用的时候 只能通过 v-focus-a 来使用

// 注册一个全局自定义指令 v-focus
Vue.directive('focus', {
  	// 当绑定元素插入到 DOM 中。 其中 el为dom元素
  	inserted: function (el) {
    		// 聚焦元素
    		el.focus();
 	}
});
new Vue({
  el:'#app'
});
</script>
Vue.directive 注册全局指令 带参数
  <input type="text" v-color='msg'>
 <script type="text/javascript">
    /*
      自定义指令-带参数
      bind - 只调用一次,在指令第一次绑定到元素上时候调用

    */
    Vue.directive('color', {
      // bind声明周期, 只调用一次,指令第一次绑定到元素时调用。在这里可以进行一次性的初始化设置
      // el 为当前自定义指令的DOM元素
      // binding 为自定义的函数形参   通过自定义属性传递过来的值 存在 binding.value 里面
      bind: function(el, binding){
        // 根据指令的参数设置背景色
        // console.log(binding.value.color)
        el.style.backgroundColor = binding.value.color;
      }
    });
    var vm = new Vue({
      el: '#app',
      data: {
        msg: {
          color: 'blue'
        }
      }
    });
  </script>
自定义指令局部指令
- 局部指令,需要定义在 directives 的选项 用法和全局用法一样
- 局部指令只能在当前组件里面使用
- 当全局指令和局部指令同名时以局部指令为准
<input type="text" v-color='msg'>
 <input type="text" v-focus>
 <script type="text/javascript">
    /*
      自定义指令-局部指令
    */
    var vm = new Vue({
      el: '#app',
      data: {
        msg: {
          color: 'red'
        }
      },
   	  //局部指令,需要定义在  directives 的选项
      directives: {
        color: {
          bind: function(el, binding){
            el.style.backgroundColor = binding.value.color;
          }
        },
        focus: {
          inserted: function(el) {
            el.focus();
          }
        }
      }
    });
  </script>
4. 计算属性 computed
[kəmˈpjuːtɪd]
计算属性与方法的区别:计算属性是基于依赖进行缓存的,而方法不缓存
 <div id="app">
     <!--
        当多次调用 reverseString  的时候
        只要里面的 msg 值不改变 他会把第一次计算的结果直接返回
		直到data 中的msg值改变 计算属性才会重新发生计算
     -->
    <div>{{reverseString}}</div>
    <div>{{reverseString}}</div>
     <!-- 调用methods中的方法的时候  他每次会重新调用 -->
    <div>{{reverseMessage()}}</div>
    <div>{{reverseMessage()}}</div>
  </div>
  <script type="text/javascript">
    /*
      计算属性与方法的区别:计算属性是基于依赖进行缓存的,而方法不缓存
    */
    var vm = new Vue({
      el: '#app',
      data: {
        msg: 'Nihao'
      },
      methods: {
        reverseMessage: function(){
          console.log('methods')
          return this.msg.split('').reverse().join('');
        }
      },
      //computed  属性 定义 和 data 已经 methods 平级
      computed: {
        //  reverseString   这个是我们自己定义的名字
        reverseString: function(){
          console.log('computed')
         return this.msg.split('').reverse().join('');
        }
      }
    });
  </script>
使用computed计算属性传参
vue中computed计算属性无法直接进行传参,如果有传参数的需求可以使用闭包函数(也叫匿名函数)实现。例如传过来不同的状态,我们设置成不同的颜色。(三目运算符可以实现但是只能设置两种,状态多了就不行了)
computed: {
    statusColor() {
      return function(val) {
        console.log(val);//根据val进行操作
      };
    },
  },
computed: {
			evaluationStatus() {
				const hasNoResponsibilities = this.row[this.column.code] && this.row[this.column.code].length === 0;// 是否存在 职责
				let isVisible = false;
				let displayText = '';
				if (this.viewMode === 'add') {
					isVisible = false; // 添加模式下不显示
				} else if (this.viewMode === 'preview') { // 预案详情模式
					isVisible = hasNoResponsibilities;
					displayText = '无职责';
				} else if (this.viewMode === 'evaluation') { // 评估模式
					isVisible = true;
					displayText = hasNoResponsibilities ? '缺席' : '';
				}

				return {isVisible, displayText};
			},
			isVisible() {
				return this.evaluationStatus.isVisible;
			},
			displayText() {
				return this.evaluationStatus.displayText;
			},
			iconClass() {
				if (this.evaluationStatus.displayText === '缺席') {
					return 'icon-quexishenpanqingkuang';
				} else if (this.evaluationStatus.displayText === '无职责') {
					return 'icon-bohui';
				}
				return '';
			},
		},
- 场景:
5. 侦听器 watch
- 使用watch来响应数据的变化
- 一般用于异步或者开销较大的操作
- watch 中的属性 一定是data 中 已经存在的数据
- 当需要监听一个对象的改变时,普通的watch方法无法监听到对象内部属性的改变,只有data中的数据才能够监听到变化,此时就需要deep属性对对象进行深度监听
export default {
  watch: {
    someObject: {
      handler(newValue, oldValue) {
        // 注意:在嵌套的变更中,
        // 只要没有替换对象本身,
        // 那么这里的 `newValue` 和 `oldValue` 相同
      },
      //watch 默认是浅层的:被侦听的属性,仅在被赋新值时,才会触发回调函数——而嵌套属性的变化不会触发。如果想侦听所有嵌套的变更,你需要深层侦听器:
      deep: true
    }
  }
}
6. 过滤器(vue3没有)
- Vue.js允许自定义过滤器,可被用于一些常见的文本格式化。
- 过滤器可以用在两个地方:双花括号插值和v-bind表达式。
- 过滤器应该被添加在JavaScript表达式的尾部,由“管道”符号指示
- 支持级联操作
- 过滤器不改变真正的
data,而只是改变渲染的结果,并返回过滤后的版本 - 全局注册时是filter,没有s的。而局部过滤器是filters,是有s的
6.1 全局
   Vue.filter('lower', function(val) {
      return val.charAt(0).toLowerCase() + val.slice(1);
    });
6.1 局部
  <div id="app">
    <input type="text" v-model='msg'>
      <!-- upper 被定义为接收单个参数的过滤器函数,表达式  msg  的值将作为参数传入到函数中 -->
    <div>{{msg | upper}}</div>
    <!--
      支持级联操作
      upper  被定义为接收单个参数的过滤器函数,表达式msg 的值将作为参数传入到函数中。
	  然后继续调用同样被定义为接收单个参数的过滤器 lower ,将upper 的结果传递到lower中
 	-->
    <div>{{msg | upper | lower}}</div>
    <div :abc='msg | upper'>测试数据</div>
  </div>

<script type="text/javascript">
   //  lower  为全局过滤器
   Vue.filter('lower', function(val) {
      return val.charAt(0).toLowerCase() + val.slice(1);
    });
    var vm = new Vue({
      el: '#app',
      data: {
        msg: ''
      },
       //filters  属性 定义 和 data 已经 methods 平级
       //  定义filters 中的过滤器为局部过滤器
      filters: {
        //   upper  自定义的过滤器名字
        //    upper 被定义为接收单个参数的过滤器函数,表达式  msg  的值将作为参数传入到函数中
        upper: function(val) {
         //  过滤器中一定要有返回值 这样外界使用过滤器的时候才能拿到结果
          return val.charAt(0).toUpperCase() + val.slice(1);
        }
      }
    });
  </script>
6.3 过滤器中传递参数
<div id="box">
    <!--
    filterA 被定义为接收三个参数的过滤器函数。
    其中 message 的值作为第一个参数,
    普通字符串 'arg1' 作为第二个参数,表达式 arg2 的值作为第三个参数。
    -->
    {{ message | filterA('arg1', 'arg2') }}
</div>
<script>
    // 在过滤器中 第一个参数 对应的是  管道符前面的数据   n  此时对应 message
    // 第2个参数  a 对应 实参  arg1 字符串
    // 第3个参数  b 对应 实参  arg2 字符串
    Vue.filter('filterA',function(n,a,b){
        if(n<10){
            return n+a;
        }else{
            return n+b;
        }
    });

    new Vue({
        el:"#box",
        data:{
            message: "哈哈哈"
        }
    })

</script>
7.生命周期
- 事物从出生到死亡的过程
- Vue实例从创建 到销毁的过程 ,这些过程中会伴随着一些函数的自调用。我们称这些函数为钩子函数
常用的 钩子函数
| beforeCreate | 在实例初始化之后,数据观测和事件配置之前被调用 此时data 和 methods 以及页面的DOM结构都没有初始化 什么都做不了 |
|---|---|
| created | 在实例创建完成后被立即调用此时data 和 methods已经可以使用 但是页面还没有渲染出来 |
| beforeMount | 在挂载开始之前被调用 此时页面上还看不到真实数据 只是一个模板页面而已 |
| mounted [ˈmaʊntɪd] | el被新创建的vm.$el替换,并挂载到实例上去之后调用该钩子。 数据已经真实渲染到页面上 在这个钩子函数里面我们可以使用一些第三方的插件 |
| beforeUpdate | 数据更新时调用,发生在虚拟DOM打补丁之前。 页面上数据还是旧的 |
| updated | 由于数据更改导致的虚拟DOM重新渲染和打补丁,在这之后会调用该钩子。 页面上数据已经替换成最新的 |
| beforeDestroy | 实例销毁之前调用 |
| destroyed [dɪˈstrɔɪd] | 实例销毁后调用 |
| deactivated | 该钩子函数配合keep-alive来使用,使用了keep-alive就不会调用beforeDestory和destoryed钩子了,因为组件没有被销毁,而是被缓存起来了,所以deactivated钩子可以看做是beforeDestory和destoryed的替代。 |
添加keep-alive标签后会增加activated和deactivated这两个生命周期函数,初始化操作放在actived里面,一旦切换组件,因为组件没有被销毁,所以它不会执行销毁阶段的钩子函数,所以移除操作需要放在deactived里面,在里面进行一些善后操作,这个时候created钩子函数只会执行一次,销毁的钩子函数一直没有执行。 原文链接:https://blog.csdn.net/muzidigbig/article/details/112696398
activated
vue2/3生命周期钩子对照表
| Vue 2 | Vue 3 |
|---|---|
| beforeDestroy | beforeUnmount |
| destroyed | unmounted |
| deactivated | deactivated |
| activated | activated |
vue3 下 的 监听组件被激活的事件
import { onActivated } from 'vue';

export default {
  setup() {
    onActivated(() => {
      console.log('Component activated');
    });
  }
}
8. 组件
https://blog.csdn.net/weixin_41654160/article/details/118653612
引入组件2中方式
1. 注册为全局组件
在main.js 中
import Vue from 'vue';
import VueDragResize from 'vue-drag-resize';

Vue.component('vue-drag-resize', VueDragResize)
2. 局部引入
# 在需要的组件中引入
 import VueDragResize from 'vue-drag-resize';
  export default {
      name: 'app',
      components: {
          VueDragResize
      },
  }
3. vue 2 引入组件
<div id="example">
  <!-- 2、 组件使用 组件名称 是以HTML标签的形式使用  -->
  <my-component></my-component>
</div>
<script>
    //   注册组件
    // 1、 my-component 就是组件中自定义的标签名
	Vue.component('my-component', {
      template: '<div>A custom component!</div>'
    })

    // 创建根实例
    new Vue({
      el: '#example'
    })

</script>
局部注册
- 只能在当前注册它的vue实例中使用
  <div id="app">
      <my-component></my-component>
  </div>


<script>
    // 定义组件的模板
    var Child = {
      template: '<div>A custom component!</div>'
    }
    new Vue({
      //局部注册组件
      components: {
        // <my-component> 将只在父模板可用  一定要在实例上注册了才能在html文件中使用
        'my-component': Child
      }
    })
 </script>
9. 父子组件通信方式
通信种类
父组件向子组件通信
子组件向父组件通信
隔代组件间通信
兄弟组件间通信
实现通信方式
整理vue中8种常规的通信方案
- 通过 props 传递
- 通过 $emit 触发自定义事件
- 使用 ref
- EventBus
- root
- attrs 与 listeners
- Provide 与 Inject
- Vuex
emit
绑定监听:
this.$emit("eventName", data)
消息订阅与发布
- 需要引入消息订阅与发布的实现库, 如: pubsub-js
a. 订阅消息: PubSub.subscribe('msg', (msg, data)=>{})
b. 发布消息: PubSub.publish(‘msg’, data)
- 优点: 此方式可用于任意关系组件间通信
mitt
未整理,类似于 消息订阅与发布
vuex
是什么: vuex是vue官方提供的集中式管理vue多组件共享状态数据的vue插件
优点: 对组件间关系没有限制, 且相比于pubsub库管理更集中, 更方便
slot 插槽
- 是什么: 专门用来实现父向子传递带数据的标签
a. 子组件
b. 父组件
- 注意: 通信的标签模板是在父组件中解析好后再传递给子组件的
props
子组件无法修改父组件传递过来的参数
props 还可以定义以下属性:
- type:指定该 prop 的类型。可以是下列原生构造函数中的一种:String、Number、Boolean、Array、Object、Date、Function、Symbol。也可以是一个自定义构造函数或一个包含多个类型的数组。
- default:为该 prop 指定一个默认值。
- required:声明该 prop 是否为必需的,以布尔类型进行设置。
- validator:可以定义一个自定义的检验函数来验证传入的 prop 是否合法。这个函数应返回一个布尔值,如果返回 false 则会发出警告。在开发模式下发出警告,在生产模式下会抛出错误。
- coerce:将 prop 转换为另一个类型。例如:type 为 Number ,但是我们想要接收一个字符串,就可以采用该属性,在该选项中定义一个转换方法。
- set/get:自定义 prop 的 setter 和 getter 函数,以及在使用 v-model 时的事件名称。
props: {
  // String 类型带有默认值
  name: {
    type: String,
    default: 'binjie09'
  },
  // 数组类型,不具有默认值
  list: Array,
  // Number 类型,不具有默认值,且必须传入
  age: {
    type: Number,
    required: true
  },
  // 自定义校验函数
  email: {
    type: String,
    validator: function(value) {
      return /^[a-z]+@[a-z]+\.[a-z]+$/.test(value)
    }
  },
  // 转换为一个 Number 类型
  count: {
    coerce: function(value) {
      return Number(value)
    }
  },
  // 自定义 setter 和 getter
  propA: {
    set: function(newValue) {
      this.$emit('update:prop-a', newValue)
    },
    get: function() {
      return this.internalValue
    }
  }
}
props: ['visible'],
props: {
            remarks_title: '',
            itemObj: {
                type: Object,
                default: () => ({}),
            },
            proId: {
                type: [String, Number],
                default: undefined
            },
            theme: {
                type: String,
                default: 'blue',
                validator: (val) => ['blue', 'white'].includes(val)
            },
            title: {
                type: String,
                default: '标题'
            },
            sendClick: {
                type: Boolean,
            },
            businessId: '',// 业务主表id
            businessId: {
                type: Number,
            },
            businessId: {
                type: [Number,String]
            },
            tagList: {
                type: Array,
                default: () => [
                    {
                        tag: '缺陷部位:导线_本体',
                    },
                    // {
                    //   tag: '管控周期:蹲点',
                    // },
                    // {
                    //   tag: '管控周期:蹲点2',
                    // },
                ],
            },
            type: {
                type: String,
                default: 'base',
                validator: (val) => ['base', 'tab'].includes(val),
            },
        },
10. vue 父子组件调用
https://blog.csdn.net/qq_41956789/article/details/103064474
父组件传值到子组件
- 1.通过
props - 2.通过 绑定ref --针对数据是异步加载,通过
props会导致数据加载不出来
this.$nextTick(( )=>{
    this.$refs['xxx'].loadData(this.timeAxis);
})
<Particulars ref="form" :dataObject="detailData" :towerInfo="towerInfo" :sendClick="sendClickTrue"
                             @sonHandleCallback="hiddenView"></Particulars>
可以直接调 子组件data 中属性 dataFrom this.$refs.child.dataFrom
案例说明
<Eliminatepopup :businessId="detail.id" :key="index" title="xxx" v-if="showTrackPopup" @sonHandleCallback="sonHandleCallback"></Eliminatepopup>
父组件调用子组件会缓存数据,添加key 可以实现 子组件的销毁 ,例如表单提交,如果不销毁则会缓存之前填写的数据
:businessId="detail.id"定义了 对象 businessId 需要传递到子组数据// 子组件 export default { name: 'eliminatepopup', props: { detail: { type: Object, default: () => {}, }, title: { // 父组件传递过来的 字段,默认值是 "跟踪" type: String, default: '跟踪', }, businessId: Number// 父组件传递过来的参数 }, data () { return { } }, created () { // 页面初始化后绑定 业务id this.item.id=this.businessId; }, methods: { /** * 关闭、取消 按钮,触发 父组件的关闭方法 * 也可以 this.$parent.$parent.$parent.closePopup(); */ closePopup(){ var data={ type:'close' } this.$emit('sonHandleCallback', data);// 触发父组件方法 }, }, }
11. 接口调用
- 原生ajax
- 基于jQuery 的ajax
- fetch [fetʃ]
- axios
promise
- 主要解决异步深层嵌套的问题
- promise 提供了简洁的API 使得异步操作更加容易
var p = new Promise(function(resolve, reject){
    // 成功 resolve
    // 失败 reject
})
p.then(function(res){
    // 从 resolve  中获取正确结果
},function(res){
     // 从 reject  中获取失败结果
})

// 等价于
p.then(function(res){
    // 从 resolve  中获取正确结果
})
.catch(function(res){
     // 从 reject  中获取失败结果
})
实例方法
.then()
- 得到异步任务正确的结果
.catch()
- 获取异常信息
.finally()
- 成功与否都会执行(不是正式标准)
对象方法
.all()
Promise.all并发处理多个异步任务,所以任务都完成,才会返回结果
.race()
Promise.race并发处理多个异步任务,只要有一个任务完成就得到结果
export function mapGetAddress (lnglat) {
  return new Promise((resolve, reject) => {
    AMap.plugin('AMap.Geocoder', function () {
      const geocoder = new AMap.Geocoder({})
      geocoder.getAddress(lnglat, function (status, result) {
        if (status === 'complete' && result.info === 'OK') {
          resolve(result);
        } else {
          reject(result)
        }
      })
    })
  })
}
mapGetAddress([data.lnglat.lng, data.lnglat.lat]).then(res => {
   console.log( res)
}).catch(rej => {
    console.log( rej)
    throw (rej)
}).finally(() => {
    console.log('------')
})
  <script type="text/javascript">
    /*
      Promise常用API-对象方法
    */
    // console.dir(Promise)
    function queryData(url) {
      return new Promise(function(resolve, reject){
        var xhr = new XMLHttpRequest();
        xhr.onreadystatechange = function(){
          if(xhr.readyState != 4) return;
          if(xhr.readyState == 4 && xhr.status == 200) {
            // 处理正常的情况
            resolve(xhr.responseText);
          }else{
            // 处理异常情况
            reject('服务器错误');
          }
        };
        xhr.open('get', url);
        xhr.send(null);
      });
    }

    var p1 = queryData('http://localhost:3000/a1');
    var p2 = queryData('http://localhost:3000/a2');
    var p3 = queryData('http://localhost:3000/a3');
     Promise.all([p1,p2,p3]).then(function(result){
       //   all 中的参数  [p1,p2,p3]   和 返回的结果一 一对应["HELLO TOM", "HELLO JERRY", "HELLO SPIKE"]
       console.log(result) //["HELLO TOM", "HELLO JERRY", "HELLO SPIKE"]
     })
    Promise.race([p1,p2,p3]).then(function(result){
      // 由于p1执行较快,Promise的then()将获得结果'P1'。p2,p3仍在继续执行,但执行结果将被丢弃。
      console.log(result) // "HELLO TOM"
    })
  </script>
fetch
- Fetch API是新的ajax解决方案 Fetch会返回Promise
- fetch不是ajax的进一步封装,而是原生js,没有使用XMLHttpRequest对象。
- fetch(url, options).then()
  <script type="text/javascript">
    /*
      Fetch API 基本用法
      	fetch(url).then()
     	第一个参数请求的路径   Fetch会返回Promise   所以我们可以使用then 拿到请求成功的结果
    */
    fetch('http://localhost:3000/fdata').then(function(data){
      // text()方法属于fetchAPI的一部分,它返回一个Promise实例对象,用于获取后台返回的数据
      return data.text();
    }).then(function(data){
      //   在这个then里面我们能拿到最终的数据
      console.log(data);
    })
  </script>
fetch API 中的 HTTP 请求
- fetch(url, options).then()
- HTTP协议,它给我们提供了很多的方法,如POST,GET,DELETE,UPDATE,PATCH和PUT
- 默认的是 GET 请求
- 需要在 options 对象中 指定对应的 method method:请求使用的方法
- post 和 普通 请求的时候 需要在options 中 设置 请求头 headers 和 body
   <script type="text/javascript">
        /*
              Fetch API 调用接口传递参数
        */
       #1.1 GET参数传递 - 传统URL  通过url  ? 的形式传参
        fetch('http://localhost:3000/books?id=123', {
            	# get 请求可以省略不写 默认的是GET
                method: 'get'
            })
            .then(function(data) {
            	# 它返回一个Promise实例对象,用于获取后台返回的数据
                return data.text();
            }).then(function(data) {
            	# 在这个then里面我们能拿到最终的数据
                console.log(data)
            });

      #1.2  GET参数传递  restful形式的URL  通过/ 的形式传递参数  即  id = 456 和id后台的配置有关
        fetch('http://localhost:3000/books/456', {
            	# get 请求可以省略不写 默认的是GET
                method: 'get'
            })
            .then(function(data) {
                return data.text();
            }).then(function(data) {
                console.log(data)
            });

       #2.1  DELETE请求方式参数传递      删除id  是  id=789
        fetch('http://localhost:3000/books/789', {
                method: 'delete'
            })
            .then(function(data) {
                return data.text();
            }).then(function(data) {
                console.log(data)
            });

       #3 POST请求传参
        fetch('http://localhost:3000/books', {
                method: 'post',
            	# 3.1  传递数据
                body: 'uname=lisi&pwd=123',
            	#  3.2  设置请求头
                headers: {
                    'Content-Type': 'application/x-www-form-urlencoded'
                }
            })
            .then(function(data) {
                return data.text();
            }).then(function(data) {
                console.log(data)
            });

       # POST请求传参
        fetch('http://localhost:3000/books', {
                method: 'post',
                body: JSON.stringify({
                    uname: '张三',
                    pwd: '456'
                }),
                headers: {
                    'Content-Type': 'application/json'
                }
            })
            .then(function(data) {
                return data.text();
            }).then(function(data) {
                console.log(data)
            });

        # PUT请求传参     修改id 是 123 的
        fetch('http://localhost:3000/books/123', {
                method: 'put',
                body: JSON.stringify({
                    uname: '张三',
                    pwd: '789'
                }),
                headers: {
                    'Content-Type': 'application/json'
                }
            })
            .then(function(data) {
                return data.text();
            }).then(function(data) {
                console.log(data)
            });
    </script>
axios
- 基于promise用于浏览器和node.js的http客户端
- 支持浏览器和node.js
- 支持promise
- 能拦截请求和响应
- 自动转换JSON数据
- 能转换请求和响应数据
axios基础用法
- get和 delete请求传递参数
- 通过传统的url 以 ? 的形式传递参数
- restful 形式传递参数
- 通过params 形式传递参数
- post 和 put 请求传递参数
- 通过选项传递参数
- 通过 URLSearchParams 传递参数
    # 1. 发送get 请求
	axios.get('http://localhost:3000/adata').then(function(ret){
      #  拿到 ret 是一个对象      所有的对象都存在 ret 的data 属性里面
      // 注意data属性是固定的用法,用于获取后台的实际数据
      // console.log(ret.data)
      console.log(ret)
    })
	# 2.  get 请求传递参数
    # 2.1  通过传统的url  以 ? 的形式传递参数
	axios.get('http://localhost:3000/axios?id=123').then(function(ret){
      console.log(ret.data)
    })
    # 2.2  restful 形式传递参数
    axios.get('http://localhost:3000/axios/123').then(function(ret){
      console.log(ret.data)
    })
	# 2.3  通过params  形式传递参数
    axios.get('http://localhost:3000/axios', {
      params: {
        id: 789
      }
    }).then(function(ret){
      console.log(ret.data)
    })
	#3 axios delete 请求传参     传参的形式和 get 请求一样
    axios.delete('http://localhost:3000/axios', {
      params: {
        id: 111
      }
    }).then(function(ret){
      console.log(ret.data)
    })

	# 4  axios 的 post 请求
    # 4.1  通过选项传递参数
    axios.post('http://localhost:3000/axios', {
      uname: 'lisi',
      pwd: 123
    }).then(function(ret){
      console.log(ret.data)
    })
	# 4.2  通过 URLSearchParams  传递参数
    var params = new URLSearchParams();
    params.append('uname', 'zhangsan');
    params.append('pwd', '111');
    axios.post('http://localhost:3000/axios', params).then(function(ret){
      console.log(ret.data)
    })

 	#5  axios put 请求传参   和 post 请求一样
    axios.put('http://localhost:3000/axios/123', {
      uname: 'lisi',
      pwd: 123
    }).then(function(ret){
      console.log(ret.data)
    })
axios 全局配置
#  配置公共的请求头
axios.defaults.baseURL = 'https://api.example.com';
#  配置 超时时间
axios.defaults.timeout = 2500;
#  配置公共的请求头
axios.defaults.headers.common['Authorization'] = AUTH_TOKEN;
# 配置公共的 post 的 Content-Type
axios.defaults.headers.post['Content-Type'] = 'application/x-www-form-urlencoded';
axios 拦截器
- 请求拦截器
- 请求拦截器的作用是在请求发送前进行一些操作
- 例如在每个请求体里加上token,统一做了处理如果以后要改也非常容易
- 请求拦截器的作用是在请求发送前进行一些操作
- 响应拦截器
- 响应拦截器的作用是在接收到响应后进行一些操作
- 例如在服务器返回登录状态失效,需要重新登录的时候,跳转到登录页
- 响应拦截器的作用是在接收到响应后进行一些操作
	# 1. 请求拦截器
	axios.interceptors.request.use(function(config) {
      console.log(config.url)
      # 1.1  任何请求都会经过这一步   在发送请求之前做些什么
      config.headers.mytoken = 'nihao';
      # 1.2  这里一定要return   否则配置不成功
      return config;
    }, function(err){
       #1.3 对请求错误做点什么
      console.log(err)
    })
	#2. 响应拦截器
    axios.interceptors.response.use(function(res) {
      #2.1  在接收响应做些什么
      var data = res.data;
      return data;
    }, function(err){
      #2.2 对响应错误做点什么
      console.log(err)
    })
async 和 await
async/await 是ES7提出的基于Promise的解决异步的最终方案。
- async作为一个关键字放到函数前面
- 任何一个
async函数都会隐式返回一个promise
- 任何一个
await关键字只能在使用async定义的函数中使用- await后面可以直接跟一个 Promise实例对象
- await函数不能单独使用
- async/await 让异步代码看起来、表现起来更像同步代码
async function test(){
    let a = await getSomeThing();
    console.log(a)
}
也可以使用then
async function test(){
    let a = await getSomeThing();
    return a
}
test().then(function(data){
    console.log(data)
})
使用 const 对返回值解析
async function test(){
   const { data: res } = await getSomeThing();
}
 	# 1.  async 基础用法
    # 1.1 async作为一个关键字放到函数前面
	async function queryData() {
      # 1.2 await关键字只能在使用async定义的函数中使用      await后面可以直接跟一个 Promise实例对象
      var ret = await new Promise(function(resolve, reject){
        setTimeout(function(){
          resolve('nihao')
        },1000);
      })
      // console.log(ret.data)
      return ret;
    }
	# 1.3 任何一个async函数都会隐式返回一个promise   我们可以使用then 进行链式编程
    queryData().then(function(data){
      console.log(data)
    })

	#2.  async    函数处理多个异步函数
    axios.defaults.baseURL = 'http://localhost:3000';

    async function queryData() {
      # 2.1  添加await之后 当前的await 返回结果之后才会执行后面的代码

      var info = await axios.get('async1');
      #2.2  让异步代码看起来、表现起来更像同步代码
      var ret = await axios.get('async2?info=' + info.data);
      return ret.data;
    }

    queryData().then(function(data){
      console.log(data)
    })
案例
submitForm(formName) {
    this.$refs.loginFormRef.validate(async valid => {
        if (!valid) return
        const { data: res } = await this.$http.post('login', this.loginForm)
        if (res.meta.status !== 200) {
            this.$message.error('登录失败!')
            return
        }
        this.$message.success('登录成功')
        // 1. 将登录成功之后的 token,保存到客户端的 sessionStorage 中
        //   1.1 项目中出了登录之外的其他API接口,必须在登录之后才能访问
        //   1.2 token 只应在当前网站打开期间生效,所以将 token 保存在 sessionStorage 中
        window.sessionStorage.setItem('token', res.data.token)
        // 2. 通过编程式导航跳转到后台主页,路由地址是 /home
        //this.$router.push('/home')
    })
},
12. 路由
路由的基本概念
路由(英文:router)就是对应关系。
路由分为两大类:
① 后端路由
② 前端路由

SPA 与前端路由
SPA 指的是一个 web 网站只有唯一的一个 HTML 页面,所有组件的展示与切换都在这唯一的一个页面内完成。 此时,不同组件之间的切换需要通过前端路由来实现。
结论:在 SPA 项目中,不同功能之间的切换,要依赖于前端路由来完成!
是前端路由 通俗易懂的概念:Hash 地址与组件之间的对应关系
① 用户点击了页面上的路由链接
② 导致了 URL 地址栏中的 Hash 值发生了变化
③ 前端路由监听了到 Hash 地址的变化
④ 前端路由把当前 Hash 地址对应的组件渲染都浏览器中
component组件
<component :is="comName"></component>通过 is 指定组件名称,实现跳转,component在这里component是组件的占位符,主要用于展示不同的组件,即component就是一个动态组件
<button @click="comName = 'Left'">展示Left</button>
<button @click="comName = 'Right'">展示Right</button>
<div class="box">
    <!-- 渲染Left组件和Right组件 -->
    <!-- component组件是Vue内置的 -->
    <!-- is表示要渲染的组件的名字 -->
    <component :is="comName"></component>
</div>
<script>
    import Left from '@/compeonents/Left.vue'
    import Right from '@/components/Right.vue'
    export default {
        components: {
            Left,
            Right
        },
        data() {
            return {
                //comName 表示要展示的组件的名字
                comName: Left,
            }
        }
    }

</script>
vue-router 的基本用法
vue-router 是 vue.js 官方给出的路由解决方案。它只能结合 vue 项目进行使用,能够轻松的管理 SPA 项目 中组件的切换
vue-router 目前有 3.x 的版本和 4.x 的版本。其中:
- vue-router 3.x 只能结合 vue2 进行使用
- vue-router 4.x 只能结合 vue3 进行使用
vue-router 3.x 的官方文档地址:https://v3.router.vuejs.org/zh/
vue-router 4.x 的官方文档地址:https://next.router.vuejs.org/
vue-router 4.x 的基本使用步骤
- 引入相关库文件
- 声明路由链接和占位符
- 创建路由组件
- 创建路由模块
- 把路由挂在到Vue 根实例中
1.安装
npm install vue-router@4
## 或者
yarn add vue-router@4
2.声明路由链接和占位符
可以使用 标签来声明路由链接,并使用 标签来声明路由占位符。示例代码如下:
<script src="https://unpkg.com/vue@3"></script>
<script src="https://unpkg.com/vue-router@4"></script>

<div id="app">
  <h1>Hello App!</h1>
  <p>
    <!--使用 router-link 组件进行导航 -->
    <!--通过传递 `to` 来指定链接 -->
    <!--`<router-link>` 将呈现一个带有正确 `href` 属性的 `<a>` 标签-->
    <router-link to="/">Go to Home</router-link>
    <router-link to="/about">Go to About</router-link>
  </p>
  <!-- 路由出口 -->
  <!-- 路由匹配到的组件将渲染在这里 -->
  <router-view></router-view>
</div>
3. 创建路由模块
在项目中创建 router.js 路由模块,在其中按照如下 4 个步骤创建并得到路由的实例对象:
① 从 vue-router 中按需导入两个方法
② 导入需要使用路由控制的组件
③ 创建路由实例对象
④ 向外共享路由实例对象
⑤ 在 main.js 中导入并挂载路由模块
在src\router\index.js
import Vue from 'vue'
import Router from 'vue-router'
// 引入 自定义组件
import Login from '@/components/Login'
import Home from '@/components/Home'
import Welcome from '@/components/Welcome'
import users from '@/components/user/users'
import Roles from '@/components/power/Roles'

Vue.use(Router)

const router = new Router({
  routes: [
    { path: '/', redirect: '/login' },
    { path: '/login', component: Login },
    {
      path: '/home', component: Home, redirect: '/Welcome',
      children: [
        { path: '/welcome', component: Welcome },
        { path: '/users', component: users },
        { path: '/roles', component: Roles }
      ]
    }
  ]
})

// 挂载路由导航守卫
router.beforeEach((to, from, next) => {
  // to 将要访问的路径
  // from 代表从哪个路径跳转而来
  // next 是一个函数,表示放行
  //     next()  放行    next('/login')  强制跳转
  if (to.path === '/login') {
    return next();
  }
  // 获取token
  const tokenStr = window.sessionStorage.getItem('token');
  if (!tokenStr) {
    return next('/login');
  }
  next();
})

export default router
在 main.js中
import router from './router'


new Vue({
  router,
  render: h => h(App)
}).$mount('#app')
4. 重定向 redirect
{ path: '/', redirect: '/login' },
{ path: '/login', component: Login },
5. 嵌套路由
/user/profile                  			/user/posts
+------------------+                  +-----------------+
| User             |                  | User            |
| +--------------+ |                  | +-------------+ |
| | Profile      | |  +------------>  | | Posts       | |
| |              | |                  | |             | |
| +--------------+ |                  | +-------------+ |
+------------------+                  +-----------------+
const routes = [
  {
    path: '/user',
    component: User,
    children: [
      {
        path: 'profile',
        component: UserProfile,
      },
      {
        path: 'posts',
        component: UserPosts,
      },
    ],
  },
]
6.命名视图
<router-view class="view left-sidebar" name="LeftSidebar"></router-view>
<router-view class="view main-content"></router-view>
<router-view class="view right-sidebar" name="RightSidebar"></router-view>
const router = createRouter({
  history: createWebHashHistory(),
  routes: [
    {
      path: '/',
      components: {
        default: Home,
        // LeftSidebar: LeftSidebar 的缩写
        LeftSidebar,
        // 它们与 `<router-view>` 上的 `name` 属性匹配
        RightSidebar,
      },
    },
  ],
})
7.路由传参
路由传参分为 params 传参与 query 传参
params : 只能配合 name 使用,但是不能刷新,解决方法:路由参数要修改为
'/login/:username'(官方称为动态路由)、或者 可以考虑本地存储解决query : 传过去的参数会拼接在地址栏中(?name=xx)。query 较为灵活既可以配合 path 使用,也能配合 name 使用
name 最重要的一点就是配合 params 进行路由的参数传递
7.1 方式一:通过 params 传参
编程式:
data:{
  username: ''
},
login() {
  ...
  this.$router.push({
    name: 'home', //注意使用 params 时一定不能使用 path
    params: { username: this.username },
  })
}
声明式:
<router-link :to="{ name: 'home', params: { username: username } }">
取值:this.$route.params.username
7.2 方式二:通过 query 传参
编程式:
data:{
  username: ''
},
login() {
  ...
  this.$router.push({
    path: '/home',
    query: { username: this.username },
  })
}
声明式:
<router-link :to="{ path: '/home', query: { username: username } }">
取值:this.$route.query.username
params 传参后,刷新页面会失去拿到的参数。所以路由参数要修改为 '/login/:username'(官方称为动态路由)
const routes = [
  {
    path: '/login',
    component: Login
  },
  {
    path: '/home/:username',
    name: '/home',
    component: Home
  }
8. 路由懒加载
this_.test_timer = setTimeout(()=>{   //设置延迟执行
   	// 阻塞
    clearTimeout(this_.test_timer);  //清除延迟执行
},1000);

// dom 元素初始化完成后执行
this_.$nextTick(() => {
 this_._initScroll();
});
18. Vue中全局事件总线*$bus*使用
this.$bus.$on('refreshTaskNum', this.getTaskNumGroupProcDefKey); // 切记getTaskNumGroupProcDefKey 不能带括号
this.$bus.$emit('refreshTaskNum');
19. mixins 混入
20 其他
10. 下载文件
window.open(file.url,"_blank");
如果使用 axios ,会出现跨域问题
创建a标签进行下载,但是存在 问题,如果下载失败,会导致页面重定向--不建议使用 等同的还有
window.location.href = url;
const link = document.createElement("a"); //自己创建的a标签
link.href = file.url;
document.body.appendChild(link);
link.click();
document.body.removeChild(link);
window.URL.revokeObjectURL(file.url);
vue打开新窗口
gotoJkzx(){
    const loginName = this.$store.state.user.loginName;
    let url = this.$store.state.user.configItem.JKZX_URL||'http://61.190.54.213:19091/JKZX';
    const href= `${url}/sso/jkzx?from=jkzx&token=${loginName}@`
    window.open(href, "_blank");
}
shareProj(item){
      // 跳转参数
      const query ={
        from:'gdzjpt', // 系统来源
        companyId:item.companyId,
        proId:item.proId,
      }
      const queryStr = this.objectToQueryString(query); // 将对象转换为URL查询字符串
      /**
       * 对请求参数进行 编码
       * encodeURIComponent:编码
       * decodeuRIComponent:解码
       */
      let url = this.$store.state.user.configItem.screen_url||'http://8.136.114.254:9792';
      const href= url+'?'+encodeURIComponent(queryStr);

    // 复制路径
      copyToClipboard(href,()=>{
        console.log(href);
        this.msgSuccess("复制成功!");
      })
      // window.open(href, "_blank");
    },
    /**
     * 将对象转换为URL查询字符串
     *  使用JavaScript中的Object.entries()方法和Array.prototype.map()方法来实现将对象转换为URL查询字符串的操作
     * @param obj: 对象
     * @returns {string}  { a: 1, b: 2, c: 3 } =>   输出: a=1&b=2&c=3
     */
    objectToQueryString(obj) {
      return Object.entries(obj)
        .map(([key, value]) => `${encodeURIComponent(key)}=${encodeURIComponent(value)}`)
        .join('&');
    }
加密解密
请求参数加密
 import { Base64 } from '@/plugins/utils/jsencrypt';

var parameter = {
 	itemId: itemId  // 项目
 }
const base = new Base64();
const attachParams = base.encode(JSON.stringify(parameter));
复制文本
https://blog.csdn.net/weixin_57163112/article/details/128455074
 copyToClipboard("180****5313", () => {
        this.$message.success("手机号复制成功");
 });
// 复制文本
export const copyToClipboard = (text, callback) => {
    if (navigator.clipboard) {
        // clipboard api 复制
        navigator.clipboard.writeText(text);
    } else {
        var textarea = document.createElement('textarea');
        document.body.appendChild(textarea);
        // 隐藏此输入框
        textarea.style.position = 'fixed';
        textarea.style.clip = 'rect(0 0 0 0)';
        textarea.style.top = '10px';
        // 赋值
        textarea.value = text;
        // 选中
        textarea.select();
        // 复制
        document.execCommand('copy', true);
        // 移除输入框
        document.body.removeChild(textarea);
    }
    if (callback) callback(text)
};
<template>
  <div>
    <div
      ref="textToCopy"
      @dblclick="copyToClipboard"
      style="cursor: pointer; padding: 10px; border: 1px solid #ccc; width: 200px;">
      双击复制这段文本!
    </div>
    <p v-if="isCopied" style="color: green; margin-top: 10px;">文本已复制!</p>
  </div>
</template>

<script>
export default {
  data() {
    return {
      isCopied: false
    };
  },
  methods: {
    copyToClipboard() {
      const text = this.$refs.textToCopy.innerText; // 获取文本内容
      const textarea = document.createElement('textarea');
      textarea.value = text;
      document.body.appendChild(textarea);
      textarea.select();
      document.execCommand('copy'); // 执行复制操作
      document.body.removeChild(textarea);

      this.isCopied = true;  // 显示“已复制”提示
      setTimeout(() => {
        this.isCopied = false; // 3秒后隐藏提示
      }, 3000);
    }
  }
}
</script>
idea 开发vue:https://hcshow.blog.csdn.net/article/details/106113723
插件商城:https://ext.dcloud.net.cn/ 主要针对 HBuirderX,可以直接运行,查看插件
vue是避免操作dom
vue 左滑右滑 https://www.cnblogs.com/OIMM/p/13059838.html
vue中created、mounted、activated的区别
执行顺序:created => mounted => activated
created:在模板渲染成html之前调用,即通常初始化某些属性值,然后再渲染成视图;但是注意,只会触发一次
mounted:在渲染成html之后调用,通常是初始化页面完成后,再对html的dom节点进行一些需要的操作。是挂载vue实例后的钩子函数,钩子在主页挂载时执行一次,如果没有缓存的话,再次回到主页时,此函数还会执行。
activated:是组件被激活后的钩子函数,每次回到页面都会执行
Vue中beforeRouterEnter和beforeRouteLeave的应用
注:子组件中无法使用,需要在\router\index.js 中定义过路由的组件才可以触发
使用场景:例如页缓存,从当前页面的子页面出来需要刷新,其他页面跳转过来不能刷新,则此时
beforeRouteEnter
项目需要在进入某个页面前,判断从特定页面进来时,做某些处理。例如:只有从详情页回到列表页需要重新调接口。此时,用到了beforeRouteEnter方法。
注意:在在内部获取不到外部的this,方法、变量等都获取不到。但vm可以获取到method中的方法 以及变量,可以自行打印vm看一下
beforeRouteEnter (to, from, next) {
next(vm => {
  // 通过 `vm` 访问组件实例
 vm.deleteScan();
})
}
beforeRouteLeave
在页面离开时做的操作,最常见的场景:用户修改了页面某些字段,还没有保存就要离开当前页面。此时在页面离开前需要给用户提示
beforeRouteLeave(to, from, next) {
    this.alert();
    next();
  },

alert(){
   alert('当前修改还未保存!');
}
此时函数内部可以访问到this,重要:执行完要做的操作后,必须写 next();,否则页面不会走
使用记录
1. vue3 去掉了过滤器,推荐使用的是属性计算
<template><div>{{splitName(name)}}</div></template>

<script>
    export default {
      data () {
        return {
          msg: 'Hello world!'
        },
        methods:{
            //线路名称太长,去掉电压等级部分
            splitName(name){
                name=name.toLowerCase();
                retthis.$refsurn name.substring(name.indexOf('k')+1,name.length);
            }
        }
      }
    }
</script>
2.输出html
<p>使用双花括号语法:{{ rawHtml }}</p>
<p>使用 v-html 指令:<span v-html="rawHtml"></span></p>
<el-table-column label="闭环时间" align="center" prop="closeTime" width="180">
    <template slot-scope="scope">
		<span>{{ parseTime(scope.row.closeTime, '{y}-{m}-{d}') }}</span>
    </template>
</el-table-column>


<el-table-column prop="conf_name" label="执行人">
    <template slot-scope="scope">
		<div v-html="scope.row.assigneeName"></div>
    </template>
</el-table-column>
<el-table-column label="开始时间" align="center" prop="startTime"/>
vant 关闭自动加载 :immediate-check="false"
<van-list v-model:loading="loading" :finished="finished" finished-text="没有更多了" @load="onLoad" :immediate-check="false">

</van-list>
3. 异步
fun1 (item) {
	consle.log(1)
	this.fun3(this.fun2);// 先执行 fun3 然后成功后执行 fun2
    //this.fun3(this.fun2());// 用 this.fun2()  表示离开执行函数,会离开调用 fun2 方法
},
fun2(){// 异步
	let url = this.saveUrlType[this.position.subtype];
	this.$commonRequestJSON('put', url, this.position, response => {
		if (response.code == 200) {
			Toast('操作成功')
		}else{
			Toast(response.msg)
		}
	})
},
fun3 (callback) {// 异步
	this.getPosition(res => {// 使用箭头函数 没有this指向问题
		if (res) {
			this.position.longitudeGb = res.lng_gb;
			if(typeof callback === "function") {
				callback();
			}else{
				Toast("采集成功");
			}
		} else {
			Toast.fail({ message: '坐标获取失败' })
		}
	})
},
4. 静态资源文件的引入
- 方式一
全国: require("echarts/map/json/china.json"),
5. vue在css样式种使用data中的变量
5.1 vue2 中 使用data中的变量
在template中使用,注意styleVar一定要绑定在需要用到css变量的元素,或者该元素的上层元素上。类似js的作用域。
特别说明,小程序上无法这样使用,在动态绑定
style样式时渲染到标签中的是[object Object],原因是因为:小程序不支持动态绑定对象格式的样式,可以 加上[]:style="[styleVar]"
<template>
  <div class="box" :style="styleVar"> <!-- 说明:这里不能少 类似js的作用域 否则 下面的style 中无法使用 -->
      <div class='son'> 下面就可以使用 </div>
  </div>
</template>
<script>
export default {
    props: {
        height: {
            type: Number,
            default: 94,
        },
        whith: {
            type: Number,
            default: 200,
        },
    },
    computed: {
        styleVar() {
            return {
                '--box-width': this.whith + 'px',
                '--box-height': this.height + 'px'
            }
        }
    },
}
</script>
<style lang="scss"  scoped>
.son {
  height: var(--box-height); /* 这里调用 --box-height  要和上面 定义的变量 保存一致*/
  width: var(--box-width);
  background: red;
}
</style>
5.1 vue3 中 使用data中的变量
<template>
<div>
    <p class="text">测试文本</p>
    </div>
</template>

<script>
    export default {
        data() {
            return {
                color: "red"
            };
        }
    };
</script>

<style scoped vars="{ color }">
    .text {
        color: var(--color);
    }
</style>
5.1 CSS 中的 v-bind() 使用data 中的变量
本文主要介绍Vue3中的新增的v-bind()的常用使用方式,主要包括在css,less,scss中的使用,可以参考官方文档查看:Vue3官方文档,本文将主要通过一个demo中的使用来展示
<template>
  <div class="text">hello</div>
</template>

<script>
export default {
  data() {
    return {
      color: 'red'
    }
  }
}
</script>

<style>
.text {
  color: v-bind(color);
}
</style>
/* 组合使用 */
transition: all .9s v-bind(transition);
/* 对象调用 */
width: v-bind('span.width');
/* 拼接使用 */
width: v-bind(width + 'px');
/* 直接使用 */
height: v-bind(div_height);
样式穿透
一般在组建中创建的 <style lang="scss" scoped> 都会带上 scoped 属性,这是防止样式上的污染,但是又会出现一个问题,设置的全局的样式无法生效,例如上面中使用的 :style="styleVar" 父组件中的属性就无法在子组件中公用,这时就可以通过 ::v-deep 选择器来穿透 scoped 属性
  .field-wrapper {
    ::v-deep input ,::v-deep textarea{
      text-align: var(--input-text-align);
    }
    /* select */
    ::v-deep .el-scrollbar{
      text-align: var(--input-text-align);
    }
  }
CSS Modules
待研究
一个 <style module> 标签会被编译为 CSS Modules 并且将生成的 CSS class 作为 $style 对象暴露给组件:vue
<template>
  <p :class="$style.red">This should be red</p>
</template>

<style module>
.red {
  color: red;
}
</style>
calc中使用变量
left: calc(#{$avatar-width} + 15px - #{$dot-width}/ 2 + 1px + #{$badge-left});
top: calc(30px + var(--window-top));
height: calc(100vh - env(safe-area-inset-bottom, $statusBarHeight)) !important;
vue3 挂在全局
import {commonRequest, commonRequestJSON} from './net/commonRequest.js';// 网络请求
myApp.config.globalProperties.$commonRequestJSON = commonRequestJSON;
颜色循环数组
data() {
  return {
    colors: [
      'linear-gradient(135deg, #f6d365 0%, #fda085 100%)', // 渐变色1
      'linear-gradient(to right, #a8caba 0%, #5d4157 100%)', // 渐变色2
      'linear-gradient(to right, #23074d, #cc5333)', // 渐变色3
      'linear-gradient(to right, #e52d27, #b31217)' // 渐变色4
    ]
  }
}
<template>
  <div>
    <div v-for="(item, index) in items" :key="index" :style="{ backgroundImage: colors[index % colors.length] }">
      <!-- 这里是你要展示的元素 -->
    </div>
  </div>
</template>
url中传入参数
http://127.0.0.1:8083/#/?id=1
调用 this.$route.query.id
const paramsStr = location.href.split('?')[1];
解决带参多次跳转页面列表问题
思路2 使用 activated
 export default {
        name: 'ZjjcTestJzAllList',

        data () {
            return {
                // 查询参数
                queryParams: {
                    pageNum: 1,
                    pageSize: 10,
                },
                queryParamsItem: {} // 考虑到 其他页面跳转过来可能会 带入参数查询,防止重置丢失之前的条件,所以记录起来
            }
        },

        created () {
            if (this.$route.query) {
                this.loadData(this.$route.query)
            }
        },
        methods: {
            loadData (item) {
                this.queryParamsItem = item || {}; // 记录当前跳转过来时带入的参数,防止重置丢失
                this.initParame(item)
                this.getList()// 列表数据加载
                this.initQueryData()// 其他数据加载
            },
            // 解决其他页面跳转当前页面传参的问题
            initParame (item) {
                this.resetQueryData();// 重置查询条件
                if (item) {
                    // 通过js 浅拷贝 将父页面 传递过来的参数 赋值给 queryParams 对象 不能通过 this.queryParams=item 进行赋值 会覆盖原有的一些参数
                    for (let key in item) {
                        this.$set(this.queryParams, key, item[key])
                    }
                }
            },
            // 页面列表数据加载完成后,执行 其他数据加载,主要是字典,下拉选等
            initQueryData () {
                this.initDictData()// 字典
                this.initTestCompany() //检测单位
            },

            /** 查询桩基检测人员审核列表 */
            async getList () {
                this.loading = true
                const response = await this.$axiosApi('/projectManage/zjjcTestJz/listAll', this.queryParams, 'get')
                if (response.code == 200 && response.rows) {
                    this.dataList = response.rows
                    this.total = response.total
                    this.loading = false
                }
            },
            // 重置查询条件
            resetQueryData () {
                this.queryParams = {
                    pageNum: 1,
                    pageSize: 10
                }
            },
            /** 重置按钮操作 */
            resetQuery () {
                this.resetQueryData();// 重置查询条件
                this.initParame(this.queryParamsItem);
                this.getList()
            },
        },
        watch: {
            '$route': function (to, from) {
                if (to.query) {
                    this.loadData(to.query)
                }
            }
        },
    }
加减乘除浮点型精确运算方法
页面缓存如何处理路由跳转
//父页面
      gotoOpRec(params){
             params.routerKey = this.moment(Date.now()).format("YYYY-MM-DD HH:mm:ss");
        this.$router.push({path: '/wlWorkOpRec',query:params})
      }
created() {
      this.initData();
    },
    activated() {
      if (!this.lastQuery.routerKey || !this.$route.query.routerKey ||
        this.lastQuery.routerKey!=this.$route.query.routerKey) {
        this.initData();
      }
    },
    methods: {
      initData(){
        const item = this.dataProcessing(this.$route.query);
        this.lastQuery = item;
        this.loadData(item);
      },
      dataProcessing(item){
        item = item ?? {};
        const processedItem = { ...item }; // 创建 item 对象的副本
        const keys = ['weekNum', 'mId', 'sId']; // 需要保证 这几个属性参数 是 int类型
        for (const key of keys) { // 遍历所有需要转换的属性
          processedItem[key] = processedItem[key] ? parseInt(processedItem[key]) : ''; // 如果属性存在,则进行转换;否则,设置为 ''
        }
        return processedItem;
      },
}
路由保存的参数,数据类型被修改
parseInt('123')
Boolean('true')
      dataProcessing(item){
        item = item || {};
        const processedItem = { ...item }; // 创建 item 对象的副本
        const keys = ['teamId','weekNum', 'mId', 'sId']; // 需要保证 这几个属性参数 是 int类型
        for (const key of keys) { // 遍历所有需要转换的属性
          processedItem[key] = processedItem[key] ? parseInt(processedItem[key]) : ''; // 如果属性存在,则进行转换;否则,设置为 ''
        }
        processedItem.showPopup = processedItem.showPopup? Boolean(processedItem.showPopup):false;
        return processedItem;
      },
=====
Vue 赋值没有生效
this.queryParams.status 进行赋值没有生效
this.$set(this.queryParams, 'status', '') 可以赋值成功
问题原因
- Vue 响应式限制:Vue 无法检测到直接给对象添加新属性或删除属性的变化
queryParams初始化问题:在data()中,queryParams被初始化为空对象{}- 属性不存在:当组件初始化时,
queryParams.status属性并不存在 - 初始化时机:如果属性在组件初始化时不存在,Vue 就无法为其设置 getter/setter
解决方案
有几种方式可以解决这个问题:
方案一:在 data 中预定义属性(推荐)
    data() {
        return {
            queryParams: {
                applyNo: '',
                status: '',
            },
        }
    }
方案二:使用 $set 方法(你当前使用的方式)
this.$set(this.queryParams, 'status', '')
最佳实践
推荐使用方案一:在 data() 中预定义所有可能用到的属性,这样:
- 不需要使用
$set - 代码更清晰
- 性能更好
- 避免响应式问题
封装组件
https://blog.csdn.net/weixin_39824834/article/details/111136098
参看:https://blog.csdn.net/tangxiujiang/article/details/79620542
https://www.jianshu.com/p/a11cb130b3b2?ivk_sa=1024320u
注册全局 组件
https://www.jianshu.com/p/9a593afb9c66
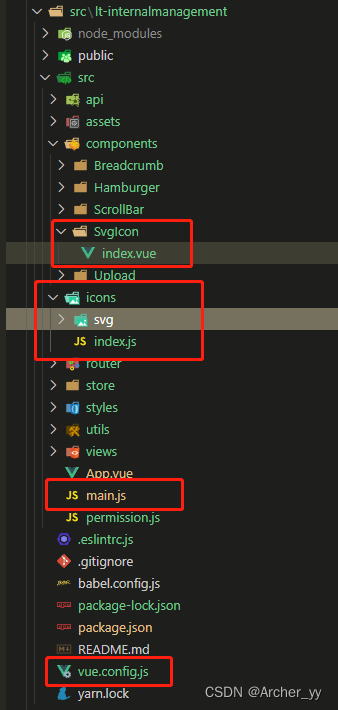
vue引入svg
vue3 封装svg
https://blog.csdn.net/weixin_45266125/article/details/102746945
1.main.js 引入 iconfont.js
import "@/assets/icon/iconfont.js";
2. 新建SvgIcon.vue,将svg的导入封装起来
<template>
    <svg :class="svgClass" aria-hidden="true">
        <use :xlink:href="iconName"/>
    </svg>
</template>

<script>
export default {
  name: 'SvgIcon',
  props: {
    iconClass: {
      type: String,
      required: true
    },
    className: {
      type: String,
      default: ''
    }
  },
  computed: {
    iconName () {
      return `#${this.iconClass}`
    },
    svgClass () {
      if (this.className) {
        return 'svg-icon ' + this.className
      } else {
        return 'svg-icon'
      }
    }
  }
}
</script>

<style scoped>
    .svg-icon {
        width: 1em;
        height: 1em;
        vertical-align: -0.15em;
        fill: currentColor;
        overflow: hidden;
    }
</style>
3.main.js 引入并注册组件 SvgIcon.vue
import SvgIcon from '@/components/SvgIcon.vue'; // svg组件
....
myApp.component("SvgIcon",SvgIcon);
4.使用
<svg-icon icon-class="icon图标名称" />
vue2封装svg
https://blog.csdn.net/Dilemma_me/article/details/127746198
1. 首先要安装3个插件:svg-sprite-loader,svgo,svgo-loader
npm install svg-sprite-loader -S
npm install svgo -S
npm install svgo-loader -S
2. 新建 src/icons/index.js
import Vue from 'vue'
import SvgIcon from '@/components/SvgIcon'// svg组件

// register globally
Vue.component('svg-icon', SvgIcon)

const requireAll = requireContext => requireContext.keys().map(requireContext)
const req = require.context('./svg', false, /\.svg$/)
requireAll(req)
3 .src/components/SvgIcon/index.vue
<template>
  <svg :class="svgClass" aria-hidden="true">
    <use :xlink:href="iconName"></use>
  </svg>
</template>

<script>
export default {
  name: 'svg-icon',
  props: {
    iconClass: {
      type: String,
      required: true
    },
    className: {
      type: String
    }
  },
  computed: {
    iconName() {
      return `#icon-${this.iconClass}`
    },
    svgClass() {
      if (this.className) {
        return 'svg-icon ' + this.className
      } else {
        return 'svg-icon'
      }
    }
  }
}
</script>

<style scoped>
.svg-icon {
  width: 1.2em;
  height: 1.2em;
  vertical-align: -0.18em;
  fill: currentColor;
  overflow: hidden;
}
</style>
4. main.js
import '@/icons' // icon
5. vue.config.js
const path = require('path')
module.exports = {
  chainWebpack: config => {
    // 给svg规则增加⼀个排除选项
    config.module
      .rule('svg')
      .exclude.add(path.resolve(__dirname, './src/icons'))

    // 新增icons规则,设置svg-sprite-loader处理icons⽬录中的svg
    config.module
      .rule('icons')
      .test(/\.svg$/)
      .include.add(path.resolve(__dirname, './src/icons'))
      .end()
      .use('svg-sprite-loader')
      .loader('svg-sprite-loader')
      .options({ symbolId: 'icon-[name]' })
      .end()
      .use('svgo-loader')
      .loader('svgo-loader')

    // config.resolve.alias.set('@img', path.resolve(__dirname, 'src/assets/img/'))
  },
}
使用js 拼接下 修改class和color
const sngicon = label.getElementsByTagName('svg')[0];
const sngiconUse = sngicon.getElementsByTagName('use')[0];
sngiconUse.setAttribute('xlink:href', '#icon-' + 'ic_show'); // js 动态修改 svg class
sngicon.style.color = '#fff';// js 动态修改 svg 颜色
注意:svg文件里面不能有fill属性,否则无法修改
svg颜色设置

.ql-stroke {
   stroke: #444;
}
自定义指令
创建一个v-myfocus指令,实现input框自动聚焦
https://blog.csdn.net/weixin_33908217/article/details/93656686
https://blog.csdn.net/qq_40669739/article/details/105606810
绑定元素-ref 的使用
https://blog.csdn.net/weixin_43363871/article/details/106311161
在
vue中获得某个dom或者组件,我们会通过绑定ref然后通过绑定后的名字来获取这个dom等价于 document.getElementById('wrapper') 和 document.querySelector('.pop_scroll')
this.el.querySelector('#wdzb_detail_item_wrap'); ==== this.refs.wdzb_detail_item_wrap;
ref 写在标签上时:this.$refs.ipt 获取的是添加了ref="ipt"标签对应的dom元素
ref 写在组件上时:this.$refs['component'] 获取到的是添加了ref="component"属性的这个组
<template>
 //给标签使用
    <input type="text" ref="ipt"/>
 //给组件使用
    <comp-detail ref="component"></list-detail>
    <button @click="confirm">确定</button>
</template>
methods:{
    confirm(){
        console.log(this.$refs.ipt.value)  //打印出输入框中的value值
        this.$refs['component'].init()     //调用组件comp-detail中的init()方法
     }
}
 this.$nextTick(() => {
 	this.$refs['component'].init();
 });
1.正常使用
绑定指定某一个组件 <div ref="box"></div>
获取 this.$refs.box --> 获取的js 对应的dom 元素
使用-添加背景色: this.$refs.box.style = "color:black";
2. 动态绑定
 <div v-for="item in items" :key="item.tab" :ref="'show'+item.id" @click="clickItem(item)">
  {{ item.tab }}
</div>
this.$refs[`show${value.id}`][0].style = "color:black";
或者:
this.$refs[`show${value.id}`].style = "color:black";
//父页面定义父组件ref showxx子组件 根节点 ref=inform (获取子组件的高度)
 console.log(this.$refs[`show${value.id}`][0].$refs.inform.offsetHeight);//offsetHeight
scrollToBottom(){
    this.$nextTick(()=>{
        let container  = this.$el.querySelector("#chatInfo");
        container.scrollTop = container.scrollHeight;
    })
},


scrollToBottom () {
    var this_ = this
    this.$nextTick(() => {
        const container = this_.$refs.container;
        //这里的定时是为了列表首次渲染后获取scrollHeight并滑动到底部。
        this_.scrollHeight = container.scrollHeight;
        container.scrollTo(0, this.scrollHeight);
    })
}
3.获取尺寸
参考:https://blog.csdn.net/songduo112/article/details/107099034/
https://blog.csdn.net/KLS_CSDN/article/details/107338838
存在
<template>
	<div ref="picWrapper"></div>
</template>
获取高度值:(包含内边距 padding)
const height = this.$refs.picWrapper.offsetHeight;//高
const width = this.$refs.picWrapper.offsetWidth;// 宽
这里的offsetHeight可以替换,用来获取其他的属性
offsetWidth //返回元素的宽度(包括元素宽度、内边距和边框,不包括外边距)
offsetHeight //返回元素的高度(包括元素高度、内边距和边框,不包括外边距)
clientWidth //返回元素的宽度(包括元素宽度、内边距,不包括边框和外边距)
clientHeight //返回元素的高度(包括元素高度、内边距,不包括边框和外边距)
style.width //返回元素的宽度(包括元素宽度,不包括内边距、边框和外边距)有单位
style.height //返回元素的高度(包括元素高度,不包括内边距、边框和外边距)有单位
scrollWidth //返回元素的宽度(包括元素宽度、内边距和溢出尺寸,不包括边框和外边距),无溢出的情况,与clientWidth相同
scrollHeigh //返回元素的高度(包括元素高度、内边距和溢出尺寸,不包括边框和外边距),无溢出的情况,与clientHeight相同
获取元素样式值:
const height = window.getComputedStyle(this.$refs.picWrapper).height;//带单位 120px
获取元素内联样式值:
const height =this.$refs.picWrapper.style.height;// 存在可能获取不到的场景
this.$refs.sign_warp.$el.style.height;// 带单位 120px
 this.contEl = this.$el.querySelector(`#tabli${this.bottomTabIndex}`);//this.$refs.wdzb_detail_item_wrap;
console.log(this.contEl.getBoundingClientRect()) // 获取元素的
getElementSize() {
      const element = this.$refs.myElement;
      const width = element.offsetWidth;
      const height = element.offsetHeight;
      console.log('宽度:', width, '高度:', height);
    },
getElementSize2(){
    const element = this.$refs.myElement;
    const rect = element.getBoundingClientRect();
    const width = rect.width;
    const height = rect.height;
    console.log('宽度:', width, '高度:', height);
}
使用 ResizeObserver 监听元素尺寸变化
<template>
  <div ref="myElement" style="width: 200px; height: 150px;">
    测试元素
  </div>
</template>

<script>
export default {
  mounted() {
    const element = this.$refs.myElement;
    this.resizeObserver = new ResizeObserver(() => {
      const width = element.offsetWidth;
      const height = element.offsetHeight;
      console.log('更新后的宽度:', width, '更新后的高度:', height);
    });
    this.resizeObserver.observe(element);
  },
  beforeDestroy() {
    // 清除观察器
    if (this.resizeObserver) {
      this.resizeObserver.disconnect();
    }
  }
}
</script>
4. 判断元素是否超出容器
通过对元素的 scrollWidth 和 offsetWidth 比较,得出是否超出容器
checkTextOverflow () {
    const textElement = this.$refs.textRef
    const spreadBtn = this.$refs.btnRef
    if (textElement.scrollWidth > textElement.offsetWidth) { // 水平方向出现滚动条了
    	spreadBtn.style.display = 'inline-block'
    }
},
案例:父组件传值到子组件(异步)
如果数据是异步获取的,子组件可能会获取不到,目前了解到有2种方式
1.通过
v-if2.通过
$next调用子组件方法进行赋值
方式一:通过使用 v-if
- 父组件
<template>
    <div>
        <child :child-data="asyncData" v-if="asyncData"></child>
    </div>
</template>
<script>
    import child from './child'

    export default {
        data: () => ({
            asyncData: ''
        }),
        components: {
            child
        },
        created () {
        },
        mounted () {
            // setTimeout模拟异步数据
            setTimeout(() => {
                this.asyncData = '需要传递到子页面的参数--异步加载出来的数据';
            }, 2000)
        }
    }
</script>
el-select 重置不生效(下拉选)
在赋值的后面调用 this.$forceUpdate();
<el-form-item label="杆号" prop="towerId">
    <el-select class="wp60" v-model="form.towerId" @change="refreshData()" placeholder="请选择开始GT" size="medium" filterable>
    <el-option v-for="item in towerLise" :label="item.towerNo" :key="item.towerId" :value="item.towerId"
    	@click.native="checkStartTower(item)" ></el-option>
    </el-select>
</el-form-item>


refreshData(){
	this.$forceUpdate();
},
vue 实现拖拽
https://blog.csdn.net/weixin_37989623/article/details/105458244
vue中 click 和 touch 冲突
点击后先触发 touchstart --> touchmove -> touchend --> click
所以可以通过位移,来确定是 touch 事件还是 click事件
案例:
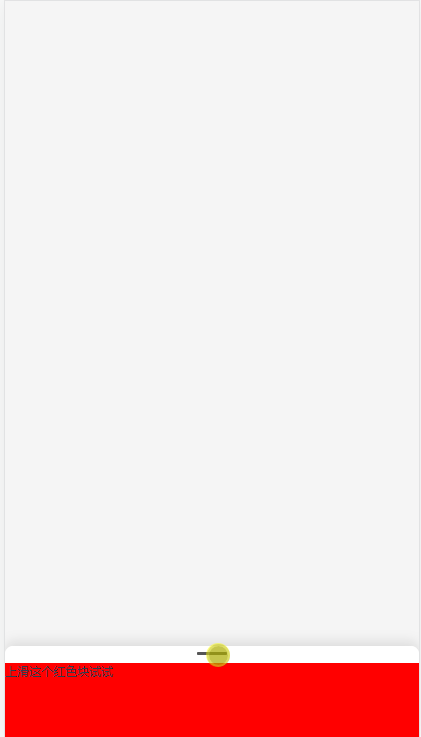
- 原版
<template>
  <div id="drawer-layout">
    <div id="shadowBox"></div>
    <div id="contBox">
      <slot name="content">
        <div style="height: 150px;background: red;">上滑这个红色块试试</div>
        <div style="height: 150px;background: orange;"></div>
        <div style="height: 150px;background: yellow;"></div>
        <div style="height: 150px;background: green;"></div>
        <div style="height: 150px;background: blue;"></div>
        <div style="height: 150px;background: purple;"></div>
      </slot>
    </div>
  </div>
</template>

<script>
export default {
  name:"DrawerLayout",
  data() {
    return {
      h: '', // 窗口的可视高度
      params: {
        contEl: '', //背景灰色浮层
        shadowEl: '', //内容块
        top: 0.1, //内容块停留的最高处 (取值范围:0.1-1,默认0.1)
        bottom: 0.9, //内容块停留的最低处 (取值范围:0.1-1,默认0.9)
        opacity: 0.5, //背景灰色浮层的最高透明值 (取值范围:0.1-1,默认0.5)
        duration: 0.3, //松手时候下滑或上滑动画的持续时间 (单位:秒,默认0.3)
      },
    };
  },
  methods: {
    init(params) {
      this.shadowEl = params.contEl;
      this.contEl = params.shadowEl;
      this.top = params.top ? this.h * params.top : this.h * 0.1;
      this.bottom = params.bottom ? this.h * params.bottom : this.h * 0.9;
      if (this.top >= this.bottom) {
        alert('top的值应该小于bottom的值');
        return;
      }
      this.opacityMax = params.opacity ? params.opacity : 0.5;
      this.duration = params.duration ? params.duration : 0.3;
      this.y = this.bottom;
      this.contEl.style.top = this.y + 'px';
      this.contEl.style.height = this.h - this.y + 'px';
    },
    touchstart(e) {
      this.ifTouch = true;
      this.setDom('start');
      this.startY = e.touches[0].clientY;
      this.lastClientY = this.startY;
      this.state = this.contEl.scrollTop == 0 ? 'unscroll' : 'scroll';
    },
    touchmove(e) {
      if (this.contEl.scrollTop != 0) {
        this.state = 'scroll';
      }
      var clientY = e.touches[0].clientY;
      this.direction = clientY - this.lastClientY > 0 ? 'toBottom' : 'toTop';

      /*两种情况执行方法:
		1. 当前元素不在顶部
		2. 运动方向向下&&contBox元素的滚动值为0&&当前状态不是滚动*/
      if (
        this.y != this.top ||
        (this.direction == 'toBottom' &&
          this.contEl.scrollTop == 0 &&
          this.state != 'scroll')
      ) {
        e.preventDefault();
        this.y += clientY - this.lastClientY;
        this.y = this.y > this.bottom ? this.bottom : this.y;
        this.y = this.y < this.top ? this.top : this.y;
        this.height = this.h - this.y;
        this.opacity =
          (this.opacityMax * (this.bottom - this.y)) / (this.bottom - this.top);
        this.setDom('move');
      }
      this.lastClientY = clientY;
    },
    touchend(e) {
      var _this = this;
      if (this.state == 'scroll') {
        return;
      }
      this.y = this.direction == 'toBottom' ? this.bottom : this.top;
      this.height = this.h - this.y;
      this.opacity = this.direction == 'toBottom' ? 0 : this.opacityMax;
      this.setDom('end');
      this.ifTouch = false;
    },
    setDom(state){
      switch (state) {
        case 'start':
          this.contEl.style.transition = 'none';
          this.shadowEl.style.transition = 'none';
          this.shadowEl.style.display = 'block';
          break;
        case 'move':
          this.contEl.style.height = this.height + 'px';
          this.contEl.style.top = this.y + 'px';
          this.shadowEl.style.opacity = this.opacity;
          break;
        case 'end':
          this.contEl.style.height = this.height + 'px';
          this.contEl.style.transition =
            'top ' + this.duration + 's,height ' + this.duration + 's';
          this.contEl.style.top = this.y + 'px';
          this.shadowEl.style.transition = 'opacity ' + this.duration + 's';
          this.shadowEl.style.opacity = this.opacity;
          if (this.direction == 'toBottom') {
            setTimeout(()=>{
              this.shadowEl.style.display = 'none';
            }, 300);
          }
          break;
        default:
          break;
      }
    },
    bindEvent() {
      this.contEl.addEventListener('touchstart', (e)=>{
        this.touchstart(e);
      });
      this.contEl.addEventListener('touchmove', (e)=>{
        this.touchmove(e);
      });
      this.contEl.addEventListener('touchend', (e)=>{
        this.touchend(e);
      });
    },
    touch(params) {
      this.contEl = this.$el.querySelector('#shadowBox');
      this.shadowEl = this.$el.querySelector('#contBox');
      this.params.contEl = this.contEl;
      this.params.shadowEl = this.shadowEl;
      this.h = `${document.documentElement.clientHeight}`;
      window.onresize = () => {
        this.h = `${document.documentElement.clientHeight}`;
      };
      this.init(params);
      this.bindEvent();
    },
  },
  mounted() {
    this.touch(this.params)
  },
};
</script>

<style lang="scss" scoped>
#drawer-layout {
  width: 100%;
  height: 100%;
  #shadowBox {
    width: 100%;
    height: 100%;
    position: absolute;
    top: 0;
    left: 0;
    z-index: 19930427;
    background: black;
    opacity: 0;
    display: none;
  }
  #contBox {
    width: 100%;
    height: 10%;
    position: relative;
    top: 90%;
    left: 0;
    z-index: 19930428;
    overflow: auto;
    background: white;
    box-shadow: 0 -8px 20px rgba(0,0,0,.1);
    border-radius: 15px 15px 0 0;
    padding-top: 30px;
  }
  #contBox::after{
    content: "";
    display: block;
    width: 55px;
    height: 5px;
    background:#565656;
    border-radius: 5px;
    position: absolute;
    left: 0;
    top: 10px;
    right: 0;
    margin: auto;
  }

}
</style>
- 改进版
touchmove (e) {
                if (this.contEl.scrollTop != 0) {
                    this.state = 'scroll'
                }
                var clientY = e.touches[0].clientY;
                this.drag_direction = clientY - this.lastClientY > 0 ? 'toBottom' : 'toTop'//定义向上向下

                /*两种情况执行方法:
                  1. 当前元素不在顶部
                  2. 运动方向向下&&contBox元素的滚动值为0&&当前状态不是滚动
                */
                if (
                    this.drag_y != this.smallHeight ||
                    (this.drag_direction == 'toBottom' &&
                        this.contEl.scrollTop == 0 &&
                        this.state != 'scroll')
                ) {
                    e.preventDefault();
                    this.drag_y += clientY - this.lastClientY;
                    this.drag_y = this.drag_y > this.maxHeight ? this.maxHeight : this.drag_y;
                    this.drag_y = this.drag_y < this.smallHeight ? this.smallHeight : this.drag_y;
                    this.drag_height = this.wrap_height - this.drag_y+this.drag_offset;
                    this.drag_opacity = (this.maxHeight - this.drag_y) / (this.maxHeight - this.smallHeight);// 额外添加的一个属性,用于控制 其他模块,需要淡化或显示的
                    this.setDom('move');
                }
                this.lastClientY = clientY
            },
<template>
    <div id="drawer-layout">
        <div id="contBox">
            <slot/><!--插槽-->
        </div>
    </div>
</template>

<script>
    export default {
        name: 'DrawerLayout',
        data () {
            return {
                wrap_height: '',// 窗口的可视高度
                duration: 0.6,//动画的持续时间
            }
        },
        methods: {
            touchstart (e) {
                this.ifTouch = true
                this.setDom('start')
                this.startY = e.touches[0].clientY
                this.lastClientY = this.startY
            },
            touchmove (e) {
                if (this.shadowEl.scrollTop != 0) {
                    this.state = 'scroll'
                }
                var clientY = e.touches[0].clientY
                this.drag_direction = clientY - this.lastClientY > 0 ? 'toBottom' : 'toTop'//定义向上向下
                e.preventDefault();
                this.drag_y += clientY - this.lastClientY
                this.drag_height = this.wrap_height - this.drag_y
                this.setDom('move')
                this.lastClientY = clientY
            },
            touchend (e) {
                var _this = this
                if (this.state == 'scroll') {
                    return
                }
                this.drag_height=this.drag_direction == 'toBottom' ? this.smallHeight:this.maxHeight;
                this.drag_y = this.wrap_height - this.drag_height-this.drag_offset;// 获取高度
                this.setDom('end');
                this.ifTouch = false;
                this.loadWdzb();//拖拽结束后,我的周边 业务处理(更新 拖拽图标,加载数据,或者隐藏 我的周边列表)
            },
            setDom (state) {
                switch (state) {
                    case 'start':
                        this.shadowEl.style.transition = 'none'
                        break
                    case 'move':
                        this.shadowEl.style.height = this.drag_height + 'px'
                        this.shadowEl.style.top = this.drag_y + 'px';
                        //this.opacity = (this.opacityMax * (this.bottom - this.y)) / (this.bottom - this.top);
                        break
                    case 'end':
                        this.shadowEl.style.height = this.drag_height + 'px'
                        this.shadowEl.style.top = this.drag_y + 'px'
                        this.shadowEl.style.transition = 'top ' + this.duration + 's,height ' + this.duration + 's';// 定义动画
                        break
                    default:
                        break
                }
            },
            bindEvent () {
                this.shadowEl.addEventListener('touchstart', (e) => {
                    this.touchstart(e)
                })
                this.shadowEl.addEventListener('touchmove', (e) => {
                    this.touchmove(e)
                })
                this.shadowEl.addEventListener('touchend', (e) => {
                    this.touchend(e)
                })
            },
            initTouch (params) {
                this.shadowEl = this.$el.querySelector(params.dom);
                var item=this.shadowEl.getBoundingClientRect();
                this.wrap_height = `${document.documentElement.clientHeight}`;
                window.onresize = () => {
                    this.wrap_height = `${document.documentElement.clientHeight}`
                }
                this.maxHeight=params.maxHeight ?params.maxHeight:this.wrap_height*this.drag_max_ratio;// 最高 高度
                this.smallHeight=item.height;// 最低高度,初始 元素的高度
                this.drag_offset=params.offset ?params.offset:0;
                this.drag_y=item.y;// 初始元素的top
                this.duration = params.duration ? params.duration : 0.6;// 动画时长
                this.bindEvent();// 定义事件
            },
        },
        mounted () {
            var params={
                dom:'#contBox',// 元素的id属性值
                // maxHeight:650,// 可以用容器高度 *的百分比
                //smallHeight:97,// 最新高度
                duration: 0.6, //松手时候下滑或上滑动画的持续时间 (单位:秒,默认0.6)
                offset:50,// 偏移量
            }
            this.initTouch(params);
        },
    }
</script>

<style lang="scss" scoped>

    #drawer-layout {
        width: 100%;
        height: 90%;

        #contBox {
            width: 100%;
            height: 10%;
            position: relative;
            top: 90%;
            left: 0;
            z-index: 19930428;
            overflow: auto;
            background: white;
            box-shadow: 0 -8px 20px rgba(0, 0, 0, .1);
            border-radius: 15px 15px 0 0;
            padding-top: 30px;
        }

        #contBox::after {
            content: "";
            display: block;
            width: 55px;
            height: 5px;
            background: #565656;
            border-radius: 5px;
            position: absolute;
            left: 0;
            top: 10px;
            right: 0;
            margin: auto;
        }

    }
</style>
- 案例(对比上面的方法,改进了 touchmove)
<template>
    <div id="drawer-layout">
        <div id="contBox">
            <slot/><!--插槽-->
        </div>
    </div>
</template>

<script>
    export default {
        name: 'DrawerLayout',
        data () {
            return {
                wrap_height: '',// 窗口的可视高度
                duration: 0.6,//动画的持续时间
            }
        },
        methods: {
                        touchstart (e) {
                this.ifTouch = true;
                this.setDom('start');
                this.startY = e.touches[0].clientY;//pageY
                this.lastClientY = this.startY;
                this.state = this.contEl.scrollTop == 0 ? 'unscroll' : 'scroll';
            },
            touchmove (e) {
                if (this.contEl.scrollTop != 0) {
                    this.state = 'scroll'
                }
                var clientY = e.touches[0].clientY;
                this.drag_direction = clientY - this.lastClientY > 0 ? 'toBottom' : 'toTop'//定义向上向下

                /*两种情况执行方法:
                  1. 当前元素不在顶部
                  2. 运动方向向下&&contBox元素的滚动值为0&&当前状态不是滚动
                */
                if (
                    this.drag_y != this.smallHeight ||
                    (this.drag_direction == 'toBottom' &&
                        this.contEl.scrollTop == 0 &&
                        this.state != 'scroll')
                ) {
                    e.preventDefault();
                    this.drag_y += clientY - this.lastClientY;
                    this.drag_y = this.drag_y > this.maxHeight ? this.maxHeight : this.drag_y;
                    this.drag_y = this.drag_y < this.smallHeight ? this.smallHeight : this.drag_y;
                    this.drag_height = this.wrap_height - this.drag_y+this.drag_offset;
                    this.drag_opacity = (this.maxHeight - this.drag_y) / (this.maxHeight - this.smallHeight);// 额外添加的一个属性,用于控制 其他模块,需要淡化或显示的
                    this.setDom('move');
                }
                this.lastClientY = clientY
            },
            touchend (e) {
                console.log("end")
                var _this = this
                if (this.state == 'scroll') {
                    return
                }
                this.drag_height=this.drag_direction == 'toBottom' ? this.smallHeight:this.maxHeight;
                this.drag_y = this.wrap_height - this.drag_height;//-this.drag_offset;// 获取高度
                this.setDom('end');
                this.ifTouch = false;
                this.loadWdzb();//拖拽结束后,我的周边 业务处理(更新 拖拽图标,加载数据,或者隐藏 我的周边列表)
            },
            setDom (state) {
                switch (state) {
                    case 'start':
                        this.shadowEl.style.transition = 'none'
                        break
                    case 'move':
                        this.shadowEl.style.height = this.drag_height + 'px';
                        // 其他板块
                       this.$el.querySelector('.rigth_layer_menu_wrap').style.opacity=1-this.drag_opacity;
                        //this.shadowEl.style.top = this.drag_y + 'px';
                        break
                    case 'end':
                        this.shadowEl.style.height = this.drag_height + 'px'
                        this.shadowEl.style.transition = 'all .6s ease';// 定义动画
                        this.drag_opacity=this.drag_direction=='toBottom'?0:1;
                        this.$el.querySelector('.rigth_layer_menu_wrap').style.opacity=1-this.drag_opacity;
                        if(this.drag_direction=='toBottom'){
                            this.$el.querySelector('.rigth_layer_menu_wrap').style.removeProperty("opacity")
                        }
                        //this.shadowEl.style.transition = 'top ' + this.duration + 's,height ' + this.duration + 's';// 定义动画
                        break
                    default:
                        break
                }
            },
            bindEvent () {
                this.shadowEl.addEventListener('touchstart', (e) => {
                    this.touchstart(e)
                })
                this.shadowEl.addEventListener('touchmove', (e) => {
                    this.touchmove(e)
                })
                this.shadowEl.addEventListener('touchend', (e) => {
                    this.touchend(e)
                })
            },
            initTouch (params) {
                this.shadowEl = this.$el.querySelector(params.dom);
                this.contEl = this.$el.querySelector(params.sroll_dom);//this.$refs.wdzb_detail_item_wrap;
                var item=this.shadowEl.getBoundingClientRect();
                this.wrap_height = `${document.documentElement.clientHeight}`;
                window.onresize = () => {
                    this.wrap_height = `${document.documentElement.clientHeight}`
                }
                this.maxHeight=params.maxHeight ?params.maxHeight:this.wrap_height*this.drag_max_ratio;// 最高 高度
                this.smallHeight=item.height;// 最低高度,初始 元素的高度
                this.drag_offset=params.offset ?params.offset:0;
                this.drag_y=item.y;// 初始元素的top
                this.duration = params.duration ? params.duration : 0.6;// 动画时长
                this.bindEvent();// 定义事件
            },
        },
        mounted () {
            var params={
                dom:'#wdzb_warp',// 元素的id属性值
                sroll_dom:'#wdzb_detail_item_wrap',// 内容区域 滚动条(用于监听 滚动内容区域是否到定部和底部 )
               // maxHeight:650,// 可以用容器高度 *的百分比
                //smallHeight:97,// 最新高度
                duration: 0.6, //松手时候下滑或上滑动画的持续时间 (单位:秒,默认0.6)
                offset:50,// 偏移量
            }
            this.initTouch(params);
        },
    }
</script>
npm 下载插件
cnpm i swiper@5.4.5 -S 		## npm 下载指定版本号
npm install xx --save   ## 会把依赖包名称添加到 package.json
列表切换
VUE+Element-ui实战之el-tabs切换实时加载el-table表格数据

参考:https://blog.csdn.net/rear0312/article/details/108713680
- 主页面
<template>
    <el-tabs type="border-card" v-model="activeName" @tab-click="handleClick" >
        <!-------------------------------------------------------->
        <el-tab-pane label="待审核" name="audit">
            <AuditList  v-if="activeName == 'audit'" ref="audit"></AuditList>
        </el-tab-pane>
        <!-------------------------------------------------------->
        <el-tab-pane label="已通过" name="pass">
            <PassList v-if="activeName == 'pass'" ref="pass"></PassList></el-tab-pane>
        <!-------------------------------------------------------->
        <el-tab-pane label="已否决" name="noPass">
            <NoPassList v-if="activeName == 'noPass'" ref="noPass"></NoPassList>
        </el-tab-pane>
        <!-------------------------------------------------------->
        <el-tab-pane label="已忽略" name="ignore">
            <IgnoreList v-if="activeName == 'ignore'" ref="ignore"></IgnoreList>
        </el-tab-pane>
    </el-tabs>
</template>

<script>
  import PassList from "./PassList2";
  import NoPassList from "./NoPassList2";
  import IgnoreList from "./IgnoreList2";
  import AuditList from "./AuditList2";
  export default {
    name: "TEMPLATE",
    components: {
      PassList,
      NoPassList,
      IgnoreList,
      AuditList
    },
    data(){
      return {
        activeName: 'audit'
      };
    },
    mounted(){
      this.onQuery();
    },
    methods:{
      handleClick(tab, event) {
        this.activeName = tab.name;
        var that = this;
        setTimeout(function(){
            that.onQuery();
        },500);
      },

      onQuery() {
        this.$refs[this.activeName].getList();
      },

    }
  }
</script>

<style scoped>

</style>
- 已通过PassList2.vue:
<template>
   <div>
       <el-table
               :data="tableData"
               border
               stripe
               style="width: 100%">
           <el-table-column
                   label="序号"
                   align="center"
                   width="70px">
               <template slot-scope="scope">
                   {{(formInline.currentPage-1)*formInline.pageSize + scope.$index + 1}}
               </template>
           </el-table-column>
           <el-table-column
                   label="人员姓名"
                   prop="pName">
           </el-table-column>
           <el-table-column
                   label="联系电话"
                   prop="phone">
           </el-table-column>
           <el-table-column
                   label="所在楼层"
                   prop="floor">
           </el-table-column>
           <el-table-column
                   label="房间编号"
                   prop="spaceNum">
           </el-table-column>
           <el-table-column
                   label="人员备注"
                   prop="notes">
           </el-table-column>
           <el-table-column
                   label="提交时间"
                   prop="submitTime">
           </el-table-column>
           <el-table-column
                   label="审核时间"
                   prop="auditTime">
           </el-table-column>
       </el-table>
       <el-pagination background
                      layout="total, prev, pager, next, sizes,jumper"
                      :page-sizes="[5, 10, 15]"
                      :page-size="formInline.pageSize"
                      :total="dataTotalCount"
                      @size-change="handleSizeChange"
                      @current-change="handleCurrentChange">
       </el-pagination>
   </div>
</template>

<script>
  export default {
    name: "PassList",
    data(){
      return {
        dataTotalCount: 0,      //查询条件的总数据量
        formInline: {
          currentPage: 1,
          pageSize:10,
        },
        tableData: [],
      }
    },
    methods:{

      //分页 初始页currentPage、初始每页数据数pagesize和数据testpage--->控制每页几条
      handleSizeChange: function(size) {
        this.formInline.pageSize = size;
        this.getList();
      },

      // 控制页面的切换
      handleCurrentChange: function(currentpage) {
        this.formInline.currentPage = currentpage;
        this.getList();
      },

      getList() {
        var that = this;
        that.axios.get('/dev-api/server/accessAudit/passList', {params:this.formInline})
          .then(function (response) {
            that.tableData = response.data.data.items;
            that.dataTotalCount = response.data.data.total;
          })
          .catch(function (error) {
            that.$message({
              type: 'error',
              message: '系统异常:'+error
            });
          });
      },

    }
  }
</script>

<style scoped>

</style>
<template>
	<div>
		<el-row :gutter="20">
		    <el-radio-group v-model="currentIndex" style="margin-top: 20px;margin-left: 20px;">
		      <el-radio-button :label="0">专业巡视</el-radio-button>
		      <el-radio-button :label="1">特殊巡视</el-radio-button>
		    </el-radio-group>
    </el-row>
    <div  style="float: left;margin-top: 10px;width: 100%;">
      <component
      v-infinite-scroll
      v-bind:is="currentTabComponent"
      >
      </component>
    </div>
	</div>
</template>

<script>
  import zhuanyeXunshi  from'../xsCycleMonthPlan/index.vue'
  import teshuXunshi  from'../xsSpecailTask/index.vue'
	export default{
		name:'',
		components:{
        zhuanyeXunshi,
        teshuXunshi
		},
		data() {
			return {
        currentIndex:0,
        componentList:[zhuanyeXunshi,teshuXunshi]
			}
		},
		props:{

		},
		computed: {
		  currentTabComponent: function () {
      //  alert(this.componentList[this.currentIndex])
        return this.componentList[this.currentIndex]
		  }
		},
		methods:{

		}
	}
</script>

<style>
</style>
Vue Store储存
创建公共style
- 创建
style.css放到 src/assets/style 文件夹下 - main.js 引包
//import "@/assets/style/style.css";
import './assets/style/style.css'; // 公共样式
Vue动态设置Dom元素宽高
通过给元素绑定style,在methods中通过改变this.sliderStyle.width来设置动态宽度
<template>
    <div class="slider" :style="sliderStyle">
        <h1>Hamy</h1>
    </div>
</template>
<script>
    export default{
        name:'index',
        data(){
            return{
                sliderStyle:{
                    width:'240px'
                }
            }
        }
    }
</script>
<div class="scroll-wrap" ref="scrollWrap"></div>

// 拿到当前容器的宽度
const scrollWrapWidth = this.$refs.scrollWrap.clientWidth;
:class
:class="{ 'class_name':menuTabShow}"
:class="{ class_name:out_index+'_'+inner_index == menuImgIndexActive }"
:class="menuTabShow?'class_name1':'class_name2'"


:class="{mark_highlight_red:(scope.row.commentTypeName=='驳回' || scope.row.commentTypeName=='否')}"
vue 引入外部字体包
https://www.cnblogs.com/mahao1993/p/11596296.html
- 在 assets 下创建一个 创建 一个 font/font.css文件
@font-face {
    font-family: 'SourceHanSansCN-Bold';
    src: url('SourceHanSansCN-Bold.otf');
    font-weight: normal;
    font-style: normal;
}
- 在main.js中引入
import './assets/font/font.css';// 引入外部字体
- 使用
div {
  font-family: 'SourceHanSansCN-Bold';
}
滚动定位/锚点
将元素滚动到可视区域范围内,支持水平和垂直方向
注意:需要注意id不能为数字
this.$nextTick(() => {
// 主要当前是 通过元素id进行选择 需要加 #
    document.querySelector(`#tabli${this.bottomTabIndex}`).scrollIntoView({
        behavior: "instant", // 定义过渡动画 instant立刻跳过去 smooth平滑过渡过去
        block: "start", // 定义垂直滚动方向的对齐 start顶部(尽可能)  center中间(尽可能)  end(底部)
        inline: "start", // 定义水平滚动方向的对齐
    });
});
scrollToTop() {
    var timer = null;
    //timer的目的是实现缓慢向上滚动的效果
    timer = setInterval(function () {
        var ct = document.documentElement.scrollTop || document.body.scrollTop;
        ct -= 50;
        if (ct > 0) {
            window.scrollTo(0, ct);
        } else {
            window.scrollTo(0, 0);
            clearInterval(timer);
        }
    }, 10);
},

//监听浏览器滚动,控制 是否显示 回到顶部 按钮
someEventAction() {
    var that = this;
    window.addEventListener('scroll', function () {
        if (window.scrollY === 0 || window.pageYOffset === 0) {
            that.srcollOfTop = true;
        } else {
            that.srcollOfTop = false;
        }
    });
}
关于组件 better-scroll (滚动)
https://better-scroll.github.io/docs/zh-CN/guide/
https://www.wenjiangs.com/doc/q5e67ztr
https://ustbhuangyi.github.io/better-scroll/#/examples/picker
https://better-scroll.github.io/docs/zh-CN/guide/base-scroll-options.html#disabletouch
1.基本使用

// 切换tab ,滚动到指定 位置 (锚点)
popTabSwitch (index) {
    this.popIndexActive = index;
    // 底部滚动到选中的图片
    this.$nextTick(() => {
        var dom = this.$refs[`content${index}`];
        this.pop_scroll.scrollToElement(dom, 500,0,100);
    })
},
/*初始化 弹出层 容器 滚动 */
loadPopScroll () {
    this.$nextTick(() => {
        // 在BScroll对象中,第一个参数为DOM对象, 第二个参数为better-scroll中的配置项
        this.pop_scroll = new BScroll(this.$refs.pop_scroll, {
            tap: true,
            probeType: 3,// 否则无法监听 一些事件  比如下面的 scroll
            scrollY: true,
            momentum: true,
            click:true//不加可能会出现,vue绑定的 @click 事件 无法触发
        })
        // 绑定滚动事件, pos表示位置信息
        this.pop_scroll.on('scroll', (pos) => {
            console.log(pos.y)
        })
    })
},
使用记录
1. v-show 不能用 :show
<van-icon v-show="pop_video_page.pageCount>1" class="iconfont img_page_icon img_page_sub icon-fanhui" @click="turnVideoPage('sub')" />
2.Vue中使用 transition标签或transition-group标签以及第三方类实现动画
参考:https://blog.csdn.net/weixin_42218847/article/details/81474923
https://www.jianshu.com/p/9746d47f4757
show 动画效果
- 1.为了实现 v-show 和v-if 下的 动画
2.可能存在溢出的现象,则需要 添加 overflow: hidden; 最好是在子节点中,如果是当前元素,可能会导致 离开时动画失效
3.如果要实现动画效果的元素是通过
v-for循环渲染出来的,就不能使用transition,应该用transition-group将元素包裹
<transition name="laypop">
    <div id="div1" v-show="isShow" transiton="fade"></div>
</transition>


<style>
    /* 设置进入和离开动画 */
    /* 设置持续时间和动画函数 */
    .laypop-leave-active, .laypop-enter-active {
        transition: all .5s ease;
    }
    /**
     * 动画开始之前,和动画完成之后的元素位置
     */
    .laypop-enter-from, .laypop-leave-to {
        top: -100%;
        opacity: 0;
    }
</style>
3. vue3 取消了 过滤器 filter & 属性计算
替代方式:https://blog.csdn.net/weixin_43575792/article/details/123224908
<template>
  <h1>Example</h1>
  <p>{{formatCloud(2.3333333)}}</p>
</template>

<script>
//import {computed} from "vue";// 不确定是否可以这样用
import { computed } from '@vue/reactivity';
export default {
  data: function () {
    return{}
  },
  setup(){
    const formatCloud = computed(() => {
      return function(index){
        return parseFloat(index).toFixed(2);
      }
    })
    return {formatCloud}
  }
}
</script>
拓展,引多个
<script>
setup(){
            const map = shallowRef(null);
            const simplifyNamefilter = computed(() => {
                return function(value) {
                    console.log(value)
                    if(value.length>2){
                        return value =value.substr(1);
                    }
                    return value;
                }
            })
            return{
                map,simplifyNamefilter
            }
        },
</script>
传参
setup() {
    const getMonth = computed(() => {
        return new Date().getMonth()+1;
    })
    // 传参
    const getNum = computed( ()=>(value) => {
        return value||0;
    })
    return { getMonth,getNum}
},
案例:文字过长截取
simplifyNamefilter (value) {
    if (value.length > 2) {
        return (value = value.substr(1))
    }
    return value
},


simplifyNamefilter(value) {
      if (!value) {
        console.log('异常')
        return
      }
      if (value.length > 3) {
        return (value = value.substring(0, 2))
      } else if (value.length == 3) {
        return (value = value.substr(1))
      }
      return value
},
<template>
	<div class="step-icon" :class="{'small-text':verifyNameLength(item.shortName)}">
    	<span>{{verifyNameLength2(item.shortName)}}</span>
    </div>
</template>
<script>
    // 名称超过2个字
    export default {
        methods: {
            verifyNameLength (value) {
                if (value.length > 2) {
                    return true;
                }
                return false
            },
            // 4个字每个2换行,white-space: pre-wrap;
            verifyNameLength2 (value) {
                if (value.length > 2) {
                    return value.substring(0,2)+'\n'+value.substring(2,value.length);
                }
                return value
            },

        }
    }
</script>
<style lang="less" scoped>
    .step-icon {
        width: 72px;
        height: 72px;
        color: #ffffff;
        font-size: 28px;
        display: flex;
        justify-content: center;
        align-items: center;
        /*文字超长*/
        &.small-text{
            font-size: 24px;
            white-space: pre-wrap;
        }
</style>
4. 解决Vue中表单输入框v-model双向绑定后数据不显示的问题
this.$set(this.form,"qxLevelName","");
5. input定义单击事件
@click.native="qxAssess"
6. 监听回车
<el-input type="text" prefix-icon="el-icon-search" v-model="seach_content"
                               placeholder="请输入关键字(多关键字以空格隔开)..." style="cursor: pointer" @keyup.enter.native="seachQxPg" ></el-input>
vue项目报 Node Sass错误
## 卸载
npm uninstall node-sass
## 重装
npm i -D sass
插槽没有被使用是可以被渲染的
在
<slot>标签中提供默认按钮的 HTML 代码,这样如果没有使用插槽,则默认按钮就会被渲染意思是,可以在插槽中写默认代码,如果使用插槽会覆盖插槽中的默认代码,这样方便自定义
<div class="custom-btn df_ac">
  <slot name="customBtn">
    <!-- 如果没有使用插槽,则显示默认按钮 -->
    <button class="default-btn" @click="handleClick">默认按钮</button>
  </slot>
</div>
调用
<template slot="customBtn">
	<div class="download-btn dis-cer-cer">下载数据</div>
</template>
双向绑定
vue2
使用
v-model="xxxx"时,实际上是将父组件的xxxx绑定到了子组件的value上
props: {
  value: {
    type: [String, Number], // 根据实际的定义
    default: ''
  },
}
通过 input 事件更新父组件的值
this.$emit('input', newVal); // 当本地的 value 变化时,触发 input 事件通知父组件
demo:
父组件
@update:popupshow="popupshow = $event" 这里可以直接修改 popupshow 属性值,从而简化父组件的写法
    <MultiSelectPopup ref="custompopup" :multiMode="multiMode" :defaultOptions="defaultOptions"
                      pop_width="50%" pop_height="50%"
                      :popupshow="popupshow" v-model="localValue" title="物资选择"
                      @selectItem="selectItem" @update:popupshow="popupshow = $event"/>
子组件
this.$emit('update:popupshow', false);// 用来关闭弹窗
vue3
对父组件传递的数据进行处理
        computed: {
            // 将表格数据转换为响应式数据
            computedTableData () {
                return JSON.parse(JSON.stringify(this.value))
            }
        },
数据变更
 checkSelect (item, index) {
                const newData = [...this.computedTableData]
                newData[index].materialName = item.label
                newData[index].materialId = item.id
                this.$emit('input', newData)
                this.checkIndex = -1// 关闭下拉选
            }
自定义弹窗
<multi-select-popup title="检测人员选择" :defaultOptions="personList" v-model="form.jcUserIds"
                            :show-picker="showPicker"
                            @selectObject="selectJcUser" @update:showPicker="showPicker = $event"/>
自定义附件上传
使用 input type="file" 进行自定义
目前只是一个初稿,没有实现
<!-- 如果自定义.... 唯一不好的是 无法拖拽上传  -->
<div  class="upload-file__warp none">
    <div class="el-upload el-upload--text">
        <div  class="upload-file__content">
            <i class="iconfont icon-shangchuanbaogao upload-file__content--icon"></i>
            <div  class="upload-file__content-tip dis-col-bet">
                <div class="title"> <span class="tag">点击上传</span></div>
                <div class="subtitle">支持PDF、XLS、XLSX、DOC、DOCX等 格式 每个附件大小不能超过150M</div>
            </div>
            <input class="file-input-wrap" type="file" multiple ref="fileInput" @change="handleFileSelect">
        </div>
    </div>
</div>
<script>
    export default {
        methods: {
            handleFileSelect (event) {
                const fileList = event.target.files
                console.log(fileList)
                // 将选中的文件列表传递给父组件
                // this.$emit('file-selected', fileList);
            },
        }
    }
</script>
<style>
    .upload-file__warp {
        border: 1px dashed #d9d9d9;
        border-radius: 6px;
        box-sizing: border-box;
        width: 100%;
        height: 80px;
        margin-bottom: 10px;
        .file-input-wrap{
            opacity: 0;
            height: 100%;
        }

        /deep/ .el-upload {
            width: 100%;
            height: 100%;
        }

        .upload-file__content {
            width: 100%;
            height: 100%;
            display: flex;
            justify-content: center;
            align-items: center;
            padding: 0 20px;

            &--icon {
                font-size: 25px;
                margin-right: 10px;
                /* 设置字体颜色*/
                @include themeify {
                    color: themed('master');
                }
            }

            &-tip {
                line-height: 20px;
                font-family: Microsoft YaHei-Regular, Microsoft YaHei;
                font-weight: 400;

                .title {
                    font-size: 14px;
                    color: #31373D;

                }

                .subtitle {
                    font-size: 12px;
                    color: #BBBDBF;
                    line-height: 18px;
                }
            }
        }

        /deep/ .el-upload-list__item {
            display: none;
        }
    }
</style>
通过拖拽上传文件,并在上传成功后自己展示数据,可以尝试以下方法:
- 设置
drag和auto-upload属性为false:将这两个属性都设置为false,禁用 el-upload 组件的默认上传行为,这样拖拽文件时不会触发上传。 - 添加拖拽事件监听:使用 Vue 或原生 JavaScript,监听 el-upload 组件上的拖拽事件,获取拖拽的文件。
- 使用自定义方式上传文件:通过处理拖拽事件获得的文件,使用自定义的方式上传到服务器。您可以使用 Ajax、Fetch 或其他类似的技术来实现上传功能。上传成功后,获取服务器返回的数据。
- 自行展示上传成功的数据:根据服务器返回的数据,您可以自定义展示方式,例如添加图片预览、文件名列表、链接等等。
下面是一个示例代码,演示了拖拽上传文件并自定义展示上传成功的数据:
<template>
  <div>
    <div
      class="upload-area"
      @dragenter.prevent
      @dragover.prevent
      @drop="handleDrop"
    >
      将文件拖拽到此处上传
    </div>
    <ul>
      <li v-for="file in uploadedFiles" :key="file.id">
        {{ file.name }}
      </li>
    </ul>
  </div>
</template>

<script>
export default {
  data() {
    return {
      uploadedFiles: [] // 用于保存上传成功的文件数据
    };
  },
  methods: {
    handleDrop(event) {
      event.preventDefault();
      const files = event.dataTransfer.files;
      this.uploadFiles(files);
    },
    uploadFiles(files) {
      // 使用自定义的方式上传文件,这里使用了简单的伪代码实现
      for (let i = 0; i < files.length; i++) {
        const file = files[i];
        // 发送文件到服务器
        // 处理服务器返回的数据
        // 将文件信息添加到 uploadedFiles 数组中
        this.uploadedFiles.push({ id: file.id, name: file.name });
      }
    }
  }
};
</script>
上传文件
uploadFileAction(file){
    if(!this.limitFileType(file)){
        return;
    }
    file.status = 'uploading'
        file.message = '上传中...'
        fileUploadModule({
            url: this.doUpload,
            moduleName: this.moduleName,
            file: file.file
        }).then(res => {
        if (res.code == 200) {
            file[this.nameField] = file.file.name;// 考虑到 文件名不修改的情况下,可能又有文件名重复,所以会对文件名进行小小的修改
            file[this.urlPathField] = res.data.url
                file[this.pathField] = res.data.path;
            file[this.suffixField] = getFileSuffixName(file.file.name) // 文件后缀名
                file[this.fileSizeField] = getFileSize(file.file.size) // 文件大小
                file.status = 'done'
                file.message = '上传成功';
            this.filePathList.push(file);
        } else {
            file.status = 'failed'
                file.message = '上传失败';
            this.filterData(file)
        }
    }).catch(res => {
        file.status = 'failed'
            file.message = '上传失败';
        this.filterData(file)
            console.log(this.fileList)
    })
        },
export function fileUploadModule({url,moduleName,fileName,file}) {
  //console.log('-------------文件上传服务fileUploadBase64---------'+url+moduleName+JSON.stringify(file));
  return new Promise(async (resolve, reject) => {
    let param = new FormData();
    param.append('file', file);
    param.append('moduleName', moduleName);
    param.append('relativeFilePath', moduleName);
    param.append('fileName', file.name);
    let loginTokenObj = JSON.parse(localStorage.getItem('loginTokenObj'));
    var token = "";
    if(loginTokenObj != 'undefined' && loginTokenObj != null) {
      token = loginTokenObj.access_token;
    }
    let config = {
      headers: {
        'Content-Type': 'multipart/form-data','Authorization': 'Bearer ' + token
      }
    } // 添加请求头
    axios.post(url, param, config).then(res => {
      console.log("cpt_response data = "+JSON.stringify(res));
      if (res.data.code == 200) {
        resolve(res.data)
      } else {
        reject(res)
        // 接口错误提示
        //Toast.fail(res.data.message);
      }
    },error => {
      reject(error)
    })

  })
}
a标签下载
目前测试没出现跨域问题
downloadFile (url, fileName) {
    var x = new XMLHttpRequest();
    x.open("GET", url, true);
    x.responseType = 'blob';
    x.onload=function(e) {
        var url = window.URL.createObjectURL(x.response)
        var a = document.createElement('a');
        a.href = url
        a.download = fileName;
        a.click()
    }
    x.send();
}
附件下载
<div v-if="isShowPercentage" class="df_center zdy-mask">
    <el-progress type="dashboard" :percentage="percentage" :color="colors" ></el-progress>
</div>
<style>
    /* 遮罩*/
    .zdy-mask {
        width: 100%;
        height: 100%;
        position: absolute;
        top: 0;
        left: 0;
        z-index: 11;
        background: #8e8b8b66;
        background: rgba(0,0,0,0.4) !important;
        .el-progress__text{
            color: white;
        }
    }
</style>
export default {
    data() {
        return {
             colors: [
              {color: '#f56c6c', percentage: 20},
              {color: '#e6a23c', percentage: 40},
              {color: '#5cb87a', percentage: 60},
              {color: '#1989fa', percentage: 80},
              {color: '#6f7ad3', percentage: 100}
            ],
            isShowPercentage: false, // 进度条
            percentage: 0,
        },
    }
        methods:{
            // 附件下载
            downloadFile(url,fileName) {
                this.isShowPercentage = true; // 显示进度条/遮罩层
                this.percentage = 0; // 默认设置进度为 0
                importDownloadFile(url,fileName,(percentage)=>{
                    this.percentage = percentage;
                    if(percentage==100){
                        this.isShowPercentage = false;
                    }
                },()=>{ // 下载结束
                    this.isShowPercentage = false;
                    this.percentage = 0;
                })
            },
        }
    }
/**
 *
 * @param url : 附件url
 * @param fileName: 附件名称
 * @param progressCallback:进度回到--主要是用来 实现进度条的
 * @param completeCallback:下载完成回调
 * @returns {Promise<void>}
 */
export const importDownloadFile = async (url, fileName,progressCallback,completeCallback) => {
  var x = new XMLHttpRequest();
  x.open("GET", url, true);
  x.responseType = 'blob';
  x.onprogress = function(e) {
    if (e.lengthComputable) {
      var percentCompleted = Math.round((e.loaded * 100) / e.total);
      // 更新进度条UI
      progressCallback&&progressCallback(percentCompleted);
    }
  };

  x.onload = function(e) {
    var url = window.URL.createObjectURL(x.response)
    var a = document.createElement('a');
    a.href = url
    a.download = fileName;
    a.click();
    // 下载完成后清理资源
    cleanupResources(url, a);
    completeCallback&completeCallback(); // 下载回调,防止 onprogress 方法中出现意外,主要是用来关闭 进度条弹窗
  };
  x.send();
}
function cleanupResources(url, element) {
  // 清理创建的 URL 对象
  window.URL.revokeObjectURL(url);
  // 移除创建的链接元素
  if (element.parentNode === document.body) {
    document.body.removeChild(element);
  }
}
vue中本地文件下载
https://blog.csdn.net/weixin_42578567/article/details/126268843
1.先把文件放在静态资源 public 中
2.给标签添加点击事件
<a id="download" href="javascript:void(0);" @click="download">下载模板</a>
3.页面中引入axios
import axios from 'axios';
1
4.为了避免中文无法导出,将待导出文件名称改为英文 “ peoplecode.xls ” ,导出后的名称设置为中文名称 “ 员工工号.xls ”;
download () {
    axios.get('file/peoplecode.xls', {   //静态资源文件夹public
        responseType: 'blob',
    }).then(response => {
        const url = window.URL.createObjectURL(new Blob([response.data]));
        const link = document.createElement('a');
        let fname = '员工工号.xls';
        link.href = url;
        link.setAttribute('download', fname);
        document.body.appendChild(link);
        link.click();
    }).catch(error => {
        console.log('error:'+JSON.stringify(error))
    });
},
$refs
this.$refs['addZjjcPersonRef'].submitFrom((res)=> {
    if (res) {
        this.closePopup() // 关闭弹窗
        this.getList()
    }
})
拿到路由进行处理
computed: {
            activeMenu() {
                const route = this.$route
                const { meta, path } = route
                if (meta.activeMenu) {
                    this.activeMenuKey = meta.activeMenu;
                    return meta.activeMenu
                }
                // 如果是首页,首页高亮
                if (path === '/index') {
                    this.activeMenuKey = '/mainIndex';
                    return '/mainIndex'
                }
                // 如果不是首页,高亮一级菜单
                const activeMenu = '/' + path.split('/')[1];
                this.activeMenuKey = activeMenu;
                return activeMenu
            },
        },
vue-treeselect
// 手动清除,目前无法通过 将数值置为 空,这样会导致 显示(unknown)
this.$nextTick(() => {
    if(!node.modelId){
        this.$refs.treeselect.clear();
        this.$set(this.form,'modelId',this.completeText(node.modelId))//所属模版
  	}
})
//选择 模板类型
      checkModel(node) {
        this.$refs.form.clearValidate('modelId');
        if(node.type !=='son_node') { // 防止选到 父节点(工单分类)
          this.msgError('请选择所属模版');
          this.updateModel({}); // 将之前选择的数据置为 空
          return;
        }
        this.updateModel(node);
      },
      updateModel(node){
        this.form.classId = this.completeText(node.classId); //工单工单分类
   		// ......
        this.$nextTick(() => {
          if(!node.modelId){
            this.$refs.treeselect.clear(); // 清除,如果直接置为空,则会出现 (unknown)
            this.$set(this.form,'modelId',this.completeText(node.modelId))//所属模版
          }
        })
      },
      completeText(text){
        return text||'';
      },
vue-treeselect 案例:线路GT联动
线路和GT存在联动,如果清除线路,则GT下拉选的数据也要清空
 <treeselect v-model="queryParams.lineId" ref="line" class="table-search-select" :options="lineOptions" :normalizer="normalizer"
     :disable-branch-nodes="true"   @input="inputLine"
     :show-count="true" @select="checkLine" placeholder="请选择线路"/>

 <el-select :popper-append-to-body="false" class="table-search-select" v-model="queryParams.towerId"
 placeholder="请选择GT" clearable filterable @clear="checkTower({})">
 <el-option v-for="item in towerList" :label="item.towerNo" :key="item.id" :value="item.id"
 	@click.native="checkTower(item)" ></el-option>
 </el-select>
//获取线路GT
      checkLine(node, instanceId) {
        this.queryParams.lineId = node.id;
        this.$set(this.queryParams, 'towerId', '')
        this.getTower(node.id)// 联动 GT
      },
      // 主要是解决线路清空 需要清除 GT下拉选
      inputLine(node){
        if(!node){
          this.towerList = []; // 清空子项下拉选
          this.$set(this.queryParams, 'towerId', '');
        }
      },
      // 线路联动GT
      getTower(id) {
        if (!id) {
          return
        }
        selectBasTowerListByLineId({lineId: this.queryParams.lineId, itemId: 1}).then(response => {
          this.towerList = response.data;
        });
      },
      // 选中GT
      checkTower(item) {
        this.$set(this.queryParams, 'towerId', item.id||'');
      },
场景说明:使用属性计算无法监听对象中的字段值变更
列如下面的
        queryParams: {
          pageNum: 1,
          pageSize: 10,
          // teamId:'',
          // year:'',
        },
    computed: {
    // 如果queryParams对象初始化时没有定义teamId 和year 则此时监听失效  (queryParams: { pageNum: 1, pageSize: 10, teamId:'', year:'', })
      uploadUrl () {
        return '/wlWork/wlWorkPlan/importData/'+this.queryParams.teamId+'/'+this.queryParams.year
      }
    },
绝对值
{{ item.planQtySumBy - item.opQtySumBy | abs }}
  filters: {
    abs: function (value) {
      return Math.abs(value);
    }
  },
拼接html 实现click事件
task.img_url.forEach(filePath => {
	domHtl += `<img src="${filePath.url}" onerror="this.src='${imgUrl}';this.onerror=null" onClick="showImg('${filePath.url}')">`
});
    created() {
    },
    mounted() {
      window.showImg = this.showImg;
    },
     methods: {
          showImg(url) {
            this.isShowImg = true;
          },
     }
代理
现在因为本地开发出现跨域
nginx 中配置
location /files {
    alias /home/sfpt/file/;
    autoindex off;
}
vue.config.js 文件示例:
module.exports = {
  devServer: {
    proxy: {
      '/files': {
        target: 'http://192.168.10.220:19094',  // 后端服务器地址
        changeOrigin: true,  // 用于控制请求头中的 Host 字段
        pathRewrite: {
          '^/files': '/files',  // 保持路径一致
        },
        secure: false,  // 如果使用 https,需要设置为 false,否则需要自己处理证书
      },
    },
  },
};
使用 http://localhost:8080/files/xxxx
//  this.prefix_url 不能是 真实的 url前缀 http://192.168.10.220:19094 应该是 '/files'
this.image.url = this.prefix_url+'/xrk/1.jpeg';//"/api/image/" + this.image.id;
项目新加入下载的阿里图标iconfont无法改变颜色问题
解决方法:
- 打开svg文件,搜索“fill=”,将 svg 标签上的 fill 属性改为为 fill="currentColor",或者删除掉
- path 标签删除掉 fill 属性
vue中@oninput的用法
<input type="text" id="cardsNum2" value="1" v-on:input ="inputFunc">
vue3的新特性,::v-deep和/deep/被弃用,应该使用改为 :deep(){width:10px}。
使用中 this指向问题
定时器,可以使用 bind(改变this执行,并且不会调用函数)
箭头函数
setTimeout(function () {
	this.resetLocation();// 复位
}.bind(this), 100)
vue 引入css
- 方案1、在main.js中引入方式
import '@/assets/css/reset.css'
- 方案2、在.vue文件的
<style/>标签里面引入
@import "../assets/css/index.css";
样式穿透
<style scoped lang="less">
    :deep(.van-tabs .van-tabs__content) {
        padding: 0 !important;
    }
</style>
ES6模块化
参考:https://blog.csdn.net/weixin_65757576/article/details/124940593
定义规范:
每个js文件都是一个模块
导入其他模块成员用import
公开内部成员用exports
案例:在vue 中使用
定义文件 commonRequest.js 用于处理 网络请求的
import {
    httpRequest,
    httpRequestFormdata
} from './httpRequest.js'
import axios from 'axios'
import md5 from 'js-md5'
import { Dialog, Toast } from 'vant'


// 根据字典类型查询字典数据信息
export const getDicts = (dictType, callback) => {

    var options = {
        method: 'get',
        url: '/system/dict/data/type/' + dictType,
        headers: { 'Content-Type': 'application/json' },
    }
    httpRequestFormdata(options, function (res) {
        callback(res)
    })

}
export const commonRequestJSON = (method, url, params, callback, errCallback) => {
    var this_ = this
    if (!method) {
        method = 'get' // 请求类型,get post
    }
    var options = {
        method: method,
        url: url,
        appservercode: 'getUserInfo', //应用服务编码,详细见 《应用发布明细》文档
        params: params, //JSON.stringify(),
        headers: { 'Content-Type': 'application/json;charset=utf-8' },
        // headers: { 'Content-Type': 'application/x-www-form-urlencoded; charset=UTF-8'}
    }
    commonRequest(
        options,
        function (res) {
            callback(res)
        },
        function (res) {
            console.log('网络请求异常' + JSON.stringify(res))
            if (typeof errCallback === 'function') {
                // 异常 没有数据
                errCallback(res)
            } else {
                Toast.fail('数据异常!')
            }
        }
    )
}
按需导入 -- 语法: import {a} from '模块地址'
import { commonRequest } from "../../net/commonRequest";

//使用

onLoad () {
    commonRequestJSON('get', 'yhdanger/dsLocationRecord/findDsLocationRecordList', this.queryParams, dataCallback, dataErrCallback)
},
引入main.js 挂在在vue组件中,作为全局变量
import { getDicts,commonRequestJSON } from './net/commonRequest.js'


var myApp = createApp(App);
// vue3 给原型上挂载属性
myApp.config.globalProperties.$commonRequestJSON = commonRequestJSON;
使用
this.$commonRequestJSON('get', 'yhdanger/dsLocationRecord/findDsLocationRecordList', this.queryParams, dataCallback, dataErrCallback)
Vue定义常量、常量使用
参考:https://blog.csdn.net/qq_41193701/article/details/104990501
项目开发中常量的定义和使用都是广泛的 就比如说正则表达式等等 有限创建存放常量的文件目录 (名字自拟)

partten.js 文件用于存放需要的常量 使用export const 进行声明(此处以正则位例)
特别注意:需要 export const 进行声明
export const textLength = 30;
export const areaLength = 500;
export const phoneNum =  /^((1[3,5,8][0-9])|(14[5,7])|(17[0,6,7,8])|(19[7]))\d{8}$/;
export const email = /^\w+([-+.]\w+)*@\w+([-.]\w+)*\.\w+([-.]\w+)*$/;
方式一: index.js文件 暴露
import * as Partten from './partten.js';
export {
  Partten
};
项目中引用
 import { Partten } from "@/partten"
...............................................
  created() {
	      // 我们这里先直接输出Partten
  		  console.log('常量',Partten);
  		  console.log('常量',Partten.textLength);// 访问属性
  },
方式二: 直接项目引用1(推荐)
import * as Partten from './partten.js';// 引入
mounted(){
	console.log('常量',Partten);
  	console.log('常量',Partten.textLength);// 访问属性
},
方式三: 直接项目引用2
import {textLength,areaLength,phoneNum} from './partten.js';// 引入需要的方法变量
mounted(){
  	console.log('常量',textLength);// 访问属性
},
引入方法
场景说明,当前util 文件名 TMapBaseUtil.js
export function _createMarker (extData, click, dragstart, dragend, dragging) {
    let icon = new T.Icon({
        iconUrl: extData.icon_url,
        id: extData.id,   // 类型id
        iconSize: new T.Point(27, 27), // 图标大小
        iconAnchor: new T.Point(15, 27)  // 位移量
    })
    var marker = new T.Marker(new T.LngLat(Number(extData.lng), Number(extData.lat)), { icon: icon })
    marker.extData = extData // 这里可以像这样给点位添加自定义属性
    click && marker.on('click', () => click(extData, marker))
    dragstart && marker.on('dragstart', () => dragstart(extData, marker))
    dragend && marker.on('dragend', () => dragend(extData, marker))
    dragging && marker.on('dragging', () => dragging(extData, marker))
    return marker
}
....
方式一 直接引入
import { _createMarker, _getAddress } from '@/utils/TMapBaseUtil'
方式二,将方法全部引入
后面直接使用 TMapBaseUtil._createMarker();
import * as TMapBaseUtil from '@/utils/TMapBaseUtil'
方式三,全局
调用 this.TMapBaseUtil._createMarker();
import * as TMapBaseUtil from '@/utils/TMapBaseUtil'
// 或者挂载全局
Vue.prototype.TMapBaseUtil = commonUtil
也可以讲方法注册全局。调用:this._createMarker()
import { _createMarker, _getAddress } from '@/utils/TMapBaseUtil'
Vue.prototype._createMarker = _createMarker;
异步方法
export function _getAddress (LngLat) {
    var geocode = new T.Geocoder()
    return new Promise((resolve, reject) => {
        geocode.getLocation(LngLat, function (res) {
            resolve(res.getAddressComponent())
        })
    })
}
调用
dragend (extData, marker) {
    var LngLat = marker.getLngLat()
    _getAddress(LngLat).then(res => {
        item.address = res.address
    }).catch(rej => {
        console.log('未获取地址信息')
    }).finally(() => {
        // 保存
        alert('save')
    })
},
import 导入样式
scss 通过 import 引入样式,需要 如果使用@ 需要加上 ~
<style lang="scss" scoped>
    @import "~@/assets/style/mapdetail/style.css";
</style>
Vue 图片路径问题
https://blog.csdn.net/qq_33744228/article/details/81319485
1.把图片放在src同级的static文件夹下。 2.把图片放在cdn上,把网络地址存在imgUrl里,然后直接<img :src="imgUrl">去展示。
3.图片放在assets文件夹,然后在data里面require进图片
页面需要 append 一个html 但是图片路径出现问题,出现破图
解决方式 可以:
	data() {
    	imgUrl:require('./assets/logo.png'),// 用的是相对路径 ../../
    	imgUrl:require('@/assets/logo.png'),
    }
<div class="item">
    <h2>引用assets中图片</h2>
    <img class="img"  alt="example" :src="require('../../assets/logo.png')">
    <img class="img"  alt="example" :srcvue="require('@/assets/logo.png')">
    <img class="img"  alt="example" src="~@/assets/logo.png">
</div>
图片加载失败,加载默认图片
<img src="/logo.png" :onerror="defaultImg">

data() {
  return {
    defaultImg: 'this.src="' + require('../../assets/img/timg.jpg') + '"'
  }
}
案例
场景:地图开发,图形覆盖物比较多,所以将 覆盖物 定义为常量,写在js 文件里面,使用时需要 屏接img路径
案例中 GT用到图标位置 @/assets/images/map/tower.png
initTowerExtData(){
    ........
    var extData = {
        name: item.name,
        label_name:label_name,
        id: item.id,
        type: 'tower',
        icon_url:this_.getImgUrl(this_.icon_type['tower']),
        icon_check_url:this_.getImgUrl(this_.icon_type['tower_check']),
        position: position,
        geometryType: 'point'
    };
    .......
},
getImgUrl(imgsrc){
	return require('@/'+imgsrc);
},
js 文件(定义覆盖物的 图形,通过key vue 对的形式 ,方便后期直接获取)
var module_prefix="assets/images/map/";// 图片路径前缀 ,常规想法是 @/assets/images/map/,
export const icon_type = {// 图形 url
    'tower':module_prefix+'tower.png',
    'tower_check':module_prefix+'tower_check.png',
    ............
}
说明:初始 module_prefix = @/assets/images/map 然后再地图vue 中通过 this.icon_type['tower'],获取对应的图片,但是结果报错,无法正常加载。
参考:https://blog.csdn.net/lwh156541064/article/details/112227823
原因:@/ 需要拿出来,如果不拿出来,就无法解析成正确的图片地址
处理: 所以在 vue 中,定义了一个方法 getImgUrl 方法return require('@/'+imgsrc);} 讲 @ 剔除出去,另外不能直接使用pops中的数据
同样在 template里面
<div v-for="(item, index) in dataImg" :key="index">
	<img :src="getImgUrl(item.src)"/>
</div>
无法使用props 传递参数,所以通过html调用
:src="getImgUrl(imgUrl)"
<template>
	<img :src="getImgUrl(imgUrl)" class="no_data_warp__img hp100">
</template>

<script>
    export default {
        name: 'NoRecord',
        props: {
            imgUrl: {
                type: String,
                default: 'assets/image/no_data.png',
            },
        },
        data () {
            return {
                // imgUrl:require('@/assets/image/no_data.png'),// 用的是相对路径 ../../
            }
        },
        methods: {
            getImgUrl(imgUrl) {
                return require('@/' + imgUrl)
            }
        }
    }
</script>
滚动
@touchstart="_touchstart($event)" @touchmove="_touchmove($event)" @touchend="_touchend($event)"
https://blog.csdn.net/weixin_43837268/article/details/102905320
2.横向滚动
通过插件:
https://blog.csdn.net/maxwheel/article/details/85642183
通过css 也能实现
ul {
        width: 100%;
        height: 3.333333rem;
        background: #fff;
        padding: 0.373333rem 0.32rem 0;
        box-sizing: border-box;
        /* 下面是实现横向滚动的关键代码 */
        display: inline;
        float: left;/*没他无法滑动*/
        white-space: nowrap;
        overflow-x: scroll;
        -webkit-overflow-scrolling: touch; /*解决在ios滑动不顺畅问题*/
        overflow-y: hidden;
    }
    ul li {
        display: inline-block;  /*设置li为行内块级元素*/
        width: 3.6rem;
        height: 2.24rem;
        text-align: left;
        border-radius: 6px 6px 6px 6px;
        margin-right: 0.373333rem;
    }

/* 隐藏滚动条*/
ul::-webkit-scrollbar {
    display: none;
}
watch 变量监听
案例
1. 2级菜单,用到 van-tabs和滚动插件
https://blog.csdn.net/dhwmfzh624156/article/details/102319741
用到的知识点:
1.双层循环点击选中 https://blog.csdn.net/super__code/article/details/88416941
2.vue-bscroll 插件的使用 (滚动)
3.van-tabs 的使用
场景: 全景图中间可以打点,点击图片中的marker点,定位到底部导航 tab,并定位到对应的图片位置

<div  class="switch_wrap z_ix13">
				<van-tabs v-if="menuTabShow" id="menu_tab" :class="{ 'van-tabs__wrap--scrollable':menuTabShow}" ref="tabs" class="wh100 bt_menu"  :active="menuTabIndexActive" @click="checkMenuTab"  title-inactive-color="rgb(50, 50, 51,0.5)">
					<van-tab :title="item.name" :name="out_index" v-for="(item ,out_index) in menuTabList">
						<div class="scroll-wrap" ref="scrollWrap">
							<ul class="scroll-list" ref="scrollTab">
								<li class="scroll-item jz_df" :ref="'item_li_'+out_index+'_'+inner_index" :id="'tab_index_'+out_index+'_'+inner_index" v-for="(item_son ,inner_index) in item.children"  :class="{ check:out_index+'_'+inner_index == menuImgIndexActive }">
									<div class="scroll_container wh100 pr"  @click="checkMenuImg(item_son,out_index,inner_index)">
										<img :src="item_son.qjmapRoute" class="tab_meun_img" >
										<div class="bt_label"><span>{{item_son.name}}</span></div>
									</div>
								</li>
							</ul>
						</div>
					</van-tab>
				</van-tabs>
			</div>
// 底部 浮窗-菜单栏
	.switch_wrap {
		position: absolute;
		width:100%;
		height:20%;
		bottom: 0px;
	}
	// tab 组件
    .bt_menu .van-tabs__wrap .van-tabs__nav,.bt_menu .van-tabs__wrap .van-tabs__nav,.bt_menu .van-tab__pane{
		background: rgba(22, 55, 106,0.7);
	}
	// tab文字颜色
    .bt_menu .van-tabs__wrap .van-tab .van-tab__text {
        font-family: Source Han Sans CN;
        font-weight: 400;
        color: #FFFFFF;
        opacity: 0.5;
	}
	// 底部tab选中效果颜色
    .bt_menu .van-tabs__wrap .van-tab.van-tab--active .van-tab__text{
		color: #f8fbf8;
        opacity: 1;
	}
	/* 底部菜单 tab 选中 tab下划线 */
    .bt_menu .van-tabs__line {
		height: 2px;
        background: linear-gradient(
                90deg, #FF6A00 0%, #FF9500 47%, #FF6A00 100%);
	}
    .bt_menu.van-tabs--line .van-tabs__wrap {
		height: 5vh;
	}
	/* 底部tab 下面的图片展示区域 高度 */
    .bt_menu .van-tabs__content{
		width: 100%;
    	height: calc(100% - 5vh);/* 头部tab 高度去掉.van-tabs--line .van-tabs__wrap {height: 44px;} */
	}
    .bt_menu .van-tabs__wrap .van-tab {
		border-bottom: 1px solid rgba(255, 255, 255,0.6);
	}
    .bt_menu .van-tabs__nav--complete{
		padding-right: 0;
    	padding-left: 0;
	}
    .bt_menu .van-tab__pane{
		width:100%;
		height:100%;
	}
	/* 底部tab 图片区域 */
    .switch_wrap .scroll-wrap{
		width:98%;/* 100% 右侧 有点好看 */
		height: 100%;
		box-sizing: border-box;
		overflow: hidden;
		margin :auto;
		padding:10px 0;
	}
	.scroll-list{
		display: flex;
		height: 100%;
        overflow-x: auto;
        overflow-y: hidden;
	}
	.scroll-item{
        /*flex: 1;*/ /* 用来均分空间的*/
		/*width: 150px;*/
        width: 30vw;
        min-width: 30vw;
		height: 100%;
		margin: 0px 6px;
		// border :1px solid #333;
		text-align: center;
		/* 让 图片和外边框 存在 空间,用深色背景 */
		padding: 5px;
    	border-radius: 1vw;
		background: rgba(0,0,0,0.5);
	}
    /*选中效果*/
    .scroll-item.check {
        background: #2E57EB;//rgba(226,28,28,0.5);
    }
    /* marker 添加背景色*/
    .mk_bc{
        background: rgba(0,0,0,0.5);
        border-radius: 5px;
        padding: 2px 5px;
    }

	/* 底部tab 图片区域,每个图片的标签 */
	.bt_label {
		position: absolute;
		bottom: 0px;
		display: flex;
		align-items: center;
		justify-content: center;
		color: #FFFFFF;
		background: rgba(0,0,0,0.5);
		width: 100%;
        font-size: 3vw;
		border-radius: 0 0 2vw 2vw;
		padding: 5px 10%;
	}
	.bt_label span{
		width: 100%;
		overflow: hidden;
		text-overflow: ellipsis;
		white-space: nowrap;
	}
	.tab_meun_img{
		width:100%;height:100%;
		border-radius: 1vw;
	}
菜单数据: tree.json
1.引包
import BScroll from "better-scroll";

export default{
		name: "showVideo",
		components: {
			BScroll
		},
		data() {
			return {
				menuTabIndexActive:0,// 底部菜单 tab默认选中值
                menuImgIndexActive:'0_0',// 底部菜单 tab img 默认选中值
				menuTabList:[],// 底部tab对象
				menuTabShow:false,// 底部tab是否初始化完成,完成 是否显示
                img_wrap_width:0,// 底部tab 图片容器的宽度 .scroll-item 的宽度  因为 当前设置 px会被自动转为 vw,所以默认以 排列3张图片,定底部tab 展示的图片尺寸,initTabImgWarp 调用
                bScroll_bt_tab:''// 底部tab 定义的 bScroll 对象
			}
		},
		// 初始化加载的方法
		mounted() {
			this.initHtml();// 初始化页面
		},
		// beforeRouteLeave(){
		//     this.$refs.videoPlayer.player.pause()
		// },

		methods:{
            //========================# 初始化方法 #==============================
			/**
			 * 页面初始化
			 * 	1.保存父页面传递过来的参数
			 * 	2.初始化当前选中 tab下的检查项,也即 底部的切换栏数据
			 * 	3.初始化图片,分为2种 如果存在全景图,则展示全景图,如果没有则展示平面图。同时右上角的图片切换按理需要对应上
			 */
			initHtml(){
				this.initData();// 初始赋值
				this.initTabImgWarp();// 初始化 底部tab 容器的宽度
			},


            //========================# 2D、3D 交互,点击转场和详情控制 #==============================
            // 点击 标记点,转场或者查看详情
            markerClick(marker){
                this.showLtMenu=true;//左侧,转场、详情 按钮 是否显示
                console.log(marker);
                this.checkMarker=marker;
            },
            // 点击 全景图片中的标记点,并定位定部tab,选中
            cutToSon(){
                // 1.切换 图片选中效果
               this.getImgTabObjById(this.checkMarker.data.checkType);

            },
            // 通过id 变量 获取 选中的 节点,用于 转场是 选中效果
            getImgTabObjById(id){
                var arr=this.menuTabList;
                var result=this.menuImgIndexActive;
                out_loop:for(var out_index=0;out_index<arr.length;out_index++){
                    var out_item=arr[out_index];
                    if(!out_item.children&& out_item.children.length==0){
                        return;
                    }
                    inner_loop:for(var inner_index=0;inner_index<out_item.children.length;inner_index++){
                        var item=out_item.children[inner_index];
                        if(item.id==id){
                            console.log("匹配上"+out_index+'_'+inner_index);
                            this.checkMenuTab(out_index);
                            this.checkMenuImg(item,out_index,inner_index);
                            break out_loop;//跳出循环
                        }
                    }
                }
            },


            //========================# 底部 tab 方法 #==============================
            // 初始化 底部tab 下面的图片容器
            _initScroll (checkIndex) {
                var scrollTabNum = 0// 底部tab 容器的实际宽度
                if (!this.menuTabList[checkIndex] || !this.menuTabList[checkIndex].children || this.menuTabList[checkIndex].children.length == 0) {
                    console.log('暂未获取子项--无3级节点!')
                    return
                }
                this.bScroll_bt_tab='';
                scrollTabNum = this.menuTabList[checkIndex].children.length// 获取 当前 tab下有多少图片
                // this.$nextTick 是一个异步函数,为了确保 DOM 已经渲染
                this.$nextTick(() => {
                    let width = scrollTabNum * (this.img_wrap_width)//scroll-item  宽度定死,150px;
                    this.$refs.scrollTab.style.width = width + 'px'// 设置容器的实际宽度
                    //if(!this.bScroll_bt_tab){
                        this.bScroll_bt_tab = new BScroll(this.$refs.scrollWrap, {
                            startX: 0,
                            click: true,
                            // 划重点:核心所在,只写 scrollX, eventPassthrough就行了,写多了会冲突
                            scrollX: true,
                            eventPassthrough: 'vertical'
                        })
                    // }else{
                    //     this.bScroll_bt_tab.refresh();
                    // }

                })
            },
            // 底部菜单切换
            checkMenuTab (index, title) {
                this.menuTabIndexActive = index// 用于默认选中 底部tab
                setTimeout(() => {
                    this._initScroll(index);
                   // this.bScroll_bt_tab.refresh();
                }, 20);
            },
            //底部tab 图片区域  滚动到指定位置
            vueScrollTo () {
                // 底部滚动到选中的图片
                this.$nextTick(() => {
                    var dom = this.$refs[`item_li_${this.menuImgIndexActive}`]
                    this.bScroll_bt_tab.scrollToElement(dom, 500)
                })
            },
            // 点击底部tab 图片触发 切换
            checkMenuImg (item, out_index, inner_index) {
                // 1.切换 图片选中效果
                this.menuImgIndexActive = out_index + '_' + inner_index
                // 2. 切换 当前页面主图片,并且 打点,定义 mark
                this.init3DView(item)//初始化全景图
                // 3. 定位到 底部tab图片(滚动)
                this.vueScrollTo()
            },


            // 初始化 底部tab 容器的宽度
            initTabImgWarp(){
                const minWrapWidth = this.$refs.minWrap.clientWidth;//当前 页面的 宽度(100%)
                this.img_wrap_width=minWrapWidth/3;// 默认以 排列3个为准,来确定照片 宽度(因为设置了px 会被转为 vw 所有没有在 scroll-item 属性中写死宽度)
            },

		}
	}
监听滚动是否到顶
有于返回顶部按钮,在页面回到顶部后隐藏
//监听浏览器滚动,实现在浏览器顶部的时候
window.addEventListener('scroll', function () {
    if (window.scrollY === 0 || window.pageYOffset === 0) {
        that.srcollOfTop = true;
    } else {
        that.srcollOfTop = false;
    }
});
冒泡
https://blog.csdn.net/weixin_42555713/article/details/108660192
Vue中的事件冒泡和捕获
.stop 阻止冒泡事件
.capture 设置捕获事件
.self 只有点击当前元素的时候,才会触发处理函数
.once处理函数只被触发一次
点击子元素,不想触发父元素的事件,我们可以采用阻止事件冒泡解决 @click.stop
点击从外面执行到里面,先触发父元素再触发子元素 .我们可以在父元素的点击事件加上**@click.capture**
当只有点击自己本身元素才触发事件,忽略冒泡和捕获。@click.self
事件只能触发一次 @click.once
提交事件不会再重载页面** @click.prevent**
滚动事件的默认行为 会立即触发,不会等待onScroll完成,(包含了e.preventDefault()) @scroll.passive
<div @click="gotoDetail(detail)">
    <span  @click.stop="readAllAction(detail)">
        xxx
    </span>
</div>
路由
var url = res.pageUrl + (res.params ? ("?"+res.params) : "");
this.$router.push(url);// 组装成 url 并且参数放到 ?拼接
输入框获取光标
/* 点击 搜索时 默认获取光标*/
checkSerach (id) {
    var this_ = this
    setTimeout(function () {
        this_.$el.querySelector('#' + id).focus()
    }, 1000)
    // this.$refs[`${refs}`][0].focus();
    //  this.$refs.inputSearch2.focus();
},
路由跳转不触发:beforeDestroy
:beforeDestroy 换成beforeUnmount即可
案例:页面中定义了一个定时器,用于实时更新坐标信息,所以用 beforeDestroy 定义定时器销毁方法,但是未生效
beforeDestroy  () {
    if (this.location_interval) { //如果定时器还在运行 或者直接关闭,不用判断
        console.log('坐标信息更新定时器,清除!!!')
        clearInterval(this.location_interval) //关闭
    }
},
methods: {
     updateLocation () {
                var this_ = this
                this.location_interval = setInterval(function () {
                    this_.initLocation()
                    console.log('坐标信息更新')
                }, 500)
            },
}
Vue全局配置按钮防止被重复点击
在main.js 中 自定义指令 preventReClick
// 自定义指令,防止多次点击,重复请求
myApp.directive(
	'preventReClick', {
		mounted: function (el, binding) {
			el.addEventListener('click', () => {
				const events = el.style.pointerEvents
				if (events == "") {
					el.style.pointerEvents = 'none'
					setTimeout(() => {
						el.style.pointerEvents = "";
					}, binding.value || 600);
				}
			})
		}
	}
)
使用
<van-button :loading="isLoading" :loading-text="loadText" v-preventReClick> 提交 </van-button>

<van-button  v-preventReClick> 提交 </van-button>
Vue多人协作开发规范统一指南
待整理: https://my.oschina.net/u/4974233/blog/4939770?_from=gitee_search
如何解决单组件样式影响全局呢?官方提供了 3 中解决方案
scoped Style 中加入 scoped使用CSS Modules来设定 CSS 作用域 `基于 class 的类似 BEM的策略
this.$set
js中使用 set 方法
vue input框只能输入数字
注:input 指定 type="number" 只能输入数字,则 maxlength 属性失效
<!-- 限定整数,并且长度不超过 4 -->
<el-input v-model="form.thpNum" placeholder="请输入塔号牌" @input="formatInportData($event,'4','thpNum',form)"/>
<!-- 限定输入的是 小数,(8,4) -->
<el-input v-model="form.thpNum" placeholder="请输入塔号牌" @input="formatInportData($event,'8,4','thpNum',form)"/>


<!-- vant -->
<van-field v-model="form.pileLength" label="桩长/m" placeholder="请填写桩长"
                                               @keyup="formatInportData($event.target.value,'10,2','pileLength',form)"/>
/**
* 针对 input 对数字格式化 -- 限定只能输入整数和指定格式的小数
* 分为 小数/整数
* @param value : 需要校验的数字
* @param format:指定格式 小数或者整数 "8,4"|| "8"
* @param field:需要跟新的自动
* @param Obj:实体对象 例如表单对象--form
*/
export const formatInportData = (value,format,field,Obj) => {
const formatArr = format.split(",");
let regx2 = '';
if (formatArr.length == 1) { // 说明当前校验的是整数
// value = value.replace(/[^\d]/g,'');
regx2=new RegExp(`^\\d{0,${formatArr[0]}}`);
} else { // 小数
regx2=new RegExp(`^\\d{0,${formatArr[0]}}(?:\\.\\d{0,${formatArr[1]}})?`);
// value = value.toString().match(/^\d{0,8}(?:\.\d{0,4})?/);
}
value = value.toString().match(regx2);
value = value[0];
Obj[field] = value;
// 如果 数据不刷新,使用 set方法,目前使用没遇到问题
// Vue.set([Obj],field,value)// 不能直接使用 this.$set
}
/**
* 限定输入的是数字
* @param value
* @param maxLenght
* @param field:需要跟新的自动
* @param Obj:实体对象 例如表单对象--form
*/
export const formatInportNum = (value, maxLength, field, Obj) => {
let regx = new RegExp(`^(\\-|\\+)?\\d{0,}(?:\\.\\d{0,})?`);//new RegExp(`^(\\-|\\+)?\\d+(\\.\\d+)?$`);
value = value.toString().match(regx);
value = value[0];
// 控制输入的最多位数
if (maxLength && value.length > maxLength) {
value = value.slice(0, maxLength);
}
Obj[field] = value;
}
<el-input v-model="form.largeDistance" placeholder="请输入距大号侧距离" @input="handleOninput($event,'largeDistance')" />
// 限定只能输入数字,并且长度(8,4)
handleOninput (value,field) {
value = value.toString().match(/^\d{0,8}(?:\.\d{0,4})?/);
this.form[field] = value[0]
},
下面的写法 PC会出现 v-model数据绑定不能生效
<el-input v-model="extraScore" placeholder="请输入数字" @input="extraScore = extraScore.replace(/[^\d]/g,'')" ></el-input>
<!-- 限定输入数字的长度 -->
<el-input v-model="form.signDistance" placeholder="请输入签到距离" oninput="if(value.length > 8)value = value.slice(0, 8)" type="number"/>
<!-- 00.0000 格式 -->
<el-input v-model="form.bqLength" placeholder="请输入便桥长度" oninput="value=value.toString().match(/^\d{0,2}(?:\.\d{0,4})?/)" />
- 正整数
<el-input v-model="form.signDistance" placeholder="请输入签到距离" maxlength="6" onkeyup="value=value.replace(/[^0-9]/g,'')" />
<el-input v-model="form.jzfzNum" placeholder="请输入禁止风筝" maxlength="4" onkeyup="value=value.replace(/[^\d]/g,'')" />
<van-field v-model="form.signDistance" label="签到距离(米)" placeholder="请输入" input-align="right" maxlength="6" type="digit"/>
<html lang="en">
<head>
<meta charset="UTF-8">
<title>JS 控制输入框只能输入数字且最多两位小数</title>
</head>
<body>
<h1>JS控制输入框只能输入数字且最多两位小数</h1>
<input id="input" type="text" name="money"/> 元
<script>
document.getElementById('input').onkeyup = function () {
changeNum(this);
}
function changeNum(obj) {
//如果用户第一位输入的是小数点,则重置输入框内容
if (obj.value != '' && obj.value.substr(0, 1) == '.') {
obj.value = "";
}
obj.value = obj.value.replace(/^0*(0\.|[1-9])/, '$1');//粘贴不生效
obj.value = obj.value.replace(/[^\d.]/g, ""); //清除“数字”和“.”以外的字符
obj.value = obj.value.replace(/\.{2,}/g, "."); //只保留第一个. 清除多余的
obj.value = obj.value.replace(".", "$#$").replace(/\./g, "").replace("$#$", ".");
obj.value = obj.value.replace(/^(\-)*(\d+)\.(\d\d).*$/, '$1$2.$3');//只能输入两个小数
if (obj.value.indexOf(".") < 0 && obj.value != "") {//以上已经过滤,此处控制的是如果没有小数点,首位不能为类似于 01、02的金额
if (obj.value.substr(0, 1) == '0' && obj.value.length == 2) {
obj.value = obj.value.substr(1, obj.value.length);
}
}
}
</script>
</body>
</html>
通过监听事件监听,对于一些特殊要求的输入框可以采用此方法
<el-input v-model="form.telephone" placeholder="请输入11位手机号" @change="confirmTelephone"></el-input>
confirmTelephone() {
if (!/^1[0-9]{10}$/.test(this.form.telephone))
this.form.telephone = '';
},
解决el-input输入框使用oninput或onkeyup后,v-model双向绑定失效问题
<el-input v-model="form.account" clearable placeholder="请输入编号" onkeyup="value=value.replace(/[^0-9]/g,'')"
@blur="form.account = $event.target.value" ></el-input>
$event
<input @blur="getData($event)"></input>
axios
async await const
{data:{xxx},data1:{xxxx}.....}
从axios获取数据,然后提取 data,并且重命名为 res
methods: {
async getUserList () {
const { data: res } = await this.$axios.get('users', { params: this.queryInfo });
console.log(res)
}
}
vue2 自定义指令
需要实现触底加载下一页
先封装v-loadmore 指令
- 首先,创建一个新的文件来封装
v-loadmore指令。假设我们将这个文件命名为loadmore-directive.js,并放在src/directives目录下
// src/directives/loadmore-directive.js
export default {
bind(el, binding) {
debugger;
const { arg, value, modifiers } = binding;
const distance = +Object.keys(modifiers)[0] || 0; // 获取修饰符,如果没有则默认为 0
const selectWrap = el.querySelector(`.${arg}`); // 滚动的容器
// 检查 selectWrap 是否存在
if (!selectWrap) {
console.error(`Element with class ${arg} not found.`);
return;
}
const handleScroll = () => {
const isNext =
selectWrap.scrollHeight <= selectWrap.scrollTop + selectWrap.clientHeight + distance;
if (isNext) {
value(); // 触发回调函数
}
};
// 添加滚动事件监听器
selectWrap.addEventListener('scroll', handleScroll);
// 将 handleScroll 存储在元素上以便后续访问
el._handleScroll = handleScroll;
el._vLoadmoreArg = arg; // 存储 arg 以便在 unbind 中使用
},
unbind(el) {
const selectWrap = el.querySelector(`.${el._vLoadmoreArg}`);
if (selectWrap && el._handleScroll) {
// 移除滚动事件监听器
selectWrap.removeEventListener('scroll', el._handleScroll);
delete el._handleScroll; // 清除属性以防内存泄漏
delete el._vLoadmoreArg; // 清除 arg 属性
}
}
};
- 在主文件中注册指令:在
main.js中导入并注册这个指令模块。
import loadmoreDirective from './directives/loadmore-directive';
// 注册 v-loadmore 指令
Vue.directive('loadmore', loadmoreDirective);
在组件中使用指令
<template>
<div ref="tableContent" class="table-content" >
<div class="wp100 task-list-wrap" v-loading="loading" v-loadmore:task-list-content="loadMoreData" >
<!-- tab组件 -->
<task-tab ref="taskTabRef" @checkTab="checkTab" :procDefKey="procDefKey"/>
<div class="task-list-content df_rwrap" >
<!-- 列表内容 -->
<task-list-item v-for="(item, index) in dataList" :key="item.id" :itemObj="item" :index="index" :dataType="dataType"/>
<!--暂无记录-->
<div class="list-default" v-if="dataList.length == 0 && !loading">
<NoRecord ref="norecord" tip_mess="暂无记录~"></NoRecord>
</div>
</div>
</div>
</div>
</template>
<script>
export default {
data() {
return {
// 遮罩层
loading: true,
finished: false,
// 总条数
total: 0,
dataList: [],
// 是否显示弹出层
activeCollapseNames: [],// 搜索栏 折叠 区域
// 查询参数
queryParams: {
pageNum: 0,
pageSize: 12
}
};
},
created() {
const item = this.$route.query; // 所以当前 页面跳转过来需要 通过 this.$router.push({ path: 'actTaskList' ,query:{}})
this.loadData(item);
},
methods: {
checkTab(item){
this.onRefresh()// 列表数据加载
},
loadData(item) {
this.queryParams.pageNum = 1
this.onRefresh()// 列表数据加载
},
// 加载更多数据的逻辑
loadMoreData() {
if(this.loading){ // 说明当前在切换tab,不应该去加载更多数据,是当前功能实现的bug,无法解决,所以通过this.loading=true 来return
return;
}
if ( !this.finished) {
this.onLoad();
} else {
this.msgInfo("没有更多了");
}
},
/* 下拉加载-重现加载*/
onRefresh() {
this.dataList = []// 清空列表数据
this.finished = false;
this.queryParams.pageNum = 0
this.onLoad();
},
/** 查询桩基检测人员审核列表 */
async onLoad() {
this.loading = true;
let dataUrl = '/activiti/task/selectTaskPage'; // 查询代办
this.queryParams.pageNum++;
const response = await this.$axiosApi(dataUrl, this.queryParams, 'get')
this.loading = false
if (response.code == 200 && response.rows) {
this.dataList = this.dataList.concat(response.rows);
this.total = response.total
if ((this.dataList.length == response.total) || response.rows.length == 0) {
this.finished = true// 数据加载完成
}
}else{
this.finished = true;
}
},
};
</script>
常用组件记录
1.日历
第一种 https://blog.csdn.net/weixin_41839894/article/details/121824947 官网:https://vcalendar.netlify.app/
第二种:vue-hash-calendar 更适用于app,可以左右滑动 vue: https://gitee.com/HashTang/vue-hash-calendar/
vue3: https://gitee.com/HashTang/vue3-hash-calendar
https://blog.csdn.net/u012011360/article/details/115667070
2.vue-shop 表格中使用树形控件 vue-table-width-tree-grid

https://www.npmjs.com/package/vue-table-with-tree-grid
https://blog.csdn.net/weixin_57607714/article/details/126377250
3.vue-quill-editor富文本编辑器使用步骤
4.Nprogress是一个比较简单的页面加载用进度条
两种方式引入依赖
- vue ui 面版
依赖-->安装依赖--> 运行依赖 --> nProgress
- 通过命令
npm install --save nprogress
import NProgress from "nprogress"
import 'nprogress/nprogress.css' //这个样式必须引入
import Vue from 'vue'
import App from './App.vue'
import router from './router'
import './plugins/element.js'
// 引入全局样式
import './assets/css/style.css'
// 图标库
import './assets/fonts/iconfont.css'
// 引入axios
import axios from 'axios'
// 引入进度条 start进度条开始 done进度条结束
import nProgress from 'nprogress';
// 引入进度条样式,如果不引入那就没有效果
import 'nprogress/nprogress.css';
// 配置请求跟路径
axios.defaults.baseURL = 'http://127.0.0.1:8888/api/private/v1/';
// axios请求拦截
axios.interceptors.request.use(config => {
// 为请求头对象,添加 Token 验证的 Authorization 字段
config.headers.Authorization = window.sessionStorage.getItem('token');
// start进度条开始
nProgress.start();
return config;
})
// 响应拦截器
axios.interceptors.response.use((config) => {
// done进度条结束
nProgress.done();
return config;
})
Vue.prototype.$axios = axios
Vue.config.productionTip = false
new Vue({
router,
render: h => h(App)
}).$mount('#app')
// 对axios进行二次封装
import axios from 'axios';
// 引入进度条 start进度条开始 done进度条结束
import nProgress from 'nprogress';
// 引入进度条样式,如果不引入那就没有效果
import "nprogress/nprogress.css";
// 1.利用axios对象的方法create,去创建一个axios实例
// 2.request就是axios,只不过稍微配置一下
const requests = axios.create({
// 配置对象
// 基础路径,发送请求的时候,路径中会出现api
baseURL:'/api',
// 代表请求超时的时间5s
timeout:5000,
});
// 请求拦截器
requests.interceptors.request.use((config)=>{
// start进度条开始
nProgress.start();
return config;
});
// 响应拦截器
requests.interceptors.response.use((res)=>{
// done进度条结束
nProgress.done();
return res.data;
},(error)=>{
// 响应失败的回调函数
return Promise.reject(new Error('faile')); // 终止promise回调
})
// 对外暴露
export default requests;
5. 移除所有console.*
npm install babel-plugin-transform-remove-console --save-dev
依赖-->安装依赖-->开发依赖 --> babel-plugin-transform-remove-console
然后在 文件 babel.config.js 中添加 'transform-remove-console'
// 项目发布阶段需要用到的babel插件
const prodPlugins = []
if (process.env.NODE_ENV === 'production') {
prodPlugins.push('transform-remove-console')
}
module.exports = {
presets: [
'@vue/cli-plugin-babel/preset'
],
plugins: [
[
'component',
{
libraryName: 'element-ui',
styleLibraryName: 'theme-chalk'
}
],
// 发布产品时候的插件数组(... 展开运行符)
...prodPlugins
]
}
build
vue-cli-service build --mode production --target app --no-module --dashboard
server
vue-cli-service serve --mode development --dashboard
表格-支持编辑单元格
https://vxetable.cn/#/table/start/install
图片放大插件 vue-photo-preview
异步加载数据需要调用 this.$previewRefresh(); 否则没有反应
preview:是用来分组的,如果每个图片的值都不一样,则没有下一张按钮
npm i vue-photo-preview --save
main.js,添加如下代码片段
import preview from 'vue-photo-preview'
import 'vue-photo-preview/dist/skin.css'
Vue.use(preview)
第一种方式:直接使用
<img src="xxx.jpg" preview preview-text="图片描述">
第二种方式:可以根据preview分组,不同组的照片对应的preview值不同,具体如下所示。
<img src="xxx.png" preview="1" preview-text="描述1-1">
<img src="xxx.png" preview="1" preview-text="描述1-2">
<img src="xxx.png" preview="1" preview-text="描述1-3">
<img src="xxx.png" preview="2" preview-text="描述2-1">
<img src="xxx.png" preview="3" preview-text="描述3-1">
Vue 表单设计器&自定义表单
https://blog.csdn.net/lc8023xq/article/details/110132452
| 方案 | 框架 | UI库 | 备注 |
|---|---|---|---|
| formilyjs | React、Vue | AntD、Element、Vant等主流 | 校验、事件交互阿里巴巴开源的表单设计工具体系,能做到一份表单设计多端适配;但是对 vue3 支持不完备(设计器得自己做) |
| FormMaking | VUE | AntD、Element | 校验、事件交互操作良好,需要高级版本才支持 vue3 |
| form-generator | VUE | Element | 校验 操作良好,预览不友好(不够直接爽快),目前不支持vue3 |
| form-create | VUE | iView、AntD、Element、Naive UI | 校验操作良好,支持多个 UI 框架,对 vue 2/3 均支持,无设计器 |
| VForm | VUE | Element | 校验、事件交互 操作良好,开源版不支持数据源、子表单 |
1. Variant Form
- 视频:https://space.bilibili.com/626932375
- demo: https://blog.csdn.net/jmszl1991/article/details/128546645
2. form-generator
- 下拉选无法动态添加数据
- 无法创建工大类型,只能作为表单创建器,用来创建平时开发的vue页面
2. form-create
支持Vue3 及 ElementPlusUI、AntDesign、iview 框架
下拉选能动态添加数据(接口)
3. form-create-designer
4. Vue Formulate
适配 Element Plus UI 框架的表单设计器(更适合创建vue组件)
5. form-render
阿里团队开源表单设计器,自家 Antd UI 框架友好
卡拉云 - 低代码开发工具,表单设计器的超集,拖拽表单直接连接后端数据,即搭即用
6. k-form-design
基于vue+ant-design-vue的表单设计器
设计器布局参考form-generator项目,基于vue和ant-design-vue实现的表单设计器,样式使用less作为开发语言,主要功能是能通过简单操作来生成配置表单,生成可保存的JSON数据,并能将JSON还原成表单,使表单开发更简单更快速
7. GRID-FORM
https://github.com/0604hx/grid-form
8. FormMaking
收费的
- 定义了行内布局
https://form.making.link/sample/#/zh-CN/
9.简道云:
表单设计器(最好看,支持app和PC),工作流设计
https://www.jiandaoyun.com/dashboard#/
vue 格式化时间组件 dayjs
常用方法
isBefore
isBefore 是 dayjs 库中的一个方法,用于检查一个日期是否在另一个日期之前。
在您提供的代码片段中,startDate.isBefore(lastDayOfMonth) 表示使用 isBefore 方法检查 startDate 是否在 lastDayOfMonth 之前。如果是,则条件成立,进入循环体执行相应的代码。
举个例子:
const dayjs = require('dayjs');
const startDate = dayjs('2023-01-01');
const lastDayOfMonth = dayjs('2023-01-31');
// 检查 startDate 是否在 lastDayOfMonth 之前
if (startDate.isBefore(lastDayOfMonth)) {
console.log('startDate 在 lastDayOfMonth 之前');
}
在这个例子中,我们创建了两个 dayjs 对象,分别代表 startDate 和 lastDayOfMonth。然后使用 isBefore 方法来比较这两个日期对象,判断 startDate 是否在 lastDayOfMonth 之前。如果条件成立,将会输出 "startDate 在 lastDayOfMonth 之前"。
isSame
isSame 是 dayjs 库中的一个方法,用于检查一个日期是否与另一个日期相同。
在 dayjs 中,isSame 方法用于比较两个日期是否具有相同的年份、月份和日期。它会返回一个布尔值,表示两个日期是否相同。
以下是一个示例:
const dayjs = require('dayjs');
const date1 = dayjs('2023-01-15');
const date2 = dayjs('2023-01-15');
// 检查 date1 是否与 date2 相同
if (date1.isSame(date2)) {
console.log('date1 与 date2 相同');
}
在这个例子中,我们创建了两个 dayjs 对象 date1 和 date2,它们都表示同一天:2023年1月15日。然后使用 isSame 方法来比较这两个日期对象,判断它们是否相同。如果条件成立,将会输出 "date1 与 date2 相同"。
isSame 方法还可以接收一个可选参数,用于指定要比较的精度。默认情况下,它会比较年、月和日。如果传递 'year',则只比较年份;如果传递 'month',则只比较年份和月份。
vue 格式化时间组件 moment
1. 引入库
npm install moment --save
2.在main.js中全局引入(也可单独在使用的文件中引入,具体看需求)
import moment from "moment"
Vue.prototype.$moment = moment;
3. 使用
- 日期格式化:
moment().format('MMMM Do YYYY, h:mm:ss a'); // 五月 11日 2021, 6:42:31 下午
moment().format('dddd'); // 星期二
moment().format("MMM Do YY"); // 5月 11日 21
moment().format('YYYY [escaped] YYYY'); // 2021 escaped 2021
moment().format(); //2021-05-11T18:06:42+08:00
- 相对时间:
moment("20111031", "YYYYMMDD").fromNow(); // 2011/10/31号相对于现在是: 10 年前
moment("20120620", "YYYYMMDD").fromNow(); // 2012/06/20号相对于现在是: 9 年前
moment().startOf('day').fromNow(); //当前日期开始即:2021/05/11/00:00:00相对于现在是: 19 小时前
moment().endOf('day').fromNow(); //当前日期结束即:2021/05/11/24:00:00相对于现在是: 5 小时内
moment().startOf('hour').fromNow(); //当前日期小时开始即:2021/05/11/18:00:00相对于现在是: 42分钟前
- 日历时间:
moment().subtract(10, 'days').calendar(); // 当前时间往前推10天的日历时间: 2021/05/01
moment().subtract(6, 'days').calendar(); // 当前时间往前推6天: 上星期三18:42
moment().subtract(3, 'days').calendar(); // 当前时间往前推3天: 上星期六18:42
moment().subtract(1, 'days').calendar(); // 当前时间往前推1天: 昨天18:42
moment().calendar(); // 今天18:42
moment().add(1, 'days').calendar(); // 当前时间往后推1天: 明天18:42
this.moment().subtract('1', 'd').format('YYYY-MM-DD');// 减一天
moment().add(3, 'days').calendar(); // 当前时间往后推3天: 下星期五18:42
moment().add(10, 'days').calendar(); // 当前时间往后推10天: 2021/05/21
时间加、减
moment().add(7, 'days');
moment().add(1, 'months');
// this.moment().subtract('1', 'd').format('YYYY-MM-DD');// 减一天
| 键 | 快捷键 |
|---|---|
| years | y |
| quarters | Q |
| months | M |
| weeks | w |
| days | d |
| hours | h |
| minutes | m |
| seconds | s |
| milliseconds | ms |
案例
当前月
nowMonth(date) {// date 可为空,也可为字符串 如 '2022-01-03'
let startDate = moment(date).startOf("month").format("YYYY-MM-DD HH:mm:ss")
let endDate = moment(date).endOf("month").format("YYYY-MM-DD HH:mm:ss")
return [startDate, endDate]
},
//输出===> ["2022-01-01 00:00:00","2022-01-31 23:59:59"]
上月
preMonth(date) {
let startDate = moment(date).subtract(1, "month").startOf("month").format("YYYY-MM-DD HH:mm:ss")
let endDate = moment(date).subtract(1, "month").endOf("month").format("YYYY-MM-DD HH:mm:ss")
return [startDate, endDate]
},
// 输出:["2021-12-01 00:00:00",“2021-12-31 23:59:59”]
nextMonth(date) {
let startDate = moment(date).add(1, "month").startOf("month").format("YYYY-MM-DD HH:mm:ss")
let endDate = moment(date).add(1, "month").endOf("month").format("YYYY-MM-DD HH:mm:ss")
return [startDate, endDate]
},
// 输出:["2022-02-01 00:00:00",“2022-02-28 23:59:59”]
日期格式
| 格式 | 含义 | 举例 | 备注 |
|---|---|---|---|
| yyyy | 年 | 2021 | 同YYYY |
| M | 月 | 1 | 不补0 |
| MM | 月 | 01 | |
| d | 日 | 2 | 不补0 |
| dd | 日 | 02 | |
| dddd | 星期 | 星期二 | |
| H | 小时 | 3 | 24小时制;不补0 |
| HH | 小时 | 18 | 24小时制 |
| h | 小时 | 3 | 12小时制,须和 A 或 a 使用;不补0 |
| hh | 小时 | 03 | 12小时制,须和 A 或 a 使用 |
| m | 分钟 | 4 | 不补0 |
| mm | 分钟 | 04 | |
| s | 秒 | 5 | 不补0 |
| ss | 秒 | 05 | |
| A | AM/PM | AM | 仅 format 可用,大写 |
| a | am/pm | am | 仅 format 可用,小写 |
vue 使用富文本
VUE V-HTML 富文本图片溢出
<div class="text" v-html="meet.conference_remark"></div>
<style>
.text{
/deep/ img {
width: 100%;
}
}
</style>
watch监听
watch: {
'$store.state.type_model.subType'() {
this.loadData()
}
},
watch: {
filePaths: {
handler (newValue, oldValue) {
this.initData(newValue)
},
deep: true
}
},
vue实现思维脑图
https://my.oschina.net/lichaoqiang/blog/880846
https://zhuanlan.zhihu.com/p/652255758
https://github.com/MarkMindCkm/Mark-Mind/tree/main
https://github.com/wanglin2/mind-map
https://github.com/ssshooter/mind-elixir-core/blob/master/readme.cn.md
https://gitee.com/hizzgdev/jsmind
Vuex持久化插件(vuex-persistedstate)
https://blog.csdn.net/qq_54527592/article/details/122378328
uuid
npm install uuid
import {v4 as uuidv4} from "uuid";
const myUUID = uuidv4();
console.log(myUUID);
video标签
<video ref="videoPlayer" width="840" height="680" controls>
<source :src="videoSrc" type="video/mp4">
</video>
自动播放&并且全屏
playVideo() {
this.$nextTick(() => {
// 通过 ref 获取 video 元素
const videoPlayer = this.$refs.videoPlayer;
// 重新加载视频并播放
if (videoPlayer) {
videoPlayer.load(); // 解决修改视频src,无法更新的问题
videoPlayer.play(); // 播放视频
this.videoFullscreen(videoPlayer); // 使视频播放器本身全屏
}
});
},
videoFullscreen(videoPlayerRef){
if (videoPlayerRef.requestFullscreen) {
videoPlayerRef.requestFullscreen(); // 使视频播放器本身全屏
} else if (videoPlayerRef.mozRequestFullScreen) { // Firefox
videoPlayerRef.mozRequestFullScreen();
} else if (videoPlayerRef.webkitRequestFullscreen) { // Chrome, Safari, Opera
videoPlayerRef.webkitRequestFullscreen();
} else if (videoPlayerRef.msRequestFullscreen) { // IE/Edge
videoPlayerRef.msRequestFullscreen();
}
},
Runtime-only 报错
报错:You are using the runtime-only build of Vue where the template compiler is not available. Either pre-compile the templates into render functions, or use the compiler-included build.
参考:https://blog.csdn.net/m0_49008668/article/details/141428222
vue 项目有两种模式:Runtime+compiler模式 和 Runtime-only 模式,vue 模块的 package.json 的 main 字段默认为 Runtime-only 模式,指向“dist/vue/runtime.common.js”位置。
方式1:修改模式,指定vue项目模式为:Runtime+compiler模式
vue.config.js 中的配置文件为
module.exports = {
runtimeCompiler:true
}
方式2: 在vue.config.js文件内加上 webpack 的如下配置:
module.exports = {
// webpack配置 - 简单配置方式
configureWebpack: {
resolve: {
alias: {
"vue$": "vue/dist/vue.esm.js", //加上这一句
}
}
}
}
Mousetrap键盘快捷键
npm install mousetrap --save
第三方库
省市区县地址库
https://github.com/Plortinus/element-china-area-data
Vue3拖拽插件Vue.Draggable.next
vue.draggable.next 是一款vue3的拖拽插件,基于Sortable.js实现的,你可以用它来拖拽列表、菜单、工作台、选项卡等常见的工作场景,具体效果可见下图
官网地址:https://gitcode.net/mirrors/SortableJS/vue.draggable
https://www.itxst.com/vue-draggable-next/tutorial.html
vue数字滚动插件vue-countTo
npm install vue-count-to

国内常用静态资源 CDN 公共库加速服务
1.BootCDN BootCDN 是 Bootstrap 中文网和又拍云共同支持并维护的前端开源项目免费 CDN 服务,由又拍云提供全部 CDN 支持,致力于为 Bootstrap、jQuery、Angular 一样优秀的前端开源项目提供稳定、快速的免费 CDN 加速服务。BootCDN 所收录的开源项目主要同步于 cdnjs 仓库。 自2013年10月31日上线以来已经为上万家网站提供了稳定、可靠的免费 CDN 加速服务。
2.字节跳动静态资源公共库
字节跳动静态资源库支持多协议、资源动态拼接、快速检索及资源的动态更新,安全、稳定、实时。
3.又拍云常用JavaScript库CDN服务 又拍云为您托管常用的JavaScript库,您可以在自己的网页上直接通过script标记引用这些资源。这样做不仅可以为您节省流量,还能通过我们的CDN加速,获得更快的访问速度。
4.百度静态资源公共库 是稳定,快速,全面,开源的国内CDN加速服务。 由百度遍布全国各地100+个CDN节点提供加速服务。 让开源库享受与百度首页静态资源同等待遇。 全面,开源 收录超过180+开源库,并且这个数字正在不断增加。 百度静态资源公共库服务不仅在Github开源库上接受任何人的提交请求,同时实时同步国外如CDNJS上优秀的开源库。
5.新浪云计算公共Js库 新浪云计算是新浪研发中心下属的部门,主要负责新浪在云计算领域的战略规划,技术研发和平台运营工作。主要产品包括 应用云平台Sina App Engine(简称SAE)。 SAE的CDN节点覆盖全国各大城市的多路(电信、联通、移动、教育)骨干网络,使开发者能够方便的使用高质量的CDN服务。
6.Staticfile CDN 像 Google Ajax Library,Microsoft ASP.net CDN,SAE,Baidu,Upyun 等 CDN 上都免费提供的 JS 库的存储,但使用起来却都有些局限,因为他们只提供了部分 JS 库。当然,我们还可以有像 CDNJS 这样的平台,存储了大部分主流的 JS 库,甚至 CSS、image 和 swf,但国内的访问速度却不是很理想,并且缺少很多国内优秀开源库。 因此,我们提供这样一个仓库,让它尽可能全面收录优秀的开源库,并免费为之提供 CDN 加速服务,使之有更好的访问速度和稳定的环境。同时,我们也提供开源库源接入的入口,让所有人都可以提交开源库,包括 JS、CSS、image 和 swf 等静态文件。
7.360 前端静态资源库 60 前端静态资源库是由奇舞团支持并维护的开源项目免费 CDN 服务,支持 HTTPS 和 HTTP/2,囊括上千个前端资源库和 Google 字体库。 本站静态资源库数据均同步于 cdnjs,如发现版本更新不及时或未收录,欢迎向 cdnjs 提交 PR。
7.Microsoft ASP.net CDN
ASP.Net开发团队推出的一个新的微软Ajax CDN(Content Delivery Network,内容分发网络)服务,该服务提供了对AJAX库(包括jQuery 和 ASP.NET AJAX)的缓存支持。该服务是免费的,不需任何注册,可用于商业性或非商业性用途。
https://docs.microsoft.com/en-us/aspnet/ajax/cdn/overview
8.jsDelivr开源CDN A free super-fast CDN for developers and webmasters jsDelivr开源CDN(内容分发网络)是一个公开的,任何人都可以提交。 通过使用GitHub,允许社区完全与jsDelivr通过添加和更新文件。
vuecli3去掉代码混淆和压缩
在vue.config.js中加上这句代码
module.exports = {
chainWebpack (config) {
config.optimization.minimize(false)
}
}
后台管理系统
https://gitee.com/liuyaping007/vuefrom1.1.0
CRMEB开源商城系统
前后分离,uniapp、微信公众号H5、小程序、wap、pc、APP等
- https://gitee.com/ZhongBangKeJi/CRMEB
- CRMEB开源商城Java版:https://gitee.com/ZhongBangKeJi/crmeb_java
- 安装教程:https://doc.crmeb.com/single/v5/7714
敲敲云
https://help.qiaoqiaoyun.com/account.html
ferry 自定义工单系统
https://www.fdevops.com/docs/ferry-tutorial-document/introduction
https://blog.csdn.net/qq_62294245/article/details/125496810
FastBee开源物联网平台
https://gitee.com/kerwincui/wumei-smart
ruo-yi-vue-docHub
https://gitee.com/Ning310975876/ruo-yi-vue-docHub
低代码开发
https://blog.csdn.net/wxz258/article/details/116465369
简道云:
表单设计器,工作流设计
https://www.jiandaoyun.com/dashboard#/
简搭云在线可视化表单设计,低码平台
https://gitee.com/liuyaping007/vuefrom1.1.0
异常记录
1. 有时属性设置 true/false 未生效
:modal="false" 添加 :
<el-dialog :visible.sync="dialogVisible" :modal="false">
<img width="100%" :src="dialogImageUrl" alt="">
</el-dialog>
2. vue 浏览器中告警
2.1 Vue3 Extraneous non-props attributes (id) were passed to component but could not be automatically
原因:
- 1.一个组件可能有多个根节点,请确保组件在单一根节点下
- 2.外部组件不要直接放在template下,最外层加div包裹
2.2 父组件和子组件交互的方法,发出告警
列如下面:对 sonHandleCallback 发出告警
<ShojamManageListItem :type="type"
:index="index"
:key="index" :form="item" @sonHandleCallback="sonHandleCallback"
></ShojamManageListItem>
处理:在子组件中 emits:["sonHandleCallback"], 和 data同级dd
3. v-model绑定v-for循环对象会报错问题
You are binding v-model directly to a v-for iteration alias. This will not be able to modify the v-for source array because writing to the alias is like modifying a function local variable. Consider using an array of objects and use v-model on an object
循环
[
{
"signInTime": "2022-07-16 08:50",
"address": "测试模式3173790242117.24520205",
"children": [
{
"防护措施": [
"http://172.16.10.32:18081//ahsbd/ds_files/2022/07/16/92f4b98e-02fb-4267-9d3a-eacf1e2217cf.png",
"http://172.16.10.32:18081//ahsbd/ds_files/2022/07/16/3260af80-62c7-42ca-beec-bfcfaa4cf6e0.png",
"http://172.16.10.32:18081//ahsbd/ds_files/2022/07/16/994d2e85-56ee-40dd-8c15-5a91dafe0900.png",
"http://172.16.10.32:18081//ahsbd/ds_files/2022/07/16/499ce3a9-c884-4742-b6e6-ef57d83a2129.png",
"http://172.16.10.32:18081//ahsbd/ds_files/2022/07/16/8fb2b63e-74e4-45b3-821d-2c9712b7d7e3.png"
]
},
{
"隐患内容": [
"http://172.16.10.32:18081//ahsbd/ds_files/2022/07/16/6e2132d0-533c-4124-9117-7a70a62929e8.png",
"http://172.16.10.32:18081//ahsbd/ds_files/2022/07/16/a2329cc3-9e63-4105-a838-1c1abbe87110.png",
"http://172.16.10.32:18081//ahsbd/ds_files/2022/07/16/557bcc40-eafb-4b99-a56d-2f52393c8c50.png",
"http://172.16.10.32:18081//ahsbd/ds_files/2022/07/16/30d923d1-26fc-4fb6-baac-4eb246988239.png"
]
},
{
"相对位置": [
"http://172.16.10.32:18081//ahsbd/ds_files/2022/07/16/71c288c6-5abe-4b91-9f71-f0bc906a7e87.png",
"http://172.16.10.32:18081//ahsbd/ds_files/2022/07/16/3cf594f0-4b34-4f66-b0dd-41ec7ba7e10a.png"
]
}
],
},
{
"signInTime": "2022-07-16 08:51",
"address": "测试模式3173790242117.24520205",
"children": [
{
"防护措施": [
"http://172.16.10.32:18081//ahsbd/ds_files/2022/07/16/61b5cd12-dda1-4fe9-9f70-bcb7c713af71.png",
"http://172.16.10.32:18081//ahsbd/ds_files/2022/07/16/bc6f0868-9499-42b5-a6d7-9bd9395d9dce.png"
]
},
{
"隐患内容": [
"http://172.16.10.32:18081//ahsbd/ds_files/2022/07/16/5479e831-acb1-4773-94c9-59916b067f4a.png",
"http://172.16.10.32:18081//ahsbd/ds_files/2022/07/16/abe1e2ea-fad6-4c59-aa9a-c118ac3825aa.png",
"http://172.16.10.32:18081//ahsbd/ds_files/2022/07/16/2333c2ed-0856-4c16-915e-c9db0cc5ee8e.png"
]
},
{
"相对位置": [
"http://172.16.10.32:18081//ahsbd/ds_files/2022/07/16/700fd261-e0cf-4d12-9731-bd2fd99c81f9.png",
"http://172.16.10.32:18081//ahsbd/ds_files/2022/07/16/9d6395eb-d9b3-48b3-b606-898066d83ae8.png",
"http://172.16.10.32:18081//ahsbd/ds_files/2022/07/16/26c61423-53ec-4346-a553-36082aa46d3f.png",
"http://172.16.10.32:18081//ahsbd/ds_files/2022/07/16/1ef5dcaf-2c62-46d4-b47b-a6e3671d6a44.png"
]
}
],
}
]
本来正常想法是 <van-uploader v-model="val" :deletable="false" :show-upload="false"/> 但是报错
<div v-for="(inner_item2, index2) of item">
<div v-for="(val, key) of inner_item2">
<div>{{key}}</div>
<van-uploader v-model="inner_item2[key]" :deletable="false" :show-upload="false"/>
</div>
</div>
4. 输入框中 赋值后无法输入
<el-input type="textarea" v-model="form.scheduleDesc" placeholder="请输入治理进展说明" maxlength="500"/>
是 maxlength、minlength 导致的, 如果不能去掉这个属性,通过 this.$set(this.form, 'scheduleDesc', data) 方式赋值
5. Component name “xxxxx“ should always be multi-word.eslintvue
参考:https://blog.csdn.net/u013078755/article/details/123581070
原因:组件命名的时候不够规范,根据官方风格指南,除了根组件(App.vue)外,自定义组件名称应该由多单词组成,防止和html标签冲突。 而最新的vue-cli创建的项目使用了最新的vue/cli-plugin-eslint插件,在vue/cli-plugin-eslint v7.20.0版本之后就引用了vue/multi-word-component-names规则,所以在编译的时候判定此次错误。
方案一
改名 修改组件名为多个单词,使用大驼峰命名方式或者用“-”连接单词。但是有时候因为个别原因不能改名,此方案不好使,看下面两个方案。
方案二:
关闭校验(此方案治标不治本,只是编译时不报错,如果使用vscode+eslint 会在文件头标红提示) 在根目录下找到vue.config.js文件(如果没有则新建一个),添加下面的代码
lintOnSave: false
添加后文件示例:
const { defineConfig } = require('@vue/cli-service')
module.exports = defineConfig({
transpileDependencies: true,
//关闭eslint校验
lintOnSave: false
})
方案三(推荐)
关闭命名规则校验 在根目录下找到 .eslintrc.js 文件,同样如果没有则新建一个(注意文件前有个点),代码如下
添加一行:
"vue/multi-word-component-names":"off",
添加后的效果
module.exports = {
root: true,
env: {
node: true
},
'extends': [
'plugin:vue/essential',
'eslint:recommended'
],
parserOptions: {
parser: '@babel/eslint-parser'
},
rules: {
'no-console': process.env.NODE_ENV === 'production' ? 'warn' : 'off',
'no-debugger': process.env.NODE_ENV === 'production' ? 'warn' : 'off',
//在rules中添加自定义规则
//关闭组件命名规则
"vue/multi-word-component-names":"off",
},
overrides: [
{
files: [
'**/__tests__/*.{j,t}s?(x)',
'**/tests/unit/**/*.spec.{j,t}s?(x)'
],
env: {
jest: true
}
}
]
}
6.插件样式修改不生效
:deep(.van-grid-item__content) {
align-items: center;
justify-content: space-between !important;
}
自定义组件双向绑定失效
需要绑定的对象是一个数组( form.jcUserIdArr ),但是子组件 emit 后就是无法实现对 绑定的对象赋值,直接用 v-model="jcUserIdArr" 就能实现绑定,
原因是对
form.jcUserIdArr初始化 异常导致的数据加载后,可能this.form.jcUserIdArr 是一个undefined 直接对其赋值 会导致数据 绑定失效,需要先初始化后再赋值
<multi-select-popup title="请选择检测人员" v-model="form.jcUserIdArr" />
initUserSelect () {
this.form.jcUserIdArr = []; // 这步很关键,缺了这步会导致双向绑定失效
var jcUserIdArr = []
// 业务处理 .....
this.form.jcUserIdArr = jcUserIdArr;
},
子组件
注意如果是vue3.x 用modelValue 接收,而不是 value 否则也会接收不到
props: {
modelValue: {
type: [String, Number],
default: ''
}
},
vue3.x 修改使用 update:modelValue
this.$emit('update:modelValue', this.ids.join())
编译VUE项目报错,无法识别?.形式的写法
https://blog.csdn.net/qq_44516081/article/details/125483223
项目报错无法识别 businessObject.loopCharacteristics?.completionCondition?.body ?? ""
解决办法:
- package.json中增加一下依赖:
"@babel/plugin-proposal-nullish-coalescing-operator": "^7.17.12",
"@babel/plugin-proposal-optional-chaining": "^7.17.12"
然后在babel.config.js文件中增加以下plugins部分
module.exports = {
presets: ["@vue/cli-plugin-babel/preset"],
plugins: [
'@babel/plugin-proposal-nullish-coalescing-operator', // 双问号
'@babel/plugin-proposal-optional-chaining' // 可选链
]
};
vue需要支持 可选链
data?.extData这样的写法
1. 安装 Babel 插件
首先,确保你已安装 @babel/plugin-proposal-optional-chaining 插件。可以使用以下命令安装:
bashnpm install --save-dev @babel/plugin-proposal-optional-chaining
2. 更新 Babel 配置
然后,在你的 Babel 配置文件中(例如 .babelrc 或 babel.config.js),将该插件添加到 plugins 部分:
如果你使用的是 .babelrc:
json{
"presets": ["@babel/preset-env"],
"plugins": ["@babel/plugin-proposal-optional-chaining"]
}
如果你使用的是 babel.config.js:
javascriptmodule.exports = {
presets: ['@babel/preset-env'],
plugins: ['@babel/plugin-proposal-optional-chaining']
};
打包优化
webpack-bundle-analyzer 的使用
npm install --save-dev webpack-bundle-analyzer