
paperjs
paperjs
Paper.js 是一个在 HTML5 Canvas 上运行的开源矢量图形脚本框架。它提供了简洁的场景图/文档对象模型以及大量用于创建和使用矢量图形和贝塞尔曲线的强大功能,所有这些都整齐地封装在一个设计良好、一致且简洁的编程界面中。
待整理,画布中添加 图片 https://blog.csdn.net/Pure_White520/article/details/123918536
Paperjs中的几个基本概念
https://juejin.cn/post/6844903842862104583?searchId=202410311002414D6E5E93DE64E7691418
在Paper.js中, 每个项目或者上下文都需要一系列的对象去描述它的状态,例如当前活动的项目、活动视图及有效工具等。这涉及到三个概念,program(项目)、view(视图)、tool(工具)。
program
view
像
onFrame()、onResize()这样全局的处理函数(都属于view的类),需要手动挂载在处理对象上。
paper.install(window);
window.onload = function() {
	paper.setup('myCanvas');
	let path = new Path.Rectangle([75, 75], [100, 100]);
	path.strokeColor = 'black';
  view.onframe = function(){
    path.rotate(3);
  }
}
- tool
在javaScript中,需要自己创建工具:
paper.install(window);
window.onload = function() {
  paper.setup('myCanvas');
  //创建一个简单的绘图工具:
  let tool = new Tool();
  let path;

  //定义mousedown和mousedrag处理程序
  tool.onMouseDown = function(event) {
    path = new Path();
    path.strokeColor = 'black';
    path.add(event.point);
  }

  tool.onMouseDrag = function(event) {
    path.add(event.point);
  }
}
几何
paperjs中,Point,Size,Rectangle是描述几何图形属性的基本类。
Point
Point对象描述啦二维位置,它有两个属性x和y,即坐标。代码解读 复制代码new Point (x,y)Size
Size对象描述二维空间中的抽象维度,它有两个属性width和height,即宽度和高度。代码解读 复制代码new Size(width,height)Rectangle
Rectangle对象可以描述为Point对象和Size对象的组合,描述二维位置和大小。因此它具有x,y,宽度和高度这四个属性。代码解读 复制代码new Rectangle(x,y,width,height)Rectangle对象比Point和Size对象稍微复杂一些,并暴露了一系列额外的中心和角点对象:
center,topLeft,topRight,bottomLeft,bottomRight,leftCenter,topCenter,rightCenter和bottomCenter。代码解读复制代码var rect = new Rectangle(); console.log(rect); // {x:0,y:0,width:0,height:0} //现在我们可以举例说明它的大小...... rect.size = new Size(100, 200); // 及其中心 rect.center = new Point(100, 100);作为定义矩形尺寸的替代数字方式,Rectangle对象还公开以下属性,与
x,y,width和height相对:left,top,right和bottom:代码解读复制代码var rect = new Rectangle(); rect.left = 100; rect.right = 200; rect.bottom = 400; rect.top = 200; console.log(rect);数学运算
Paper.js中point的点可以直接进行加、减、乘、除运算。代码解读复制代码var point1 = new Point(10, 20); var point2 = new Point(10, 20)*4; var point4 = point3 + 30;Paper.js提供了几种用于舍入点和大小值的数学函数:代码解读复制代码var point = new Point(1.2, 1.8); var rounded = point.round(); // { x: 1, y: 2 } var ceiled = point.ceil(); // { x: 2, y: 2 } var floored = point.floor(); // { x: 1, y: 1 } //使用Point.random()或Size.random()为0到1之间的每个属性创建一个具有随机值的点或大小: var point = new Point(50, 100) * Point.random();矢量几何
Vector几何是Paper.js中的一等公民。在许多方面,
Paper.js中的向量与点非常相似。 两者都由x和y坐标表示。 但是其中还是有一定的区别:点描述绝对位置,而矢量代表相对信息; 即从一个点到另一个点的方法。代码解读复制代码var point1 = new Point(50, 50); var point2 = new Point(110, 200); var vector = point2 - point1;Paper.js中的所有角度都以度为单位进行测量,并且顺时针方向。
路径
Paperjs使用新的Path()构造函数创建一个新的路径项,并使用path.add(segment)函数向其添加段。
 代码解读复制代码var myPath = new Path();
myPath.strokeColor = 'black';
myPath.add(new Point(0, 0));
myPath.add(new Point(100, 50));

//要插入与现有段相关的段,可以使用path.insert(index,segment)函数
myPath.insert(1, new Point(30, 40));
请注意:
Point对象表示Paper.js项目的二维空间中的一个点。 它不是指路径中的锚点。 将Point传递给add或insert等函数时,它会动态转换为Segment。
Paper.js允许使用path.smooth()函数自动平滑路径。
关闭路径,可以将其path.closed属性设置为true 。
要从路径中删除段,使用path.removeSegment(index)函数并将其传递给要删除的段的索引。
var myCircle = new Path.Circle(new Point(100, 70), 50);
myCircle.strokeColor = 'black';
myCircle.selected = true;

myCircle.removeSegment(0);
要从项目中完全删除项目,我们使用item.remove()
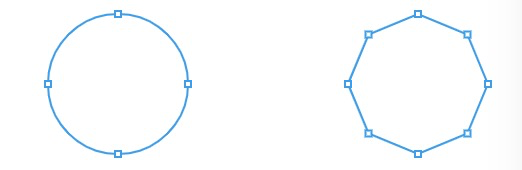
正多边形路径
要创建规则的多边形路径,我们使用新的Path.RegularPolygon(center,sides,radius)构造函数。
center参数描述多边形的中心点, sides参数描述多边形具有的边数量,radius参数描述多边形的半径。
 代码解读复制代码var triangle = new Path.RegularPolygon(new Point(80, 70), 3, 50);
triangle.fillColor = '#e9e9ff';
triangle.selected = true;

// Create a decagon shaped path
var decagon = new Path.RegularPolygon(new Point(200, 70), 10, 50);
decagon.fillColor = '#e9e9ff';
decagon.selected = true;
平滑,简化和展平
paper.js提供了两种不同的平滑路径的方法。
path.smooth()通过更改其段句柄而不添加或删除段点来平滑路径。path.simplify()通过分析path.segments数组并用更优化的段集替换它来平滑路径,从而减少内存使用并加快绘图速度。
path.flatten(error)将路径中的曲线转换为具有最大指定错误的直线。 保证结果行不会超出error参数指定的数量。
 代码解读复制代码// Create a circle shaped path at { x: 80, y: 50 }
// with a radius of 35:
var path = new Path.Circle({
	center: [80, 50],
	radius: 35
});

// Select the path, so we can inspect its segments:
path.selected = true;

// Create a copy of the path and move it by 150 points:
var copy = path.clone();
copy.position.x += 150;

// Flatten the copied path, with a maximum error of 4 points:
copy.flatten(4);

交互工具
鼠标工具
Paper.js提供了不同鼠标行为的处理函数。
 代码解读复制代码function onMouseDown(event) {
	console.log('You pressed the mouse!');
}

function onMouseDrag(event) {
	console.log('You dragged the mouse!');
}

function onMouseUp(event) {
	console.log('You released the mouse!');
}
鼠标处理函数接受包含一系列鼠标事件的时间对象,例如鼠标的当前位置( event.point ),按下鼠标的位置( event.downPoint )等。
 代码解读复制代码//绘制一条曲线
var myPath;

function onMouseDown(event) {
	myPath = new Path();
	myPath.strokeColor = 'black';
}

function onMouseDrag(event) {
	myPath.add(event.point);
}

function onMouseUp(event) {
	var myCircle = new Path.Circle({
		center: event.point,
		radius: 10
	});
	myCircle.strokeColor = 'black';
	myCircle.fillColor = 'white';
}
键盘工具
Paper.js通过定义onKeyDown或onKeyUp处理函数来接收相关按键信息。
 代码解读复制代码// Create a centered text item at the center of the view:
var text = new PointText({
	point: view.center,
	content: 'Click here to focus and then press some keys.',
	justification: 'center',
	fontSize: 15
});

function onKeyDown(event) {
	// When a key is pressed, set the content of the text item:
	text.content = 'The ' + event.key + ' key was pressed!';
}

function onKeyUp(event) {
	// When a key is released, set the content of the text item:
	text.content = 'The ' + event.key + ' key was released!';
}
项目使用
在一个Paper.js的项目中可以出现以下几大类,图层、路径、复合路径、组、文本项、栅格等。
每种项目都有特定的行为:路径包含点,层可以是活动的,组和复合路径有子。
但由于它们都是物品,因此它们也有许多共同的行为。 所有这些共享行为都可以在Item参考中找到。
创建新项目时,它们会自动添加到project.activeLayer的item.children列表的末尾。
更改项目
更改项目位置
可以通过更改其item.position属性来移动项目中的项目。 这会使项目的中心点移动。
要使项目跟随鼠标,我们可以简单地将其位置设置为鼠标的位置:
 代码解读复制代码var circlePath = new Path.Circle(new Point(50, 50), 25);
circlePath.fillColor = 'black'

function onMouseMove(event) {
	circlePath.position = event.point;
}
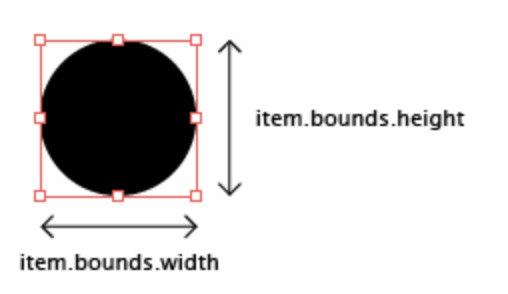
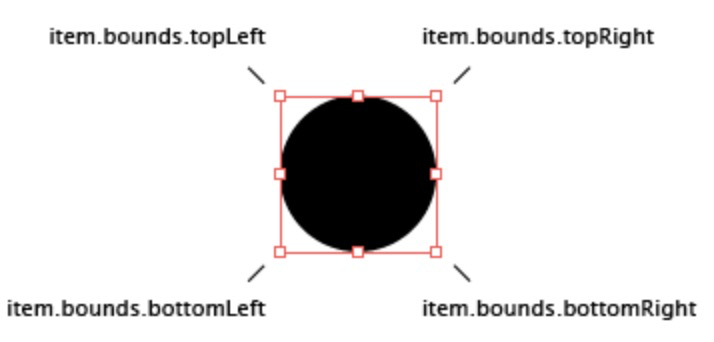
如果想知道项目的宽度和高度,我们可以查询item.bounds属性的宽度和高度 :
 代码解读复制代码var circlePath = new Path.Circle(new Point(50, 50), 25);
console.log(circlePath.bounds.width);

console.log(circlePath.bounds.topLeft);
// { x: 25.0, y: 25.0 }
console.log(circlePath.bounds.topRight);
// { x: 75.0, y: 25.0 }
console.log(circlePath.bounds.bottomRight);
// { x: 75.0, y: 75.0 }
console.log(circlePath.bounds.bottomLeft);
// { x: 25.0, y: 75.0 }
缩放项目
要按项目的相同数量缩放项目的宽度和高度,可以调用项目的item.scale(scale) 。
旋转物品
要旋转一个项目,我们调用item.rotate(角度)函数,并将它以我们想要旋转的角度传递给它。 这将按顺时针方向旋转项目角度。
 代码解读复制代码var path = new Path.Rectangle(new Point(50, 50), new Size(100, 50));
path.style = {
	fillColor: 'white',
	strokeColor: 'black'
};

// Create a copy of the path and set its stroke color to red:
var copy = path.clone();
copy.strokeColor = 'red';

// Rotate the copy by 45 degrees:
copy.rotate(45);
项目层次结构
Paper.js项目的结构基于堆叠顺序原则。
Paper.js具有图层列表:project.layers 。 每当重绘视图时,Paper.js都会遍历这些图层中的项目并按照外观顺序绘制它们。
activeLayer活动层每个Paper.js
项目都以一个Layer开始,可以通过project.activeLayer访问。所有新创建的项目将自动添加为当前活动的图层的子项。children子项我们将其他项目中包含的项目称为其子项。 可以通过其
item.children数组访问图层中包含的子项 。
按名称访问每一项
如果某个项目有名称,则可以通过其父项的子项列表按名称访问该项目:
 代码解读复制代码var path = new Path.Circle(new Point(80, 50), 35);
// Set the name of the path:
path.name = 'example';

// Save a reference to the children array in a variable,
// so we don't end up with very long lines of code:
var children = project.activeLayer.children;

// The path can be accessed by name:
children['example'].fillColor = 'red';
图层和组
可以将图层和组项视为硬盘中的文件夹。 它们将项目组合在一起,对它们执行的任何操作都会直接更改其中包含的项目。
图层和组几乎相同。 主要区别在于可以激活图层项目,这意味着创建的任何新项目都会自动放置在其中。 无论何时创建新图层 ,它都会成为项目的project.activeLayer。
创建组时,它还没有任何子组。 您可以通过几种不同的方式将子项添加到组中:
 代码解读复制代码// Create two circle shaped paths:
var path = new Path.Circle(new Point(80, 50), 35);
var secondPath = new Path.Circle(new Point(120, 50), 35);

var group = new Group([path, secondPath]);

// Change the fill color of the items contained within the group:
group.style = {
	fillColor: 'red',
	strokeColor: 'black'
};
还可以使用item.addChild(item)函数在创建组后添加子组:
 代码解读复制代码// Create two circle shaped paths:
var path = new Path.Circle(new Point(80, 50), 35);
var secondPath = new Path.Circle(new Point(180, 50), 35);

// Create an empty group:
var group = new Group();

// Add the paths to the group:
group.addChild(path);
group.addChild(secondPath);

// Change the fill color of the items contained within the group:
group.fillColor = 'green';
要将子项插入到特定索引处的组或层中,可以使用item.insertChild(index,item)函数:
 代码解读复制代码var redPath = new Path.Circle(new Point(80, 50), 30);
redPath.fillColor = 'red';

var greenPath = new Path.Circle(new Point(100, 50), 30);
greenPath.fillColor = 'green';

// Insert the green path at index 0 of the children
// array of the active layer:
project.activeLayer.insertChild(0, greenPath);
要从Paper.js文档中删除项目,可以调用其item.remove()函数。
如果项目具有子项(即,它是具有子项的图层,组或其他类型的项目),则其所有子项也将从项目中删除。
要删除项目中包含的所有子项,可以调用item.removeChildren()。
动画
可以使用onFrame处理程序在Paper.js中创建动画。
 代码解读复制代码var path = new Path.Rectangle({
	point: [75, 75],
	size: [75, 75],
	strokeColor: 'black'
});

function onFrame(event) {
	// Each frame, rotate the path by 3 degrees:
	path.rotate(3);
}
开发记录
使用
1、初始化页面 npm安装paper.js,然后main.js中全局引入 import paper from 'paper'
<template>
	<div>
		<canvas id="myCanvas" :width="canvasW" height="canvasH" ref="myCanvas"></canvas>
	</div>
</template>
this.myPaper = new paper.PaperScope();// 这个作为全局的 Paper对象
this.myPaper.setup(this.$refs.myCanvas);
添加一个文本标签
new paper.PointText(topLeft.subtract([0, 10]));通过 subtract 可以设置偏移
const topLeft = this.compoundPath.bounds.topLeft; // 获取左上角坐标

      // 创建文本
      const text = new paper.PointText(topLeft.subtract([0, 10]));
      text.fontSize = this.$store.state.commonData.fontSize;
      text.fillColor = this.color;
      text.opacity = this.opacity;
      text.content = this.compoundPath.data.categoryName; // 标签名称(类型)
      // 添加自定义数据
      text.data = { // customData
        id: this.annotation.id + '_label', // 示例:添加ID
        type:'label'
      };
文本后面添加一个背景框

- 方式一
customCreateLabel() {
      if (!this.compoundPath?.data || !this.needAddLabelTypes.includes(this.compoundPath?.data?.type) || this.compoundPath.children.length === 0) {
        return;
      }

      // 标注层【覆盖物】的左上角坐标
      const topLeft = this.compoundPath.bounds.topLeft; // 获取左上角坐标
      /**
       * 考虑到图片 通过计算以适当的比例展示在画布上,所以这里创建的label的标签,偏移量无法使用具体的像素,需要根据背景图的尺寸来定
       * 目前考虑x轴偏移量 图片宽度的1%,y轴偏移量 图片高度的1%
       * @type {number}
       */
      const offsetX = this.$store.state.commonData.bkgImageWidth/100*1;  // 取背景图的宽度的1% 作为x轴偏移量
      const offsetY = this.$store.state.commonData.bkgImageHeight/100*1;  // 取背景图的高度的1% 作为y轴偏移量
      const defaultFontSize = this.$store.state.commonData.fontSize *0.7; // 设置字体大小-- 默认字体是在图片初始的时候确定的

      const textPosition = topLeft.subtract([-offsetX, 2*offsetY]); // 初始定位坐标 以 标注层【覆盖物】 左上角网上偏移各个 1%
      // 创建文本
      const text = new paper.PointText(textPosition);
      text.fontSize = defaultFontSize;
      text.fillColor = this.color;

      // text.opacity = this.opacity; // 可选
      text.content = this.compoundPath.data.categoryName;
      const textHeight = text.bounds.size.height; // 字体高度
      const textWidth = text.bounds.size.width + 2*offsetX; // 文本宽度
      const backgroundPosition = text.bounds.topLeft.subtract([offsetX, offsetY]);// 取文本的左上角坐标,然后y轴偏移10(背景框的高度为文字高度+20,所以这里偏移10)

      /**
       * 创建背景框
       *  Rectangle 下 2个参数:
       *  - position:左上角坐标(例如 new paper.Point(x, y))。
       *  - size:宽度和高度(例如 new paper.Size(width, height))。
       *  考虑背景框的高度为文字高度+2*offsetY,这样可以设置 position y轴偏移offsetY
       * @type {paper.Rectangle}
       */
      const background = new paper.Rectangle(
          backgroundPosition,
          new paper.Size(textWidth , textHeight + 2*offsetY)
      );
      const backgroundShape = new paper.Path.Rectangle(background);
      backgroundShape.fillColor = new paper.Color(0, 0, 0, 0.8); // 设置背景框颜色
    // 创建一个组将文本和背景框包含在一起
      const group = new paper.Group([backgroundShape, text]);

// 添加自定义数据
      group.data = {
        id: `${this.annotation.id}_label`, // 添加 ID
        type:'label',// 记录当前label类型
        subType:this.compoundPath?.data?.type+'_label' // 子类型
      };
    },
- 方式二
// 创建带背景的文本
function createTextWithBackground(textContent, position, fontSize, backgroundColor) {
    // 创建文本对象
    const text = new paper.Text(textContent, {
        point: position,
        fontSize: fontSize,
        fillColor: 'black'  // 设置文本颜色
    });

    // 获取文本的边界矩形
    const textBounds = text.bounds;

    // 创建一个背景矩形,宽度和高度根据文本的边界自动调整
    const background = new paper.Rectangle(
        textBounds.x - 5, // 在文本左侧留一点空间
        textBounds.y - 2, // 在文本上方留一点空间
        textBounds.width + 10, // 宽度稍微大一点
        textBounds.height + 4  // 高度稍微大一点
    );

    // 创建背景矩形路径
    const backgroundRect = new paper.Path.Rectangle(background);
    backgroundRect.fillColor = backgroundColor; // 设置背景颜色

    // 创建一个组合对象,将文本和背景框放在一起
    const group = new paper.Group([backgroundRect, text]);

    return group;
}

// 使用该函数创建文本和背景框
const myTextGroup = createTextWithBackground("Hello, Paper.js!", new paper.Point(50, 50), 20, '#ffcc00');

// 调整位置或做其他操作
myTextGroup.position = new paper.Point(100, 100);
条件查询
const item = this.$parent.paper.project.getItem({data: {_annotationId: paperObject.data._annotationId}});
hitTest 检测鼠标是否接触到某个元素
let hitResult = this.$parent.paper.project.hitTest(
  event.point,
  this.hitOptions
);
HitResult 对象的结构:
HitResult 对象包含以下一些常用属性,具体返回的字段可能依赖于 hitTest 中的设置(如 hitOptions):
- type:相交的元素类型,通常为以下几种之一:
"point":鼠标接触到路径的一个端点。"segment":鼠标接触到路径的一个线段。"stroke":鼠标接触到路径的任何部分(包括线段、圆弧等)。"fill":鼠标接触到路径的填充区域。
- item:相交的图形元素(
Path,Shape,Raster等)。这表示鼠标接触到的图形对象,可以通过它访问该元素的属性和方法。 - location:返回一个
Point或Location对象,表示鼠标接触到图形的具体位置。- 对于路径,
location表示相交的路径上的位置,包含了如point,segment,parameter等信息。
- 对于路径,
- segment:如果相交的是路径的某个线段,
segment会包含该线段的信息。- 包含的属性有:
location(该线段上的位置点),point(线段的起始点),handleIn(线段起始点的控制点),handleOut(线段结束点的控制点)。
- 包含的属性有:
- location.point:表示鼠标接触的具体坐标点(
Point对象)。这通常是你需要进一步处理的实际点位置。
删除图形但是可能没剩下
看似删除了,但是数据还在,可以通过强制刷新功能
// 3. 强制刷新画布,确保所有删除操作生效
      if (this.paper.view) {
        this.paper.view.update();
      }
const itmArr = this.paper.project.getItems({ class: paper.Path });
itmArr.forEach(item => {
 console.log(item.data)
});