
Gitee+Typora+Git+PicGo
Gitee+Typora+Git+PicGo
PicGo + Gitee(码云)快速实现markdown图床
图床替代方案: https://blog.csdn.net/qq_45173404/article/details/12375968
参考:https://www.pianshen.com/article/2537945691/#3_25
https://blog.csdn.net/weixin_44676935/article/details/104862304
导出word需要安装: https://github.com/jgm/pandoc/releases/download/2.10.1/pandoc-2.10.1-windows-x86_64.msi
个人笔记
- typora --> 编写Markerdown
- gitee --> 仓库
- OSS --> 图床
- PicGo-Core/PicGo --> 上传图片到图床的工具
- gitbook --> 编辑电子书
- Gitee Pages --> 发布静态站点服务
- ScreenToGif --> 创建gif图片
- ZoomIt --> 画布
1.安装Git
安装参考:https://blog.csdn.net/fzx1597965407/article/details/124371720
下载地址:https://git-scm.com/download/
推荐的几种图形化界面:https://git-scm.com/downloads/guis
目前再用:Sourcetree
git使用说明书:https://git-scm.com/book/en/v2
[ReleaseNotes.html](file:///D:/software/Git/ReleaseNotes.html)
1.1. 配置git参数
在git bash下执行如下命令
$ git --version
配置参数用户名,Email地址
$ git config  --global user.name "lishihuan"
$ git config  --global user.email wangyilishihuan@163.com
检查配置参数
$ git config --list
1.2 Http 和 SSH 克隆项目介绍
说明:在管理Git项目上,**1.直接使用https **url克隆到本地,2.SSH url克隆到本地。
这两种方式的主要区别在于:
**1.**使用https url克隆会比较方便,复制https url然后到git Bash里面直接用clone命令克隆到本地就好了,但是每次fetch和push代码都需要输入账号和密码,这也是https方式的麻烦之处。
**2.**使用SSH url克隆却需要在克隆之前先配置和添加好SSH key,因此,如果你想要使用SSH url克隆的话,你必须是这个项目的拥有者。否则你是无法添加SSH key的,另外ssh默认是每次fetch和push代码都不需要输入账号和密码,如果你想要每次都输入账号密码才能进行fetch和push也可以另外进行设置。
2.git+生成SSH Key+与码云连接
https://gitee.com/help/articles/4181
2.1 Git SSH Key 生成
码云提供了基于 SSH 协议的 Git服务,在使用 SSH 协议访问仓库仓库之前,需要先配置好账户/仓库的SSH公钥。
1.输入:cd ~/.ssh
2.然后输入ls查看秘钥列表
这两个命令就是检查是否已经存在id_rsa.pub或id_dsa.pub文件
Git SSH Key生成
$ ssh-keygen -t rsa -C wangyilishihuan@163.com (三个回车)
代码参数含义: -t指定密钥类型,默认是rsa,可以省略。 -C设置注释文字,比如邮箱。 -f指定密钥文件存储文件名。
生成的文件在 C:\Users\lihuan.ssh
2.2 添加SSH Key到Git服务器
打开 C:\Users\lihuan.ssh\id_rsa.pub 将其内容复制到
仓库主页 「管理」->「部署公钥管理」->「添加部署公钥」 ,添加生成的 public key 添加到仓库中。

2.3 验证
# 在终端(Terminal)中输入
ssh -T git@gitee.com
如果你之前已经一直使用https方式进行开发,当前想要切换成为ssh方式进行开发,只需要执行如下几步的操作即可:
git remote rm origin git remote add origin "Git仓库的ssh格式地址" git push origin
3. Git 使用
3.1创建版本库(仓库)
仓库:repository,一个目录,里面的所有文件都可以被Git管理起来,每个文件的修改、删除,Git都能跟踪,以便任何时刻都可以追踪历史,或者在将来某个时刻可以“还原”。
新建一个空目录
$ cd /d/Git/
$ mkdir repository
说明 cd /d/Git/ 表示 切换到 D:/Git 目录下。 mkdir repository 表示 在当前目录下新建文件夹 repository
该目录变成git可以管理的仓库
$ cd repository
$ git init
说明 (目录下多了个.git的目录,作用:git跟踪管理版本库)
3.2. 关联远程库
在Gitee上新建仓库 ,复制SSH地址
一下命令要到仓库下才能操作
删除原有已有的远程库
$ git remote rm origin
关联需关联的远程库
$ git remote add origin git@gitee.com:cskaoyan123/python2.git
$ git remote add test git@gitee.com:zoeplanet/test.git
查看关联的远程库
$ git remote -v
3.3. 将文件下载到本地仓库
$git clone git@gitee.com:zoeplanet/test.git
3.4. 将文件上传到远程库
文件移到建立的本地仓库中
以下命令只能在本地库目录下操作
将云端仓库内容拉取到本地
$git pull 远程库名 master
将作业添加到缓存区
$git add 需要交的文件名
将缓存区内容提交到本地仓库
$git commit -m "备注"
将本地仓库内容推送到云端
$git push 远程库名 master
如果出现冲突要重新拉取后推送
3.5. 将远程库文件删除
从版本库中删除文件,用命令git rm删掉,再git commit:
$ git rm test.txt
$ git commit -m "remove test.txt"
3.6. 出现的一些问题及解决方案
- git---如何解决The authenticity of host 'gitee.com (120.55.226.24)' can't be established
Are you sure you want to continue connecting (yes/no)? yes
新生成密钥之后,在.ssh文件夹中少了一个known_hosts文件,本来密钥文件应该是三个,现在是两个,便报了这样的错误,此时选择yes回车之后,便可,同时生成了缺少了的known_hosts文件
原文链接:https://blog.csdn.net/m_wbcg/article/details/79156781
- remote: error: GH007: Your push would publish a private email address.使用命令:git push origin master (把本地库的内容推送到远程库),出现了如下问题,如图所示:

在GitHub/Gitee的账号找到设置->emails->Keep my email address private,把这一项去掉勾选即可。
4.Gitee 中添加仓库
4.1 通过网站右上角的「+」号,选择「新建仓库」,进入新建仓库页面

4.2 在新建仓库页面填写仓库信息。仓库相关概念说明如下:
- 仓库名称: 仓库的名称,用于仓库命名
- 归属:仓库归属账户,可以是个人账号/组织/企业中的一种,创建成功后该账户默认为仓库的拥有者(管理员)
- 路径:仓库的git访问路径,由
用户个性地址+仓库路径名称组成。创建仓库后用户将通过该路径访问仓库。 - 仓库介绍:仓库的简单介绍
- 是否开源:设置仓库是否为公开仓库,公开仓库对所有人可见,私有仓库仅限仓库成员可见。
- 选择语言:仓库主要开发用的编程语言
- 添加
.gitignore:系统默认提供的git忽略提交的文件模板,设置.gitignore后将默认忽略指定目录/文件到仓库 - 添加开源许可证:如果仓库为公开仓库,可以添加设置仓库的开源协议,作为对当前项目仓库和衍生项目仓库许可约束,开源许可证决定了该开源项目是否对商业友好。
- Readme:项目仓库自述文档,通常包含有软件的描述或使用的注意事项。
- 使用
\**\*模板文件初始化仓库:使用Issue或Pull Request文件模板初始化仓库

3、点击「创建」,即可在码云上创建你的第一个仓库。
4.3 生成token
仓库名称: 仓库的名称,用于仓库命名
4.3.1 点击头像,进入设置

img 4.3.2 找到右边安全设置里面的私人令牌

img 4.3.3点击
生成新令牌,把projects这一项勾上,其他的不用勾,然后提交img 4.3.4这里我们需要输入Gitee账户密码
4.3.5私人令牌生成提示

5.PicGo 图片上传到Gitee ,利用Gitee 作为图库
https://picgo.github.io/PicGo-Doc/zh/guide/
5. 1点击插件设置,输入Gitee,找到Gitee相关插件
5.2重启PicGo,这时点击图床设置,就可以在最后面找到Gitee图床。

repo : mylishihuan/image
token: cec4659a34d3715c32f882200efde74f

repo:用户名/仓库名称,mylishihuan/image (https://gitee.com/**mylishihuan/image**.git)
branch:分支,这里写上master
token:填入码云的私人令牌 (cec4659a34d3715c32f882200efde74f)
path:路径,一般写上img
customPath:提交消息,这一项和下一项customURL都不用填。在提交到码云后,会显示提交消息,插件默认提交的是
Upload 图片名 by picGo - 时间
5.3设置server 127.0.0.1 36677
这步很重要,typora 默认端口是36677 所以如果GicGo没有设置server端口为 36677 可能无法正常上传,同时GicGo如果更新可能会丢失这些配置信息所以需要重新定义gitee和server

5.4 阿里云OSS作为图床

6. PicGo-Core
偏好设置中,选择 PicGo-Core,这里的好处是不用下载exe,复制图片后自动进行上传,比PicGo 好用点

6.1 配置文件
当前配置的阿里云OSS对象存储作为图床
目录 : C:\Users\lihuan.picgo 添加 config.json 文件备份在 F:\开发环境搭建\其他软件\Typora相关工具\typora_picgo_config.json
{
  "picBed": {
    "uploader": "aliyun",
    "aliyun": {
      "accessKeyId": "",//你的AccessKeyID
      "accessKeySecret": "",
      "bucket": "lishihuan",
      "area": "oss-cn-shanghai",//OSS概览里的EndPoint(地域节点),“.”前面的内容
      "path": "img/",//Bucket下的文件夹,没有可以不写,默认不要文件夹
      "customUrl": "https://lishihuan.oss-cn-shanghai.aliyuncs.com",//OSS概览里的Bucket域名(开头加上https://)
      "options": ""//可以不写
    }
  },
  "picgoPlugins": {
    "picgo-plugin-gitee-uploader": true,
    "picgo-plugin-smms-user": false,
    "picgo-plugin-github-plus": false,
    "picgo-plugin-rename-file": false,// 也是一种 重命名插件
    "picgo-plugin-autobackup": true,
    "picgo-plugin-super-prefix": true//重命名插件
  },
  "picgo-plugin-super-prefix": {
    "prefixFormat": "YYYY/MM/",
    "fileFormat": "YYYYMMDDHHmmss"
  },
  "picgo-plugin-autobackup": {
    "space": "Local",
    "markFilepath": "Autobackup/mark.json"
  },
  "picgo-plugin-autobackup-settings": {
    "local": {
      "imagePath": "Autobackup/Images"
    },
    "nutstore": {
      "username": "",
      "password": "",
      "imagePath": ""
    }
  }
}
其他配置(gitee、)
  "picBed": {
    "current": "gitee", //当前使用gitee作为图床
    "uploader": "gitee",
    //gitee配置
    "gitee": {
      "branch": "master", //分支名
      "customUrl": "", //自定义的访问地址,如果自己没有域名可以不填
      "customPath": "",
      "path": "img/2021/", // 自定义存储路径,比如 img/
      "repo": "iien/figurebed", // 仓库名,格式是 username/reponame,改成你自己的仓库
      "token": "xxxxxxxxxxxxxxxxxxx" // gitee token,改成你自己的
    },
    //github配置
    "githubPlus": {
      "branch": "master",
      "customUrl": "",
      "path": "img/",
      "repo": "",
      "token": ""
    },
    //smms-userp配置
    "smms-user": {
      "Authorization": "Db0BpQjTLTTmgDR4VWCmISjUQSfKqjG3"
    },
    "transformer": ""
  },
6.2 PicGo插件
https://blog.csdn.net/weixin_45118180/article/details/119215202
插件安装首先找到picgo.exe
位置:Typora 安装 PicGO-Core 的路径,大概是在C:\Users\dell\AppData\Roaming\Typora\picgo\win64这个目录下,注意 dell 要换成自己电脑的用户名,进入到这个界面然后cmd ,进行插件下载
picge配置文件位置: 点击Typora里的偏好设置>打开配置文件 或 ~/.picgo/config.json
1. github-plus
用于支持github图床上传,github-plus 使用Github作为图床使用需要先设置私人令牌:Gitee图床设置
.\picgo.exe install github-plus
修改配置文件
{
  "picBed": {
    "current": "github", // 代表当前的上传图床
    "uploader": "github",
    "github": {
      "branch": "master", // 分支名,默认是 master
      "customUrl": "", // 没有自己的域名的话,默认为空即可; 如果自定义域名,注意要加http://或者https://
      "path": "img/", // 自定义文件存储路径,比如 img/ 建议填
      "repo": "", // 仓库名,格式是 username/reponame <用户名>/<仓库名称> 必填
      "token": "" // github 私人令牌 必填
    }
  },
  "picgoPlugins": {
    "picgo-plugin-github-plus": true  // 启用插件
  } // PicGo插件
}
2. super-prefix
重命名插件,super-prefix
.\picgo.exe install super-prefix
修改配置文件
"picgoPlugins": {
    "picgo-plugin-super-prefix": true//重命名插件
  },
"picgo-plugin-super-prefix": {
    "prefixFormat": "YYYY/MM/"
	"fileFormat": "YYYYMMDD-HHmm"
}
| 参数 | 建议值 | 说明 |
|---|---|---|
| prefixFormat | YYYY/MM/DD/ | 文件名个性前缀格式(以/结尾) |
| fileFormat | YYYYMMDDHHmmss | 文件名个性格式 |
3. rename-file
类似于上面的 super-prefix 插件,方法更丰富
重命名插件,rename-file
.\picgo.exe install rename-file
修改配置文件
"picgo-plugin-rename-file": {
	"format": "{y}/{m}/{d}/{hash}-{origin}-{rand:6}"
} //rename-file插件配置
插件使用说明:
可以很自定义生成文件存储路径的插件,文件(包括路径)名称支持日期、随机字符串、文件MD5、原文件名、原文件目录结构等规则
命名规则:
- {y} 年,4位
- {m} 月,2位
- {d} 日期,2位
- {h} 小时,2位
- {i} 分钟,2位
- {s} 秒,2位
- {ms} 毫秒,3位(v1.0.4)
- {timestamp} 时间戳(秒),10位(v1.0.4)
- {hash},文件的md5值,32位
- {origin},文件原名(会去掉后缀)
- {rand:
<count>}, 随机数,<count>表示个数,默认为6个,示例:{rand:32}、 - {localFolder:
<count>},<count>表示层级 ,默认为1,示例:{localFolder:6}、
gitee
{
  "picBed": {
    "current": "gitee", //当前使用gitee作为图床
    "uploader": "gitee",
    //gitee配置
    "gitee": {
      "branch": "master", //分支名
      "customUrl": "", //自定义的访问地址,如果自己没有域名可以不填
      "customPath": "",
      "path": "img/2021/", // 自定义存储路径,比如 img/
      "repo": "iien/figurebed", // 仓库名,格式是 username/reponame,改成你自己的仓库
      "token": "xxxxxxxxxxxxxxxxxxx" // gitee token,改成你自己的
    },
    //github配置
    "githubPlus": {
      "branch": "master",
      "customUrl": "",
      "path": "img/",
      "repo": "",
      "token": ""
    },
    //smms-userp配置
    "smms-user": {
      "Authorization": "Db0BpQjTLTTmgDR4VWCmISjUQSfKqjG3"
    },
    "transformer": ""
  },
  //插件配置,true是启用,false是禁用某个拆件
  "picgoPlugins": {
    "picgo-plugin-gitee-uploader": true,
    "picgo-plugin-smms-user": false,
    "picgo-plugin-github-plus": false,
    "picgo-plugin-rename-file": true,
    "picgo-plugin-super-prefix": true
  },
  "picgo-plugin-super-prefix": {
    //"prefixFormat": "YYYY/", //文件夹格式化
    "fileFormat": "YYYYMMDDHHmmss" //文件名你格式化
  },
  "picgo-plugin-gitee-uploader": {
    "lastSync": "2021-12-16 10:58:03"
  },
  "picgo-plugin-github-plus": {
    "lastSync": "2020-04-07 11:09:08"
  }
}
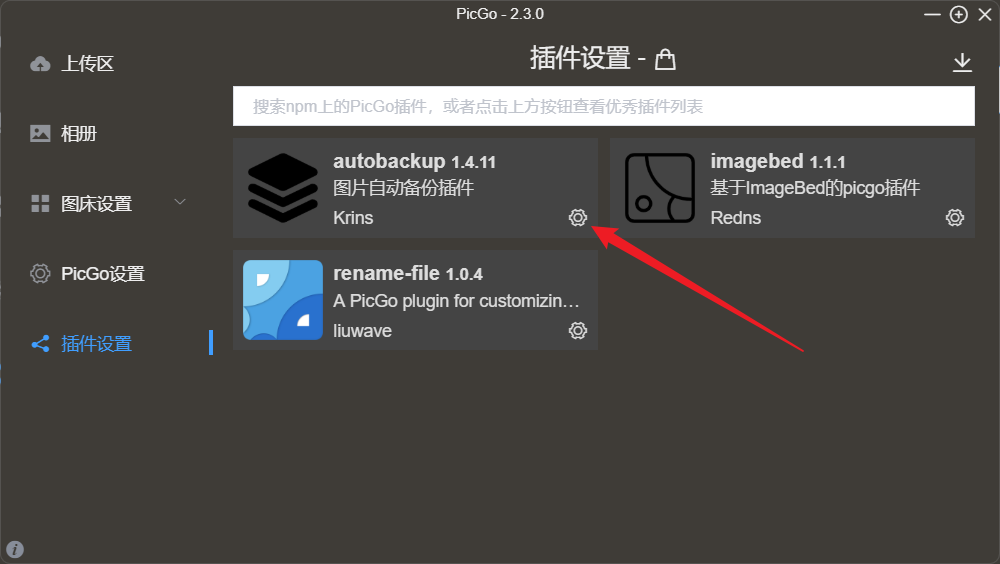
2. autobackup 本地备份
https://github.com/Redns/picgo-plugin-autobackup
进入
插件设置界面点击
autobackup右下角的齿轮按钮,选择配置Plugin
- 选择
配置picgo-plugin-autobackup
选择 备份空间 为 Local,填写 mark文件路径 (默认为 {picgo安装目录}/Autobackup/mark.json)
列如:D:/Program Files/PicGo/Autobackup/mark.json 需要保证
D:/Program Files/PicGo/Autobackup路径存在
再次点击
autobackup右下角的齿轮按钮,选择配置本地备份在对话框中输入
图片备份路径(默认为{picgo安装目录}/Autobackup/Images),点击确定,设置完成
6.3 配置图片上传压缩 --- 好像不行
C:\Users\lihuan\AppData\Roaming\Typora\picgo\win64
下cmd执行 下载下面的脚本
picgo install compress

配置文件中添加下面配置
"picgo-plugin-compress": {
  "compress": true,
  "quality": 0.8,
  "maxWidth": 1920,
  "maxHeight": 1080
}
6.Typora 的使用
typora和 PicGo都有 限定,文件超出1M 会无法正常显示
还有如果typora 上传图片老是失败,有可能 监听端口被改了,需要到 PicGo设置/设置service 修改端口 36677
安装导出word工具
Typora 的 Mermaid 流程图
用 Mermaid Live Editor 编写流程图